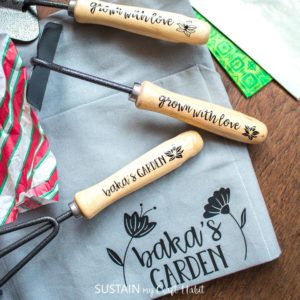
Personalized Gifts with Cricut Joy
Showing you how easy it is to personalize gifts for the holidays with Cricut Joy.
Ingredients
- Apron / Gardening Tools
- Design Space Images #M94CA101 / #MA165FDB / #M14791877 / #M147918AD
- Cricut Joy
- Smart Vinyl, Permanent in black
- Smart Iron On in black
- Weeding Tool
- Scissors
- EasyPress Mini
- EasyPress Mat
- Cricut Transfer Tape
Instructions
Preparing the Image:
- Open Cricut Design Space and click on the “+” sign to start a new project, opening up a blank canvas.
- Search images #M94CA101 / #MA165FDB #M14791877 / #M147918AD and then click on the images to insert it on the canvas. Reduce the sizes of the images to suit your project.
- Click on the text icon and type out the name you want to add. Change the font type to Babette and then click ungroup to be able to move the letters around. Click on the letters and move them closer to each other. Once in place, highlight the word and select weld to fuse all the lettering together for cutting.
- Reposition the phrase as you wish. Duplicate the phrases to make as many as needed.
Cutting the Smart Vinyl and Smart Iron On:
- Click on Make It and then choose “Without Mat” as the option for cutting when using Smart Vinyl.
- Set the material type to Smart Vinyl.
- And when cutting the Smart Iron On, set the material type to Smart Iron On Vinyl. Be sure to click the “Mirror” toggle button to on.
- Place the Smart Iron-On vinyl in the color of your choosing directly onto the standard grip mat with the SHINY SIDE DOWN.
- When prompted, load and unload the vinyl from the cutting machine.
- Choose Everyday Iron-On Vinyl from the list of options in the drop down menu and following the instructions prompted on the screen, cut out the vinyl.
Preparing the Cut Image:
- Cut around the images and using a weeding tool, peel away the excess vinyl.
Applying the Smart Iron On image with the Cricut EasyPress Mini:
- Position the mat or a towel on a flat surface. Set the temperature and time on the EasyPress 2 machine.
- Determine where you will be placing the image and preheat the fabric in that spot for 5 seconds.
- Place the pieces on to the fabric with the shiny side up.
- Press the image on to the fabric for 25 seconds with light pressure.
- Turn the fabric upside down and apply heat for another 15 seconds.
- Peel the plastic part of the vinyl off carefully once it cools and discard.
Applying the Smart Vinyl image:
- Cut a piece of transfer tape a bit larger than the size of the phrase.
- Peel away the transfer tape backing and place the transfer tape overtop of the phrase. Gently rub the vinyl to help it stick to the transfer tape.
- Peel away the vinyl backing and place the image on to the wooden handle. Peel away the transfer tape
Tried this recipe?Let us know how it was!