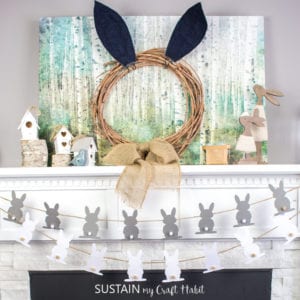
DIY Easter Paper Bunny Garland
This adorable bunny-full DIY Easter garland is an easy way to add a special touch to your Easter decorating.
Ingredients
- Printable Bunny Template in PDF and Printable Bunny Template in SVG (available in our Craft Room)
- Cricut Maker or Scissors (to cut by hand)
- Medium Weight Cardstock in light grey and white colours, one sheet per colour 12”x12”
- Mini pom-poms in light brown and white colours
- Hot glue gun with clear glue sticks
- Twine
Instructions
Using a Cutting Machine
- Click on upload and select the saved Bunny Template SVG file from your computer.
- Make 8 copies of the bunny shape to fit on a 12”x12” sheet of cardstock and arrange each shape to maximize the space and reduce paper waste.
- Align the light grey cardstock on the Cricut matte and insert into the Maker.
- Follow the set up instructions on the computer. Make sure to set the material type and weight to match your cardstock paper weight.
- Insert knife blade and hit start.
- Remove the bunny cutouts using a spatula or weeder.
- Repeat with the other colored cardstock.
Cutting Bunny Shapes by Hand
- Use the bunny shape printable as a guide for cutting out the cardstock bunnies on two different colored sheets.
Assembling the Garland
- Lay out all the paper bunny cutouts with the right side facing up.
- Heat glue gun and apply a small dab of glue where the tail will go. Press pom pom onto bunny and let it set. Continue for all the bunny shapes.
- Attach bunny shapes to a long piece of twine running the twine behind the bunny head. Space each bunny 6” apart.
Tried this recipe?Let us know how it was!