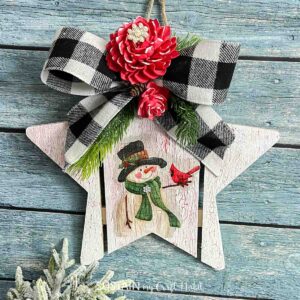
Winter Craft Idea Using a Wooden Star Surface
Adding decoupage, crackle and a big bow to a wooden star surface brings out the seasonality of the Winter months with this fun craft.
Ingredients
- Wood star we got ours from the dollar store
- Decorative paper napkins
- Paint in red and white
- Paintbrushes
- Ribbon
- Elmers Glue
- Water pen
- DecoArt Decoupage
- Hot glue or Mod Podge
- Embellishments such as berries, flowers or bells.
Instructions
- Paint your wood star red. Let dry completely.
- Paint a generous coat of school glue onto the surface. Brush it in one direction for best results. Let dry until tack.
- While the glue is still tacky, brush the white paint over it. As the paint dries, the crackle finish will form like magic! Let the paint and glue dry completely.
- Peel the ply off the napkins and carefully cut out your image.
- Brush a layer of decoupage or Mod Podge onto the star and press the paper on top. Gently press the paper napkin down to make sure the surface is covered.
- Brush a thin layer of decoupage or Mod Podge on top of the napkin and the rest of the star.
- Next use ribbon to make a bow. Hot glue the bow and any embellishments onto the top of the star.
Tried this recipe?Let us know how it was!