Cricut Peonies Framed Flowers
Ingredients
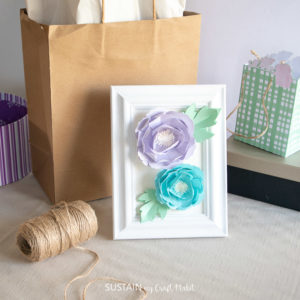
- 4x6 photo frame white or painted white with chalky paint
- Cricut Maker
- 1 sheet each of cardstock paper in cream, soft green, blue and purple
- Cricut Light Grip Mat
- Cricut Design Space Peony Pattern #MA3BFE
- Pen or other round utensil for curling petals such as a wooden skewer
- Cricut Spatula optional
- Hot glue gun with clear craft glue
Instructions
- Disassemble the photo frame, removing the glass, which can be carefully discarded.
- Uploading the Peony Pattern: on a new canvas in Cricut’s Design Space, select Images from the toolbar.
- Search “Peony” image (#MA3BFE) and select insert images.
- Resize grouping to 9” high.
- Duplicate the grouping and resize the second set to 7.5” high.
- Create the picture mat by adding a square shape and sizing it to 4” x 6” (or whatever size your photo frame is).
- Ungroup both sets of patterns.
- Move to the Color Sync tab to sort images by paper color.
- With the machine set to Cricut Maker, select “Make It” in Design Space.
- Set material type to Cardstock, choosing the appropriate weight based on your paper.
- Follow prompts for loading cardstock paper into Cricut Maker and cutting.
- Remove the cut pieces from the cutting mat.
- Repeat for the remaining images and papers.
- To Assemble the Peonies and Leaves fold up the outer edges of the peony center pieces (pistil).
- Use a pen or a wooden skewer to curl petals upward on the 10 petal pieces.
- For the smallest 3 petal pieces, fold the side tab towards the back of the petal and glue in place.
- For the large 3 petal pieces, glue the small tab to the back side of the adjoining petal to form the shape.
- Stack and glue all of the petal pieces together in this order: the big 3-petal pieces, the 10-petal pieces (make sure the larger of the two 10 petal pieces is on the bottom), then the two smaller 3 petal-pieces.
- Glue the center pistils in place.
- For the leaves: Slightly fold the leaf piece with the slit and then glue at the tab. Glue this folder leaf to the center of the intact leaf.
- To Assemble the framed art, place the cream mat into the frame. Reassemble the backing into the frame.
- Decide on the arrangement of your flowers and leaves.
- Working one peony flower and leaf at a time, glue them in place and hold until secure.
Tried this recipe?Let us know how it was!