Making Kids Face Masks Fun
Since wearing a face mask is becoming the new norm, there’s no reason why we can’t think of ways to make kid’s face masks fun to wear.
Ingredients
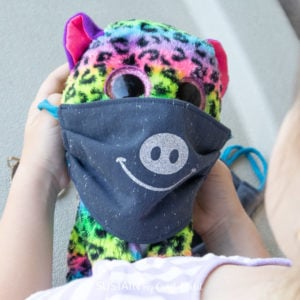
- Cricut Design Space images Moustache #M4120E8, Animal Smile Face Mask 4 #M15795B30, Pig Face Mask #M15795CD9, Whisker Face Mask #M15795D62
- Kid’s pleated fabric face masks
- Cricut Maker with Fine Point Blade
- Glitter Iron On Vinyl Aqua and Silver
- Standard Grip Mat
- Weeding Tool
- Scissors
- EasyPress Mini
- EasyPress Mat or Towel
Instructions
- Open Cricut Design Space and click on the “+” sign to start a new project, opening up a blank canvas.
- Click on the Images button from the toolbar and search face mask decals in Design Space’s free access patterns
- When selected, insert the images on to the canvas.
- Change the measurement to fit the mask accordingly.
- Select “Make It” in the upper right corner to proceed with cutting and click the “Mirror” toggle button to on.
- Choose Glitter Iron-On Vinyl from the list of options in the drop down menu and place the Iron-On vinyl directly onto the standard grip Cricut mat with the glitter side down.
- cut out the vinyl.
- Position the mat or a towel on a flat surface and set the temperature and time on the EasyPress Mini machine
- For these 100% Cotton face masks and Glitter Iron-On Vinyl, set the EasyPress Mini to medium heat.
- Determine where you will be placing the image on the mask and preheat for 5 seconds.
- Place the cut image on to the face mask with the shiny side up.
- Press the image on to the mask for 25 seconds, constantly moving EasyPress Mini as you press. Turn the mask upside down and apply heat for another 15 seconds.
- While vinyl is still warm, peel the plastic part of the vinyl off carefully and discard.
Tried this recipe?Let us know how it was!