Making a Wood Block Snowman
Add a touch of playfulness to your space with this stackable wood block snowman craft.
Ingredients
- 4 x4 post cut into 3 pieces each measuring 4 1/2” high
- Crafter’s Acrylics in White / Bright Orange / Black / Wild Rose Pink
- Paintbrushes fine tip and medium flat brush
- Chenille sock
- Cricut Design Space Snowflake Images #M8070D4
- Cricut Joy
- Smart Vinyl Permanent in black
- Weeder
- Scissors
- Cricut Transfer Tape
Instructions
Painting the Wooden Blocks
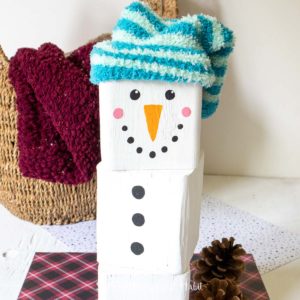
- Paint the surface of the wood blocks in white.
- Apply an upside down triangle shape in the middle of one block in orange.
- Paint two circles in black for the eyes; and seven smaller circles for the mouth.
- Paint two larger circles for the rosy cheeks in pink.
- Dab two small circles inside the eyes for highlights in white.
- Paint three circles for the buttons on another block.
Preparing the Images
- Open a blank canvas in Design Space.
- Select the text icon from the toolbar.
- Type LET.
- Change the font to “Little White Lies”.
- Click on the images icon in the toolbar and search snowflakes #M8070D4.
- Adjust the size to 2.25”.
Cutting
- Select “Make It” in Design Space.
- For cutting the words, set the material type to Smart Vinyl.
Applying the Vinyl to the Painted Snowman Blocks
- Cut around each word and snowflake with a pair of scissors.
- Using the weeding tool, peel away the excess vinyl around the cut images and discard.
- Cut a piece of transfer tape a bit larger than the size of the cut word.
- Place the transfer tape overtop of the cut word. Gently rub the vinyl to help it stick to the transfer tape. Peel away the vinyl backing, leaving just the image adhered to the transfer tape.
- Position the word with the transfer tape on to the opposite side of the wooden block. Press the vinyl word down with your fingers to help it to stick to the block. Slowly and carefully remove the transfer tape leaving the vinyl image on the block.
- Repeat for the other words and snowflakes on the remaining wooden blocks.
Finishing
- Add a sock to the top of the snowman head.
- Stack the blocks vertically or place them in a row to enjoy!
Tried this recipe?Let us know how it was!