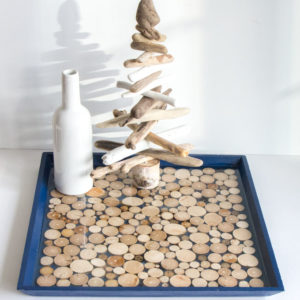
Upcycled DIY Resin Tray with Driftwood
A DIY resin tray using driftwood slices and an upcycled wooden catering tray.
Ingredients
- EnviroTex Lite Pour On
- Wood Tray painted and sealed
- Driftwood slices varying widths and thicknesses ranging from ¼” to 5/8” thick)
- All purpose sealer or white glue
- Measuring cups gloves, stir sticks, straws
- Sandpaper 220 grit
Instructions
Preparing the Materials
- Paint your wood tray in any color of your choosing.
- Using a mitre saw, cut a variety of different sized driftwood pieces into a range of thicknesses from ¼” to ⅝”.
- Cut enough slices to fully cover your tray.
- Sand the rough cut edges of the driftwood slices and wipe away any sawdust.
Assembling the Materials
- Apply one generous coat of all-purpose sealer to the inside of your serving tray. Leave it to dry.
- Using a paintbrush, apply all-purpose sealer to the bottom side of the driftwood slices and place them down onto the serving tray one at a time.
- Once the driftwood slices are set in place, use a paintbrush to apply a coat of all-purpose sealer to the tops and sides of all the driftwood slices.
Applying the Pour On Resin
- For best results be sure to read the instructions provided in the EnviroTex Lite Pour On packaging. Ensure your resin and hardener are at room temperature or warmer before mixing.
- 1st Layer: Mix exactly equal amounts of Resin and Hardener into one measuring cup. Stir continuously for 2 minutes, scraping the sides of the container.
- Pour the mixture into a second cup and stir for an additional minute, scraping the sides of the container and stir stick.
- Using the stir stick, dip your stick into the EnviroTex mixture and then begin pouring the resin over top of your piece.
- Cover to keep dust from settling in. Ensure your tray is placed on a level surface. After about 15 minutes, remove any bubbles that have risen to the surface by gently blowing over the piece through a straw.
- Cover and allow to cure overnight.
- 2nd Layer: Check your piece to see if the driftwood pieces are fully covered. If the resin surface is smooth and flat, then there is no need for another layer of resin.
- 3rd Layer: Since some of my driftwood pieces were pretty thick, I ended up needing a 3rd layer of resin.
- I repeated the 1st layer steps from the previous days to add my final layer of resin. As it hardens, the resin is self leveling but I wanted to help it along so I brushed some of the driftwood surfaces with a small clean paintbrush right after pouring.
- Cover and allow to cure overnight before using.
Tried this recipe?Let us know how it was!