DIY Leather Phone Sleeve
Create a phone sleeve using the Cricut Maker to cut leather.
Ingredients
- Cricut Genuine leather Cranberry
- Cricut Maker
- Strong Grip Mat
- Knife Blade
- Scotch tape
- Sewing Machine and matching thread
- Scissors
Instructions
Creating the Phone Sleeve Pattern
- Measure the circumference of the cell phone (both length and width) and divide meausrements by half.
- Add an extra 1/2” to the width for ease and seam allowance. Record the measurements.
- Open a new project in Design Space.
- Insert rectangle shape and adjust size as needed.
- Insert circle shape measuring 1.75” wide.
- Place the circle shape overlapping the top of the rectangle directly in the center. Have them overlapping by approx. ½”
- Select both shapes together and click on the “Slice” button.
- Click on the rectangle shape and move it away from the circle shape leaving the cut out behind.
- Delete the other shapes.
- Duplicate the rectangle shape.
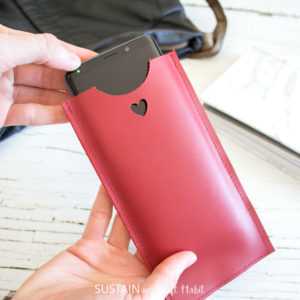
- Insert a heart shape and adjust size to ½” high. Place it in the center just below the cut out.
- Select this shape along with the heart shape to cut out the heart using the slice tool again. Discard the heart shape.
- Change the shape color to match the material color, in my case it’s cranberry.
Cutting the Phone Sleeve
- Click on Make It to view shapes on mats.
- Change material type to “garment leather”, this has the closest settings to genuine leather.
- Move the star wheels to the right side.
- Place the leather on the strong grip mat and tape the edges.
- Proceed with cutting.
- Peel away the leather and the cut pieces.
Assembling the phone sleeve
- Place cut pieces with suede sides together.
- Change to a leather presser foot and matching thread color, stitch together and along the outer 3 edges of the phone sleeve with 1/8" seam allowance.
Tried this recipe?Let us know how it was!