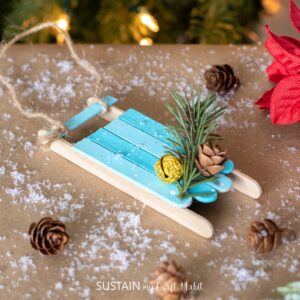
DIY Popsicle Stick Sled Ornament
Create your own adorable popsicle stick sled ornament. With these step by step unstructions, you'll see it's easier than you think!
Ingredients
- X6 Wooden Popsicle Sticks
- X1 Wooden Coffee Stir Sticks
- Cutters
- Pencil
- Ruler
- Hot Glue gun and clear glue sticks
- Acrylic paint in blue and white Americana Acrylics Indian Turquoise and Snow White
- Paintbrush
- Decorative accessories such as greenery, mini pinecone and a gold bell
- Twine cut to 8” long
Instructions
- Measure, mark and cut two popsicle sticks 3” long and two at 2 ¾” long.
- Measure, mark and cut one coffee stick at 1 ¾” and two at 1 ¼” long.
- Leave two remaining popsicle sticks at full length.
- Paint the surface of the popsicle sticks in two shades of blue, mixing blue and white together for the lighter shade. Leave the full length popsicle sticks unpainted.
- Gently flick white paint over top of the painted pieces to represent snowflakes.
- Once dry, assemble the pieces into a sled. Lay the shorter popsicle sticks with the splatter side facing down on a flat surface with cut edges lined up and longest pieces in the middle.
- Glue the shortest sticks across the back side to hold all the pieces together.
- Glue the long unpainted popsicle sticks along the length of the sled on both sides. Turn the glued piece right side up.
- Glue the last piece across the front of the sled.
- Glue a piece of greenery, a mini pinecone and a gold bell to the top of the sled.
- Tie a 10” long piece of twine to the front of the sled.
Tried this recipe?Let us know how it was!