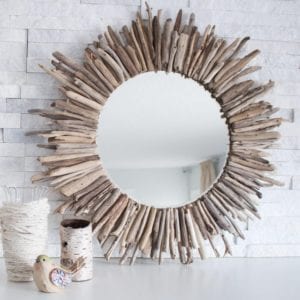
How To Make A DIY Driftwood Mirror (or Where to Buy!)
DIY Driftwood Mirror
Ingredients
- Assorted driftwood pieces - sized 3” to 7” long in various widths
- Beveled mirror - round shape, 14” diameter
- *Construction Adhesive* (or similar product) for attaching mirror to plywood
- ½” thick sheet of plywood
- Picture framing kit* (this one from Amazon holds up to 30 pounds)
- Jigsaw
- Sand paper 60 Grit
- Glue gun and plenty of glue sticks
- Some other suggestions for applying the driftwood are 1. use a wood glue or super glue for a stronger, more secure adhesive or 2. nailing gun with small brad nails
Instructions
- We used a ½” thick sheet of leftover plywood and cut it in a circular shape to match the mirror shape. Since we wanted 2 ½” of plywood to show beyond the mirror all around, the finished size of the cut out plywood is 19”. Here’s the math behind it: 14” for the size of the mirror + 2 1/2” (exposed plywood) + 2 ½” (exposed plywood) = 19”.
- Using a jigsaw, we cut along the marked line to create the base. Once the base was cut, we gently sanded down all the edges for a smooth finish. We used 60 grit, about a medium grade sandpaper to do this.
- We picked up a picture framing kit at the nearest home hardware store. And following the instructions on the back of the kit, we added two sets of hooks to the back side of the base. This was the side that was hung up against the wall.
- To apply the mirror onto the base, we carefully turned the mirror right side down on a smooth surface, taking care to ensure the mirror didn’t get scratched or broken!Using the construction adhesive, we squeezed a good amount of the glue onto the back of the mirror and spread it out with a flat spatula (a paint stick would also do).
- Again, we gently turned the mirror back over and placed it centered on top of plywood. We needed to clamp the plywood and mirror together and allowed it to dry for several days before moving on to the next steps (aka the fun part!).
- Once the mirror was secured in place we removed all the clamps and laid the mirror right side up. Using a hot glue gun (or you could use one of the other options suggested in the materials list above), we began to apply the longer driftwood pieces to the exposed plywood base. We continued to work around the circle.We layered shorter driftwood pieces on top and in between the longer driftwood pieces to hide the exposed plywood underneath.Because hot glue is not the strongest adhesive, the finished driftwood mirror was somewhat fragile so we found we had to be very careful when moving it around. But once the mirror was hung in place, the hot glue did what it needed it to!
Notes
We found this helpful post from Adhesives.org that outlines all the different types of glue and appropriate uses for each.
If you’d rather use a stronger adhesive for your DIY driftwood mirror, we’d suggest a wood glue or super glue.
Tried this recipe?Let us know how it was!