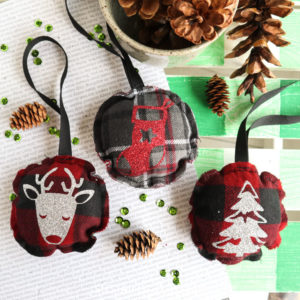
DIY Flannel Christmas Tree Ornaments
Sharing the tutorial for making a set of flannel christmas tree ornaments.
Ingredients
- Stocking.Deer.Tree SVG file
- Woven flannel fabric in a plaid pattern or any pattern of your choosing
- Cricut Maker with Fine Point Blade and Rotary Blade
- Glitter Iron On Vinyl in red and silver
- Cricut Strong Grip Mat and Fabric Grip Mat
- Weeding Tool
- Scissors
- EasyPress Mini
- EasyPress Mat or Towel
- Sewing machine and matching thread color
- Fabric Scissors
- Batting
- ¼” wide Grosgrain ribbon in black
Instructions
Preparing the Images:
- Open Cricut Design Space.
- Click on the “+” sign to start a new project, opening up a blank canvas.
- Click on the “Upload” button from the toolbar and browse your downloaded files to insert the Stocking.Deer.Tree SVG file.
Cutting the Iron-On Vinyl:
- Select “Make It” in the upper right corner to proceed with cutting.
- Click the “Mirror” toggle button to on for all mats with images to be cut in Glitter Iron-On material.
- For cutting the circle shapes, choose flannel fabric from the list of options in the drop down menu.
- Place a piece of flannel fabric on a fabric grip mat and proceed with cutting.
- Remove the circle shapes from the mat and repeat for more circle shapes in a coordinating flannel fabric.
- For cutting the stocking, deer and tree shapes, choose Glitter Iron-On Vinyl from the list of options in the drop down menu.
- Place the Iron-On vinyl directly onto the strong grip Cricut mat with the SHINY SIDE DOWN.
- Following the instructions prompted on the screen, cut out the vinyl.
Applying the Image with the Cricut EasyPress Mini:
- Position the mat or a towel on a flat surface.
- Set the temperature and time on the machine following the chart for the type of vinyl and material being used or use this EasyPress Interactive Quick Reference Guide.
- Preheat each of the ornaments for 5 seconds.
- Place one image in the center of each circle with the shiny side up.
- Press the image on to the ornament for 25 seconds, constantly moving EasyPress Mini as you press.
- Turn the ornament upside down and apply heat for another 15 seconds.
- While vinyl is still warm, peel the plastic part of the vinyl off carefully and discard.
Sewing the Ornaments:
- Cut a piece of grosgrain ribbon 10” long for each ornament.
- Fold the ribbon in half and place the cut ends at the top of the ornament and stitch it in place.
- Place two circle shapes with the wrong sides together. Stitch around the outer edge with a ¼” seam allowance leaving a 1” gap opening.
- Insert batting into the opening and then sew the opening closed.
Tried this recipe?Let us know how it was!