How to Make a Driftwood Button Mold with Silicone Putty
Learn how to make resin buttons with a driftwood resin button mold. We're sharing a tutorial so you can make your own with silicone putty.
Ingredients
- Driftwood buttons
- Sealer or glue
- Paintbrush
- EasyMold Silicone Putty
- Gloves stir sticks, parchment paper
Instructions
Preparing the surface
- Using a paintbrush, apply a coat of liquid glue over the surface of the wood button.
- Take time ensuring all crevices are coated and then when the glue is dry, turn buttons over and seal the other side. Allow glue to dry fully before proceeding with the silicone putty.
Creating the silicone putty mold
- Mix only enough to make one mold at a time. Measure equal sized amounts of components A & B.
- Quickly knead together the components until it is a uniform color, free of any swirls. This process takes about a minute.
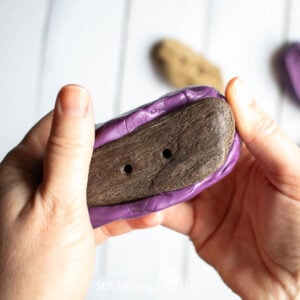
- Roll the kneaded components into a ball and then flatten so you have enough to wrap fully around the sides of the driftwood button. Press putty firmly around the button.
- Leave the button inside the mold for about 25 minutes while it cures.
- Remove the button and the mold is ready to be used!
Tried this recipe?Let us know how it was!