Making a Resin Cutting Board: Beachy Themed
Ingredients
- Envirotex Lite Pour-On
- Wooden cutting boards
- Painter’s tape
- Utility knife
- Acrylic paints in ultra deep blue, ocean blue,bahama blue and desert sand
- Paint brush
- Castin’ Craft Opaque Pigment in White
- Alcohol and dropper
- Small and large mixing cups wooden stir sticks, small kitchen torch, hair dryer or heat gun
- Disposable work surface disposable brush, gloves
Instructions
Preparing the Cutting Boards
- Apply strips of painter’s tape to the back side of the cutting board directly behind the area you will be painting and resin pouring.
Painting the Coastal Scene
- Prop the cutting board slightly off of the surface of the table.
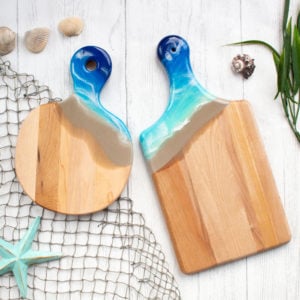
- Using a combination of acrylic paint colors, brush on the paint in diagonal stripes working quickly. First, brush on the deep blue color on the cutting board handle. Next, apply the ocean blue paint color in a diagonal direction as shown. And follow that layer with the bahama blue paint color. Lastly, brush on a diagonal stripe with the desert sand color. Leave the cutting board to dry before moving on to the next step.
Pouring the Resin “Sand”
- Mix equal parts of resin and hardener in a clean measuring cup.
- Stir for 2 minutes then transfer into a second clean measuring cup. Stir with a clean stir stick for another minute.
- Pour about 1 oz of the mixed resin into a smaller measuring cup. Add a few drops of the sand paint color to the resin and stir together. Using the end of a wide mixing stick pour the mixture along 1/2 to 3/4 of the width of the sand painted cutting board.
- After 10-15 minutes blow off any air bubbles rising to the surface of the resin using a small kitchen torch or hair dryer. Repeat as necessary over the next 1-2 hours. Aim the direction of the torch or dryer towards the cutting board handle.
Pouring the Clear Resin “Water”
- Pour about 1 oz of the mixed resin into another smaller measuring cup and put it aside for use after this step (see pouring the resin “crashing waves” below).
Pouring the Resin “Crashing Waves”
- With the smaller cup of the prepared resin, add a few drops of the opaque white color pigment to the resin and stir together. With the end of the stir stick, apply the white resin mixture in uneven diagonal stripes over the cutting board where the colors transition.
- Immediately after pouring the white resin mixture, use the hair dryer or kitchen torch to blow the resin causing the white “crashing waves” to disperse and blend. The heat and blowing air will create a pretty realistic wave-like effect.
- After 10-15 minutes blow off any air bubbles rising to the surface of the resin using a small torch or hair dryer. Repeat as necessary over the next 1-2 hours.
- Place the cutting boards on a level surface and cover to keep dust from settling in. Leave to cure overnight (24 hours for a soft cure, 72 hours for full cure).
Tried this recipe?Let us know how it was!