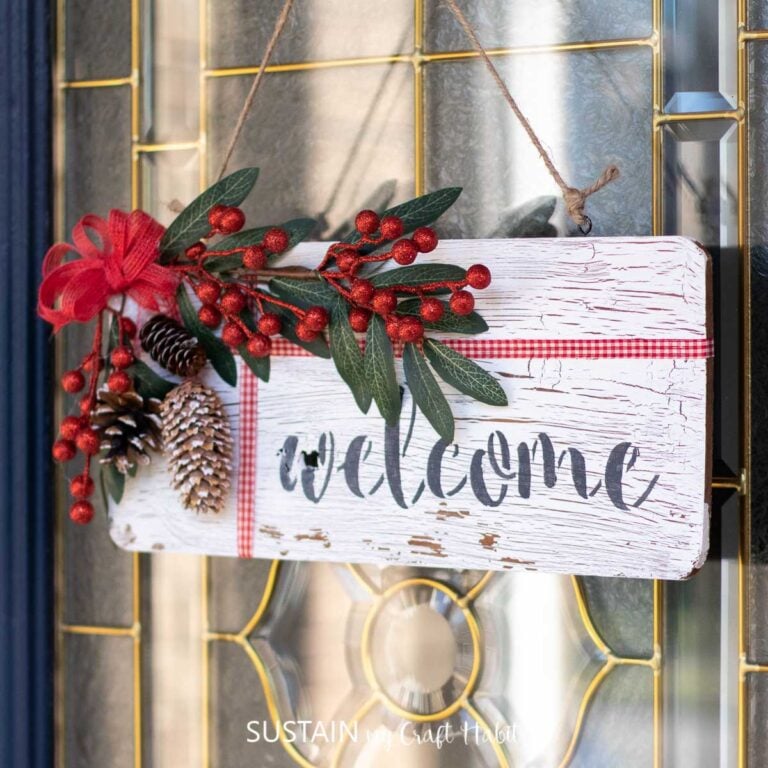
Fall Wood Sign with Dollar Tree Supplies
As autumn leaves begin to fall and the air begins to cool, it’s time to bring the cozy warmth of the season into your home. What better way to do that than with a charming DIY fall wood sign using inexpensive craft supplies from the Dollar Tree?
This project is perfect for crafters on a budget who don’t want to compromise on style.

Why You Will Love This Fall Wood Sign With Dollar Tree Supplies
You’ll love making this craft project for so many reasons. First, it’s incredibly satisfying to transform simple, inexpensive materials into a beautiful piece of home decor. As you paint, stencil, and embellish your sign, you’ll feel a sense of creative accomplishment that’s truly rewarding.
Plus, this project is wonderfully versatile – you can easily customize it to match your personal style or existing decor. Whether you prefer a minimalist look with elegant script or a more whimsical design bursting with fall motifs, the possibilities are endless.

Can I Add Some Special Touches?
For a trendy weathered look, try lightly sanding the edges of your sign after the paint has fully dried – it’s an easy way to add instant character. Don’t be afraid to play with different fall-themed stencils; leaves, pumpkins, and cozy autumn quotes can all bring your sign to life.
Consider incorporating metallic paint or glitter glue for subtle shimmer that catches the light beautifully. And for a professional finish that’ll make your sign last season after season, seal your masterpiece with a clear acrylic spray. You can find this in the crafting section at Dollar Tree, keeping your project budget-friendly to the very end. With these tips in your crafting toolkit, you’re all set to create a fall wood sign that’ll be the envy of your autumn decor.
Want to receive a ton of inspiration and money saving ideas for decorating, gift-giving and crafting? Join HERE!

Materials Needed
Disclosure: This post contains affiliate links for your shopping convenience. Should you choose to purchase through them, we will make a small commission at no extra cost to you. You can read our full disclosure policy here.
- Mini wood pallet slats (we got ours from the dollar store)
- Mini together wood cutout
- Decorative paper napkins
Paintbrushes - Decoupage or
Mod Podge - Seasonal faux flowers and greenery

How to Make a Fall Wood Sign with Dollar Tree Supplies
I shared the tutorial for this fall wood sign on a recent Facebook Live which you can catch here. All of the step by step instructions can be found in the video.

Let Your Creativity Shine
Creating this fall wood sign with Dollar Tree supplies is not only a fun and rewarding project but also incredibly budget-friendly. Why not make several signs with different autumn motifs to create a cohesive gallery wall? Or consider making a few extra as thoughtful, handmade gifts for friends and family. Remember, the key to crafting is to enjoy the process and let your creativity shine!
More Fall Decor Crafts to Try
- Gather Sign for Fall with Decoupage
- Fall Trinket Boxes
- Fall Harvest Dollar Store Charger Craft
- Stacked Pumpkins Cutout
- Fall Door Hanger with Dollar Tree Supplies


Get updates on the latest posts and more from Sustain My Craft Habit straight to your inbox by joining our weekly newsletter. We promise to send you only the good stuff.
Like it? Pin it for later!


Fall Wood Sign with Dollar Tree Supplies
Materials
- Mini wood pallet slats we got ours from the dollar store
- Mini together sign
- Decorative paper napkins
- Paintbrushes
- Decoupage or Mod Podge
- Faux flowers and greenery
Instructions
- If you’d like you can paint the wood pallet white. Otherwise cover the surface with decoupage glue.
- Separate the two plies of napkin using just the top layer. Place the napkin over the entire pallet sign and gently press down with your fingers.
- Place a piece of parchment paper over top of the napkin and take your heated iron and gently rub back and forth. This will smooth out the napkin.
- Remove the excess napkin by using a piece of sandpaper for the edges. Gently sand the spaces between the pallets.
- Finally, glue the together sign and flowers onto the wood pallet sign.