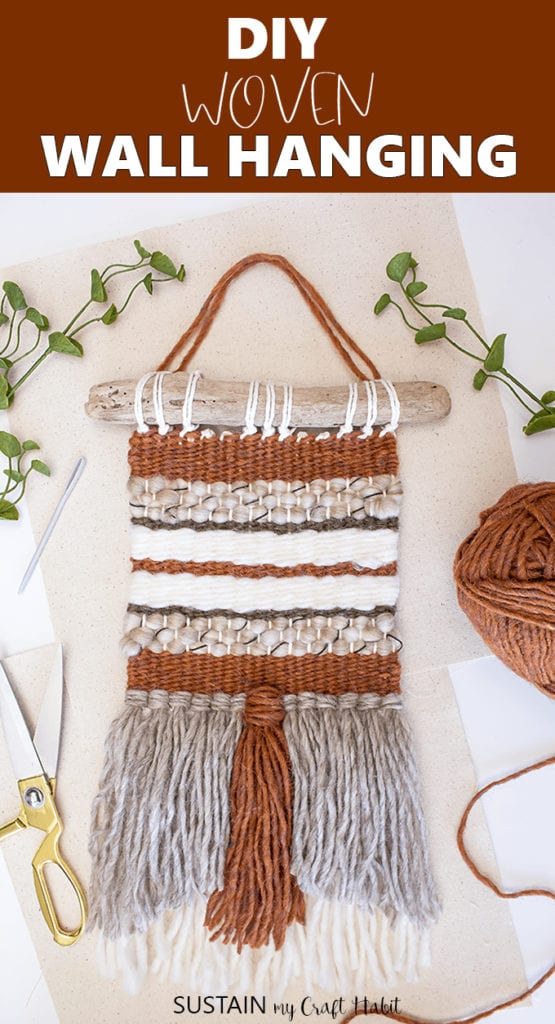
DIY Woven Wall Hanging (the Ultimate Beginner’s Guide)
We’re so happy to welcome a new guest contributor to Sustain My Craft Habit this month! Not only does Jelica from A Pretty Fix blog share our love of decorating your home with items from nature, but she creates absolutely gorgeous woven art. After pulling some strings (did you see what I did there?), she’s kindly agreed to share a DIY woven wall hanging tutorial with us. Thank you Jelica!

A Beautiful DIY Woven Wall Hanging
I want to thank Jane and Sonja for inviting me to share how to make one of my all-time favourite decor pieces for the home: a woven wall hanging.
I first discovered the art of wall weaving over four years and, like many before me, fell in love with the bold textures, colours, and creative possibilities of this ancient craft. Once I started, I never looked back! As a self-taught weaver, I am passionate about learning everything I can about weaving and enjoy sharing all that I learn with others. You can often find me working away on my next weaving project as well as any number of DIYs on my blog, A Pretty Fix, where I write about all things craft, decor and DIY for the home.
In today’s post, I want to show you how to make your own woven wall hanging from start to finish. It is a beginner’s level tutorial, so don’t worry if you’ve never woven before. In this post, you’ll learn:
- How To Set Up A Loom
- Basic Weaving Techniques
- How To Remove A Weaving From A Loom
- How To Prepare A Weaving For Hanging
And after this project is complete, if you have any left over yarn, head over to our super easy DIY mini pom-pom garland post, easy knitted kid’s headband and DIY yarn pops for planter arrangements.
Okay, let’s get started!

SUPPLIES NEEDED TO MAKE YOUR OWN WOVEN WALL HANGING:
- Loom – All weavings are created on a loom (normally a wooden frame with pegs or notches along the top or bottom). You can either purchase one or make your own (like this DIY version that I shared on my blog: How To Make a Basic Loom). For this project, I will be using a peg loom that came in this weaving starter kit.
- Needle – A blunt, 3-inch needle.
- Cotton Yarn – The vertical strings of a weaving. This is the yarn I used for this project.
- Yarn Varieties – For your horizontal rows of weaving.
- Scissors
- Driftwood Hanger – This will be attached along the top edge of the weaving for easy hanging.


DIY WOVEN WALL HANGING: THE HOW-TO STEPS
STEP 1: SETTING UP THE LOOM
All weavings are made of both vertical and horizontal rows of yarn. To begin, you will first set up the vertical strings. The vertical strings are referred to as the ‘warp.’ You will begin by ‘warping’ the loom.

a. Taking your cotton yarn, create a loop and attach to one of the pegs along the bottom (in this case, the fourth peg from the left).
Tip: For ease of measurement, you can lay your driftwood next to the pegs as you warp your loom as I’ve done above. To determine the width of the weaving, make sure that the length of the driftwood is at least 1.5 inches longer on either side of the warp. Once you’ve completed the warping process, simply set the driftwood aside.
b. Pull the yarn up to the pegs at the top and, going from left to right, wrap around the peg fourth from the left. Pull down.
c. Wrap around the next peg and pull up.
d. Continue repeating the process until you are satisfied with the width.
Here is your completed warp.

Tip: Pay attention to the tension of the warp. Test the warp by laying your hand over the warp and press down. When you lift your hand, it should spring back immediately.
STEP 2: BEGIN WEAVING
First, let’s lay down a few rows of weaving using the cotton yarn you just used for your warp. These rows will act as an anchor for all the rest of the weaving that will be created on the loom.
a. Begin by threading your needle and start weaving the yarn into the warp by going under and over each vertical string. This type of weaving is called ‘Tabby’ or ‘Plain’ Weave.

b. When you reach the opposite side, begin weaving back towards the end you started from. When you begin a new row, always begin on the opposite side of the warp string that you ended on. Otherwise, you will unravel your weave.
In the picture below, the first row of yarn ends over the first warp string. Begin weaving the second row going under the first warp string.

c. Continue creating about 4-5 rows. When you reach the end, snip off the yarn and weave in the end.

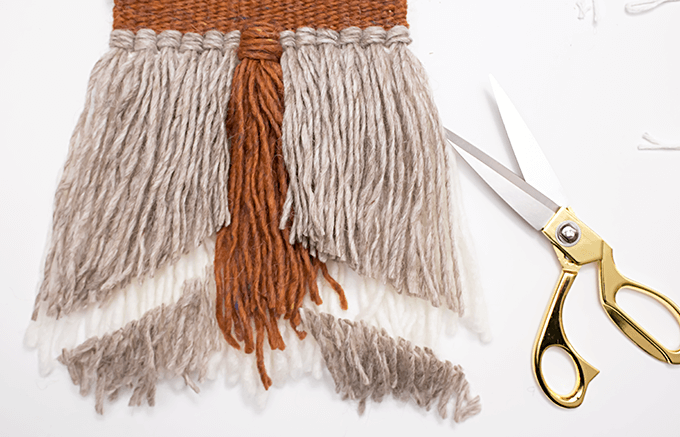
Most modern woven wall hangings have lovely fringe along the bottom. Let’s begin by adding a couple of layers of fringe just above the rows of plain weave just created.
Taking 1-2 pieces of thicker yarn (depending on how thick you wish the fringe to be), fold in half.

Add your first fringe as follows:

a. Lay the middle of your yarn over the first two warp strings.
b. Push the right side of your yarn down and up through the middle.
c. Push the left side of your yarn down and up through the middle.
d. Pull both ends up through the middle.
This will create what’s called a ‘Rya’ knot.
Pull the yarn down towards the woven rows to anchor your first piece of fringe.

Continue creating a row of fringe, from left to right.

For this piece, I added a second row with a contrasting colour. If you decide to add another row, first add a few more rows of plain weave. This will create a stronger anchor in your row of fringe.

Then add another row of fringe the same way you did the first row.


Now that you’ve created a couple of rows of fringe, you can begin weaving rows and rows of yarn above the fringe. Using the Tabby/Plain Weave Technique you’ve just learned begin weaving. Choose any combination of colours you like.


Each time you switch yarns, simply snip off the yarn you no longer wish to use, weave in the ends, and start a new row with your new yarn.

You can continue going all the way up using just plain weave to create some wonderful colours, patterns and textures with different types of yarn.
If you’d like to learn one more weaving technique to vary things up, you can also try the Basket Weave Technique. It is exactly like the Tabby/Plain Weave, but instead of going under and over every other warp string, you will go under and over 2 warp strings at a time, creating a lovely, raised texture.


Either way, keep weaving until you are about 2-3 inches from the top of the loom.

Note: I decided to change up my second fringe layer by replacing the center knot with a thicker, rust colour yarn. Replacing a Rya knot can be tricky, but it is possible. Just pull the knot and it will easily undo:

STEP 3: REMOVE WEAVING FROM THE LOOM
Being gentle with your weaving at this stage is key! You’ll notice that it will feel somewhat fragile once it’s off the loom, so pay careful attention to these next steps:

a. Gently slide the warp strings off the top pegs.
b. Do the same along the bottom.
c. Using an overhand knot, tie off each pair of strings as close to the top of the weaving as possible.
d. Do the same along the bottom.
**And be sure to snip off the warp strings along the bottom (just beneath the knots), so they don’t get tangled up into the lovely fringe pieces you’ve created for your woven wall hanging.
Tip: Tying knots along the top and bottom will prevent your weaving from coming apart, so don’t skip this step.
STEP 4: ATTACH DRIFTWOOD HANGER
To hang a wall weaving, you can use a wooden dowel, copper pipe, branch, or lucite bar…The possibilities are endless! Simply slip through the loops along the top and you are all done.
If, however, you are using driftwood, as I did here, you’ll need to attach it more securely. This is because driftwood is misshapen. If you simply feed it through the loops along the top, then the loops will pull upward at varying heights and create a wobbly, uneven look. For more project ideas using driftwood, check out this hand lettered driftwood sign and this diy wall art using painted pinecone and driftwood.
Attach Driftwood:
a. (optional) – Weave in 4 of the loops along the back of the weaving. This left me with three clusters of three loops to attach to the driftwood.

Or, skip step a. and move directly onto the next steps:
First create a starter knot:

a. Thread needle (using the same cotton yarn used to warp your weaving) and weave yarn up through back side of weaving.
b. Continue pulling upwards until you are left with a small tail.
c. Push the needle under the overhand knot at the far end of the weaving.
d. Pull the needle towards yourself until a small loop forms. Push the needle back through the loop to create your starter knot.
**Do not snip off your yarn just yet.
Lay the driftwood on top of the loops.

Using the same thread (remember, don’t snip off the yarn just yet), begin securing your driftwood hanger as follows:

a. Taking your needle, push the tip through the first loop.
b. Pull until taut.
c. Push the needle under the next knot. Pull until taut.
d. Repeat the process until you reach the last loop of the first cluster of three .
Secure by tying a knot at the base of the third loop just as you did when creating your starter knot.

**Now you can snip off your yarn.
Repeat this process for each cluster of three along the top. (Unless, of course, you chose to skip optional step a., in which case, keep moving across until you have secured each of the loops to the driftwood piece).

Your driftwood is now securely attached to your woven wall hanging.

Attach a piece of yarn to the loops for easy hanging.

Finishing Your Woven Wall Hanging:
Last step!
Shape your fringe with a cool, angular design.
Now your handmade item is ready to be displayed. If you have any yarn leftover from this woven wall hanging, consider making this child’s easy knitted headband. Or cozy up with one of these free scarf knitting patterns!

Weaving can seem so intimidating to a beginner, but once you’ve got the basics down, there are no end of creative possibilities. For more weaving inspiration and step-by-step photos for both beginners and more advanced weavers, you can visit some of my most popular wall weaving tutorials in the Popular Posts section of my blog, A Pretty Fix.

Happy weaving 🙂
![]()
For more weaving DIYs like this one, you can check out some of my other tutorials:
- An Introduction To Wall Weaving – Part 1 & An Introduction To Wall Weaving – Part 2
- A DIY Weaving Techniques: 5 Simple Ways To Add Texture
- DIY Woven Coasters
- DIY Mini Framed Weaving
Like it? Pin it for Later!


Love the woven wall hanging! The colour combination is gorgeous and that fringe (to die for)!
I know, right? The color combination is perfection!
This is beautiful! And the explanation is so thorough, I think I could actually do this!
I know, that is exactly how I felt as well! Really can’t wait to give this a try.
So beautiful !But seems a little complex.Thank you for the diy project.
Is it possible to order one of these?
These colors are perfect for my room
Hi Deborah,
I’ve sent you an email to put you in touch with Jelica, the project creator.
Have a wonderful day,
Jane
Thank you for the tutorial! I’ve looked for pretty yarns like are used on this that have cool texture but I haven’t been able to find them. Could you point me in the right direction?
Hello. Thank you for this inspiring tutorial. I’d like to buy the yarns used for this wall hanging but can’t find the chunkiest one with the black thread running through it. Please can you share?
Thanks,
Charlotte