Making Memory Ornaments with Clothing
Keep past Christmases with you always with beautiful keepsake memory ornaments. We want to teach you how to make these lovely keepsake ornaments using old clothing, which will keep the precious memories long lasting.
Repurposed Shirt Memory Ornaments – A Great Keepsake Ornament
If you are looking to create keepsake ornaments, this is a wonderful place to start. Many of us have clothes from loved ones that we cannot part with, whatever the reason may be. This is a great way to honor someone or preserve someone’s memory while upcycling in a special and thoughtful way.
I found that this makes a great gift too. If you purchase the materials in bulk, you can take one shirt and make multiple memory ornaments, and gift them out to multiple family members or multiple loved ones.
The wonderful thing about this is you can make them any time of year and gift them. We know that there are a lot of us that will look for memorable ornaments year-round, and there is nothing more memorable than a homemade ornament that is also a keepsake.
Join our crafting community to find more nature-inspired DIYs and upcycled craft ideas. It feels good to repurpose, upcycle and create with nature!
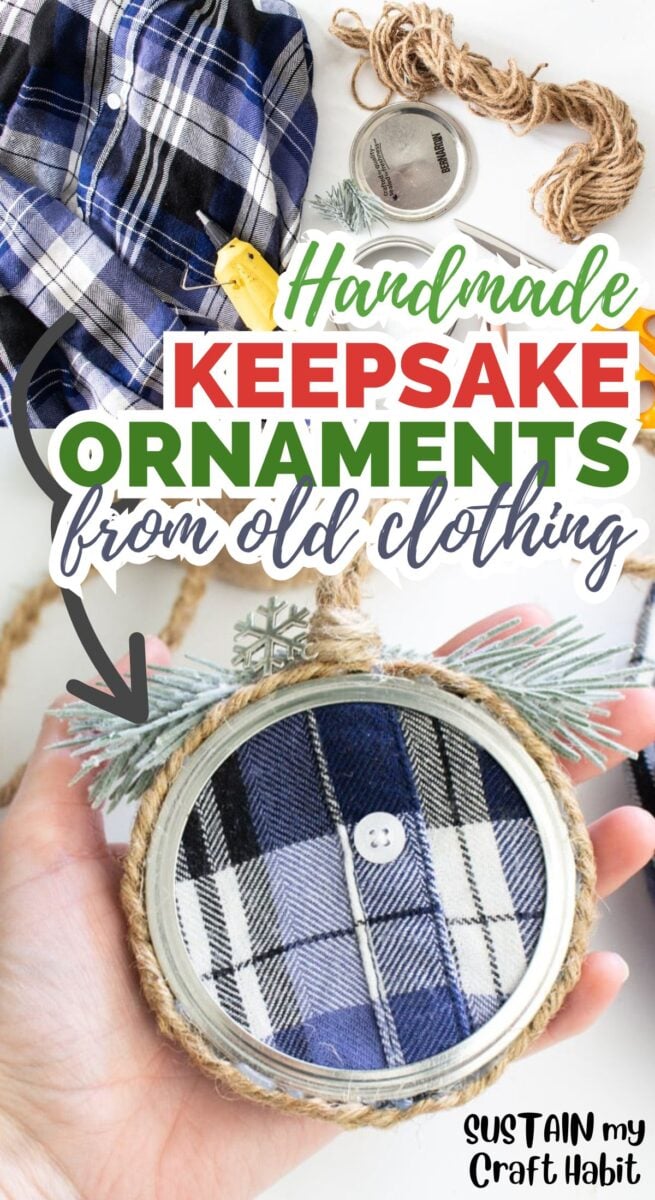
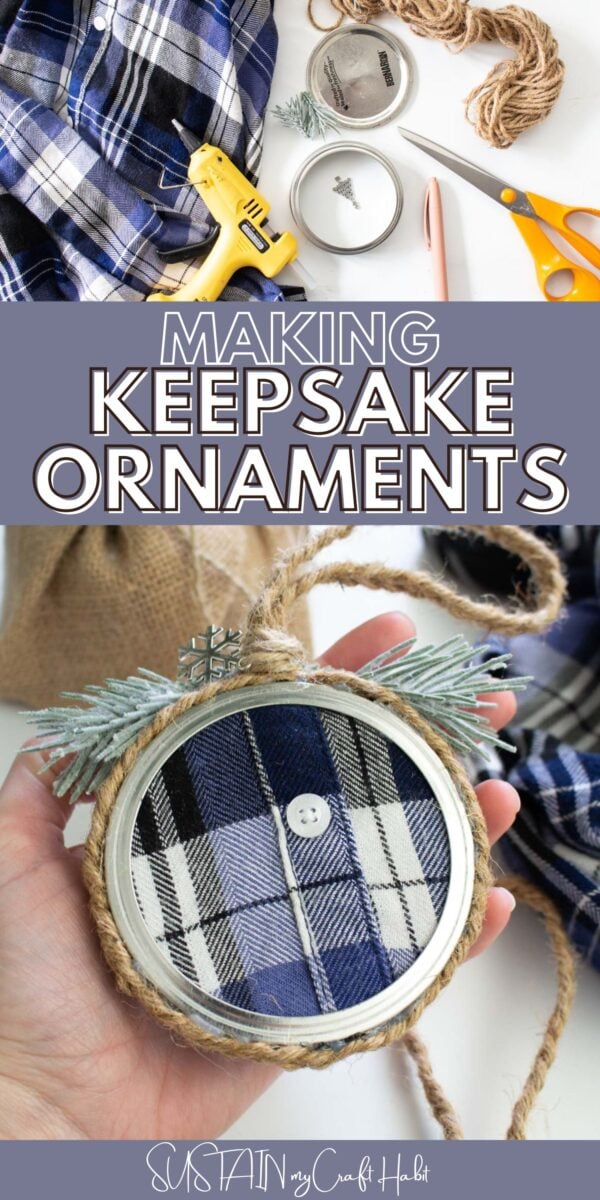
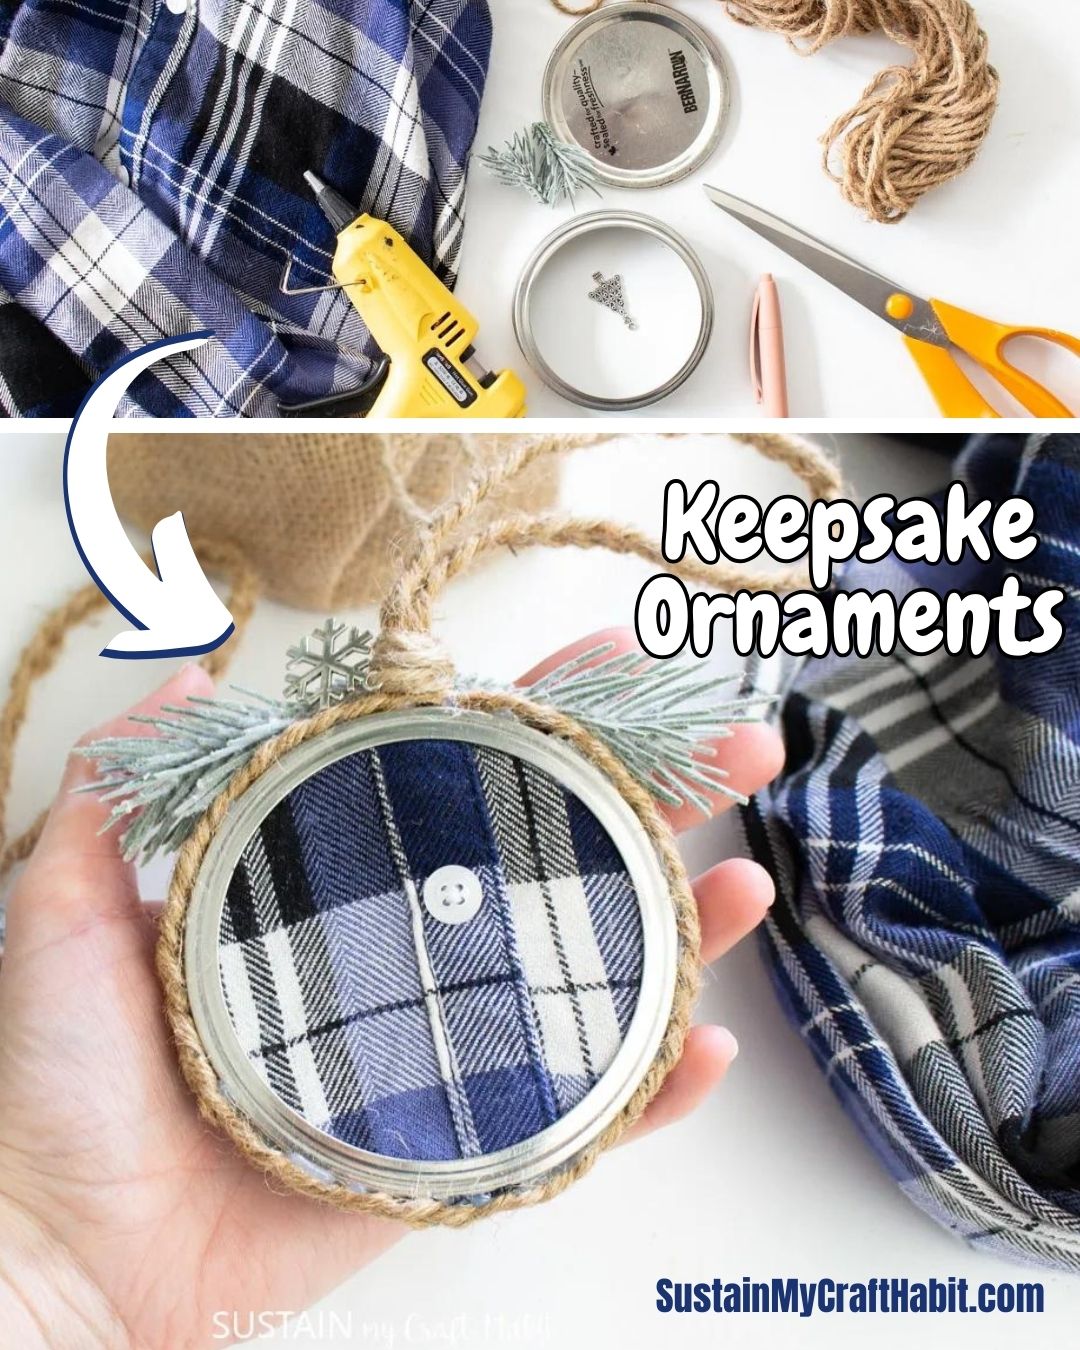
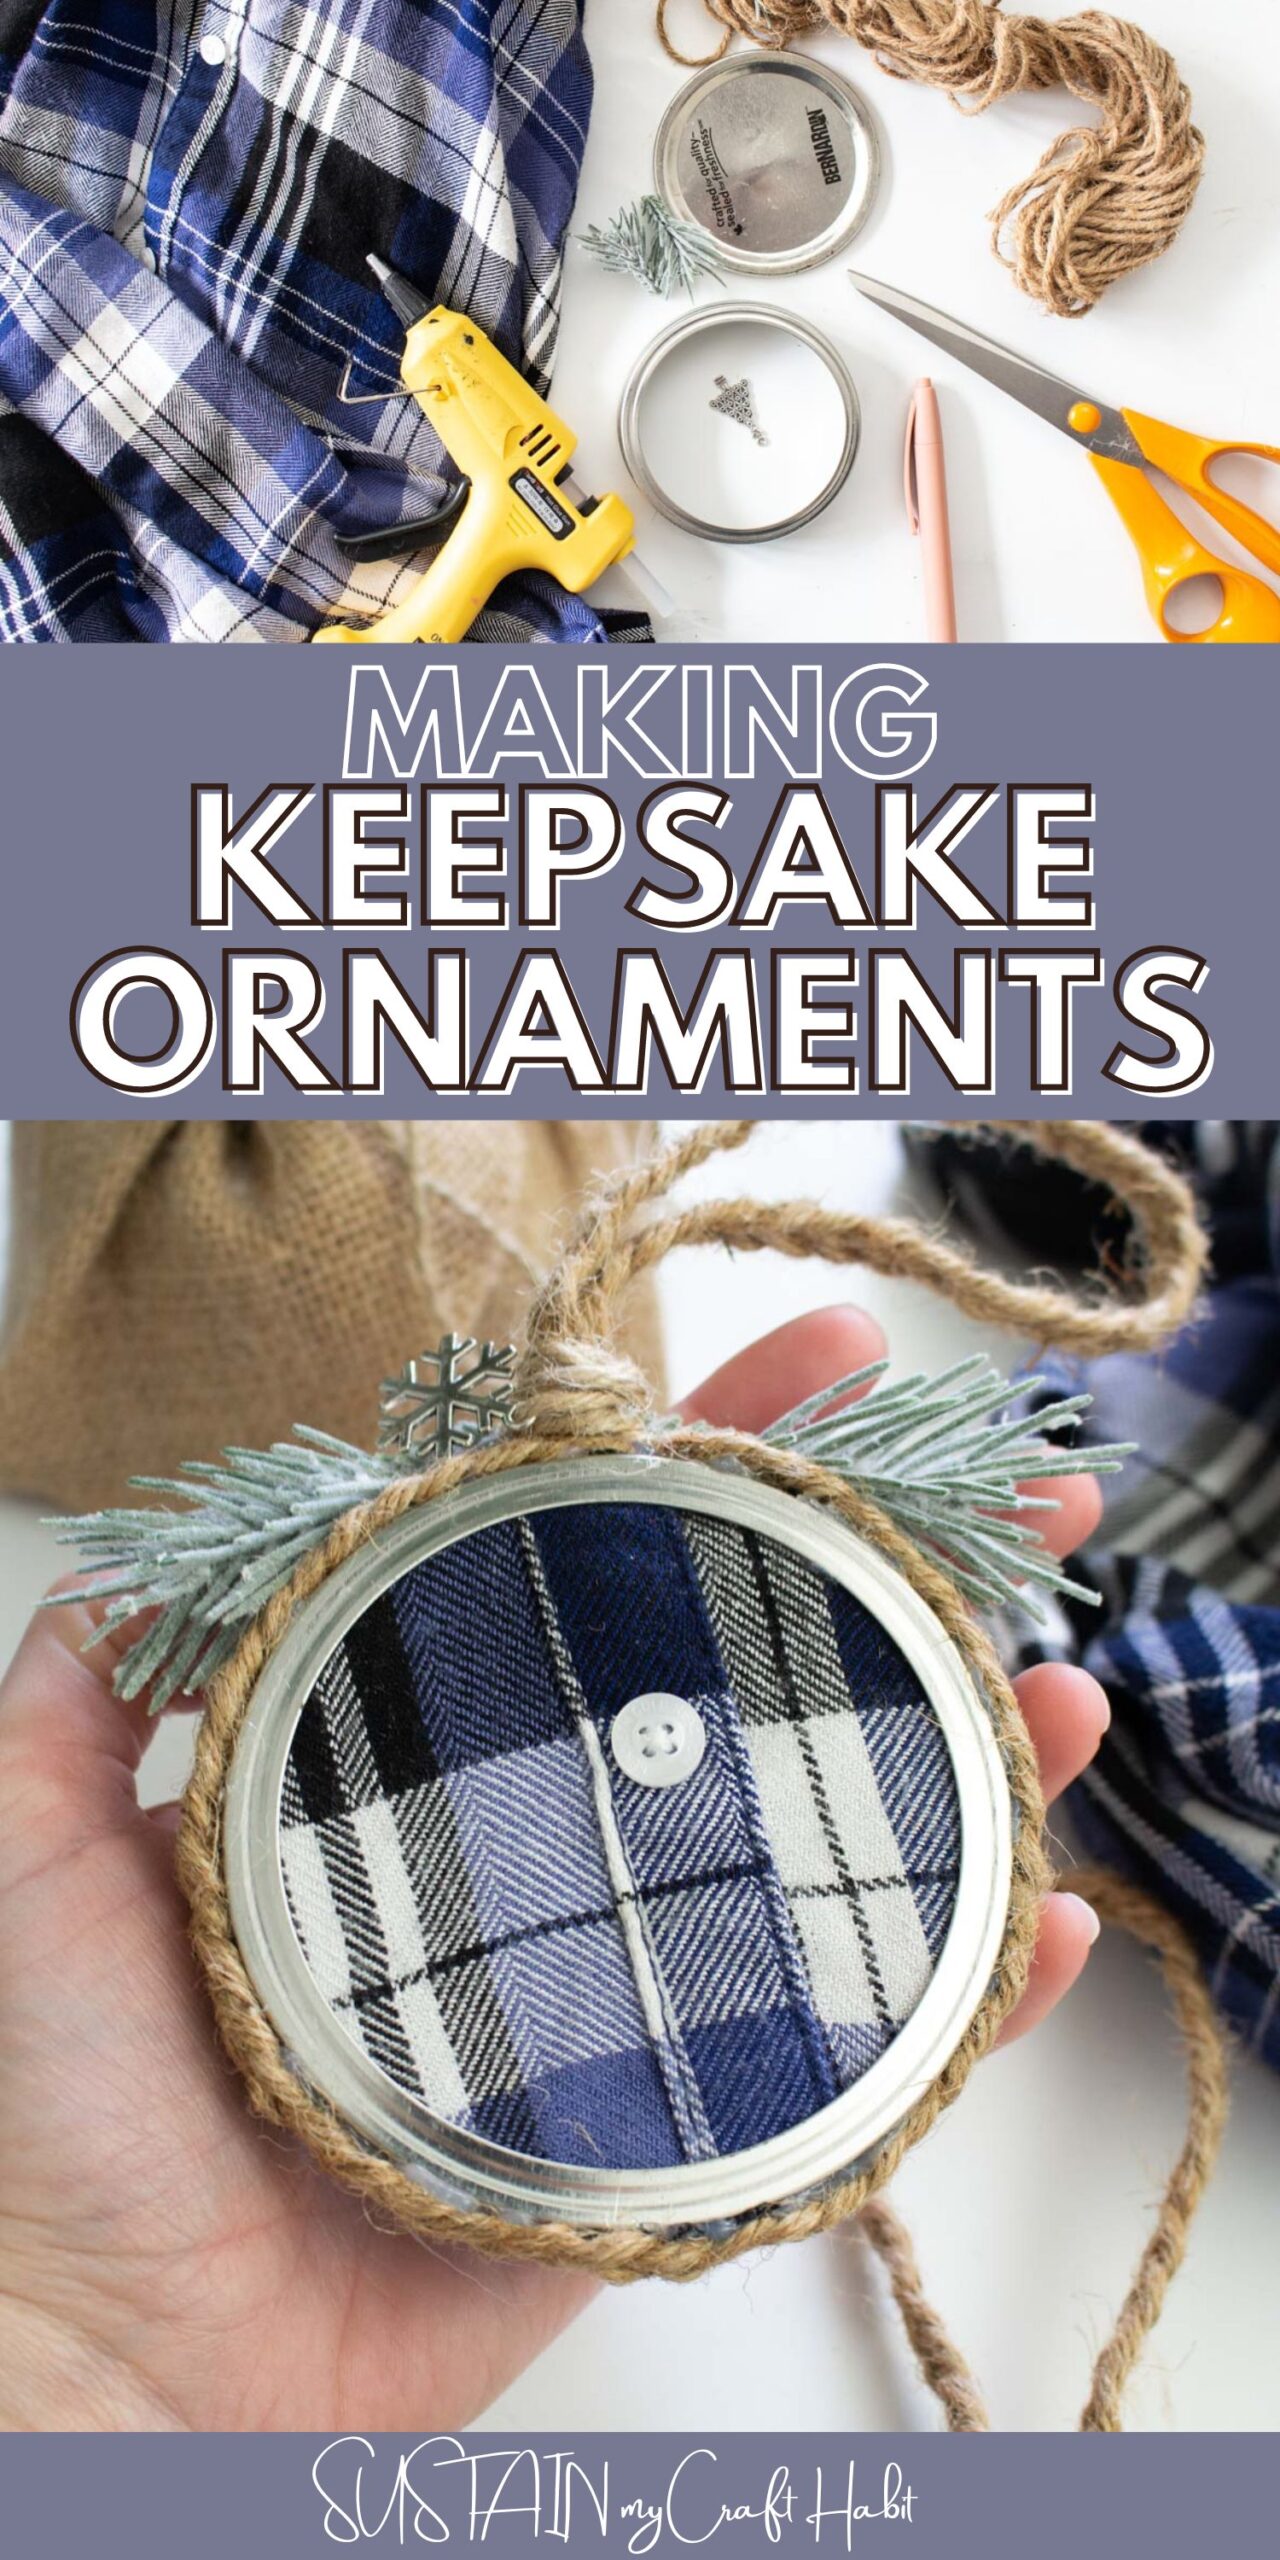
Materials Needed for these Memory Ornaments:
Disclosure: This post contains affiliate links for your shopping convenience. Should you choose to purchase through them, we will make a small commission at no extra cost to you. You can read our full disclosure here.
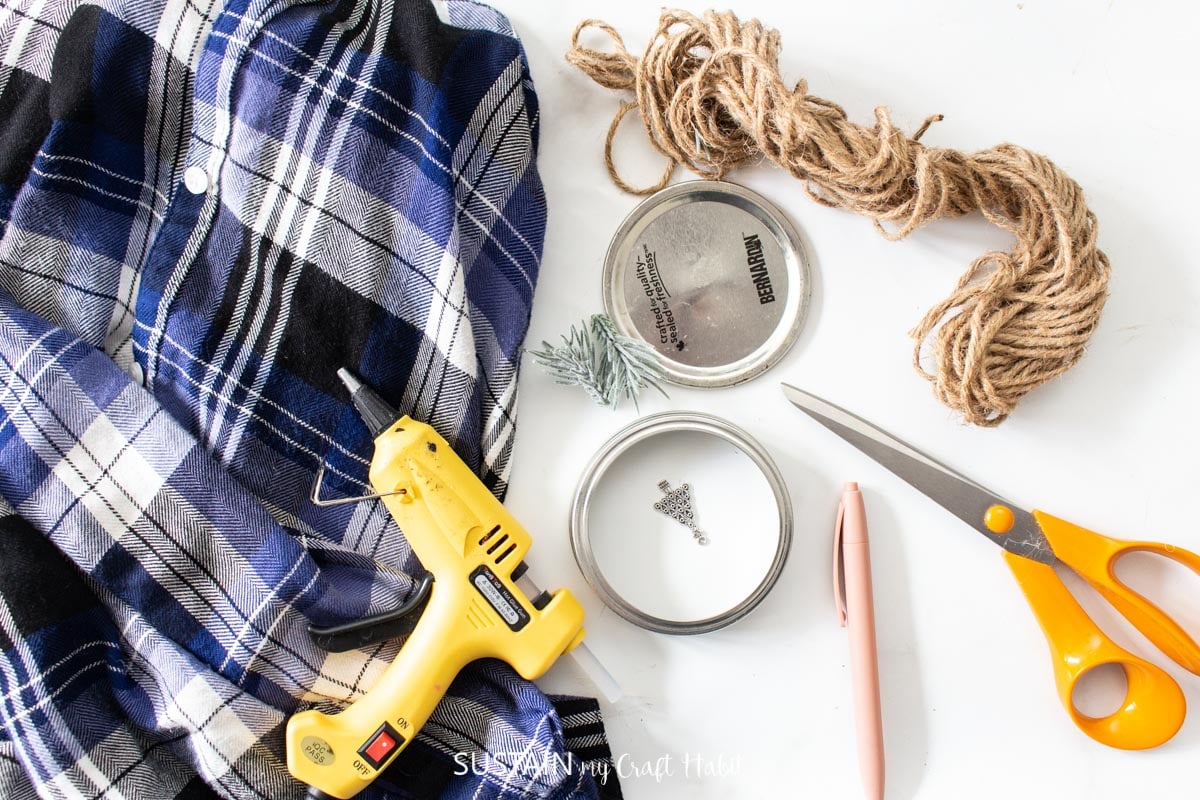
- Woven button-up shirt
- Large canning jar lid and screw band
Fabric scissors
Hot glue gun
- Winter-themed pendant charm (optional)
- Decorative greenery (optional)
How to make keepsake ornaments with this repurposed shirt:
We’re happy to provide the step-by-step video here and photo instructions below to make this beautiful memory ornament to treasure for a lifetime. Let us know in the comments if you have questions about any step!

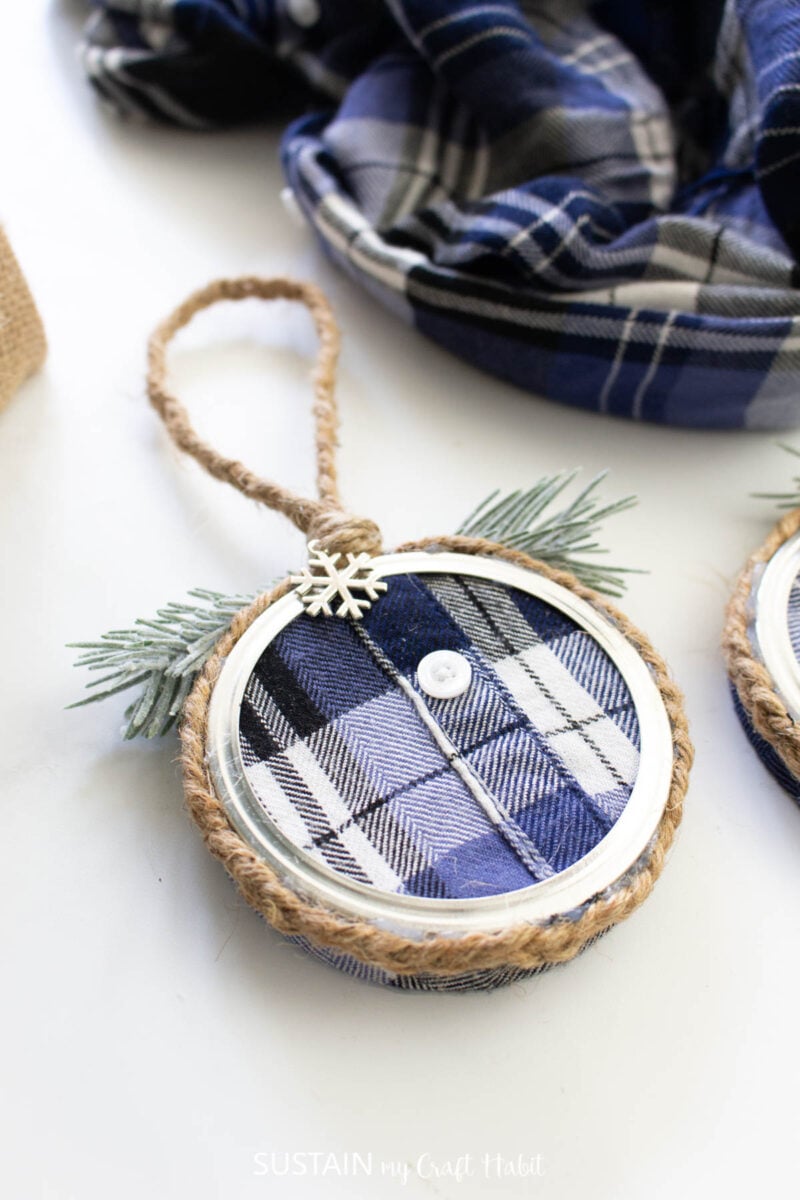
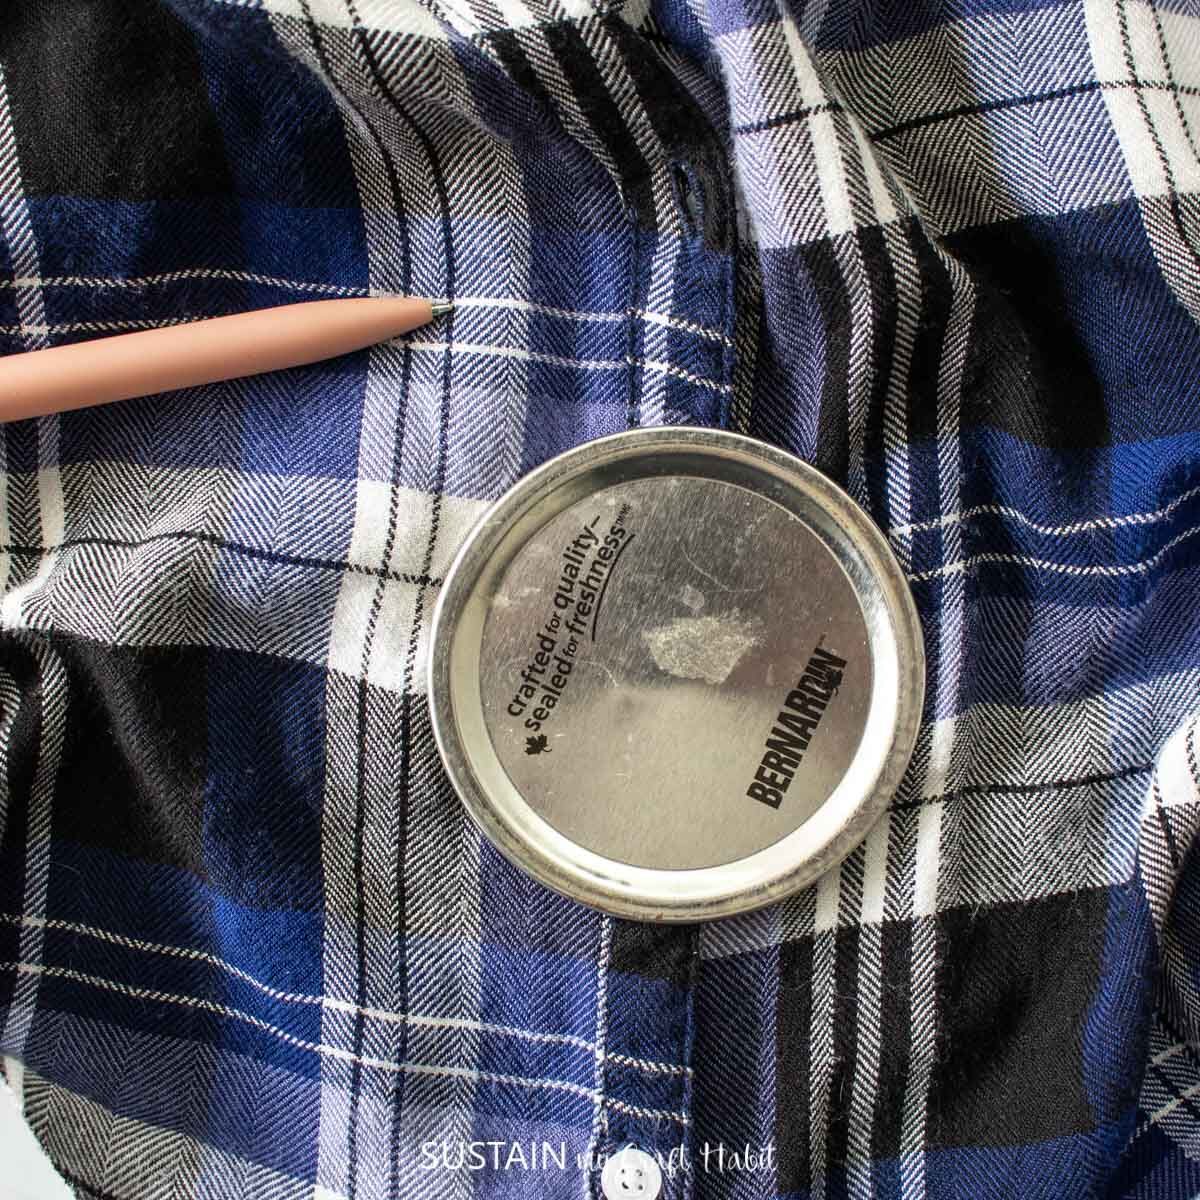
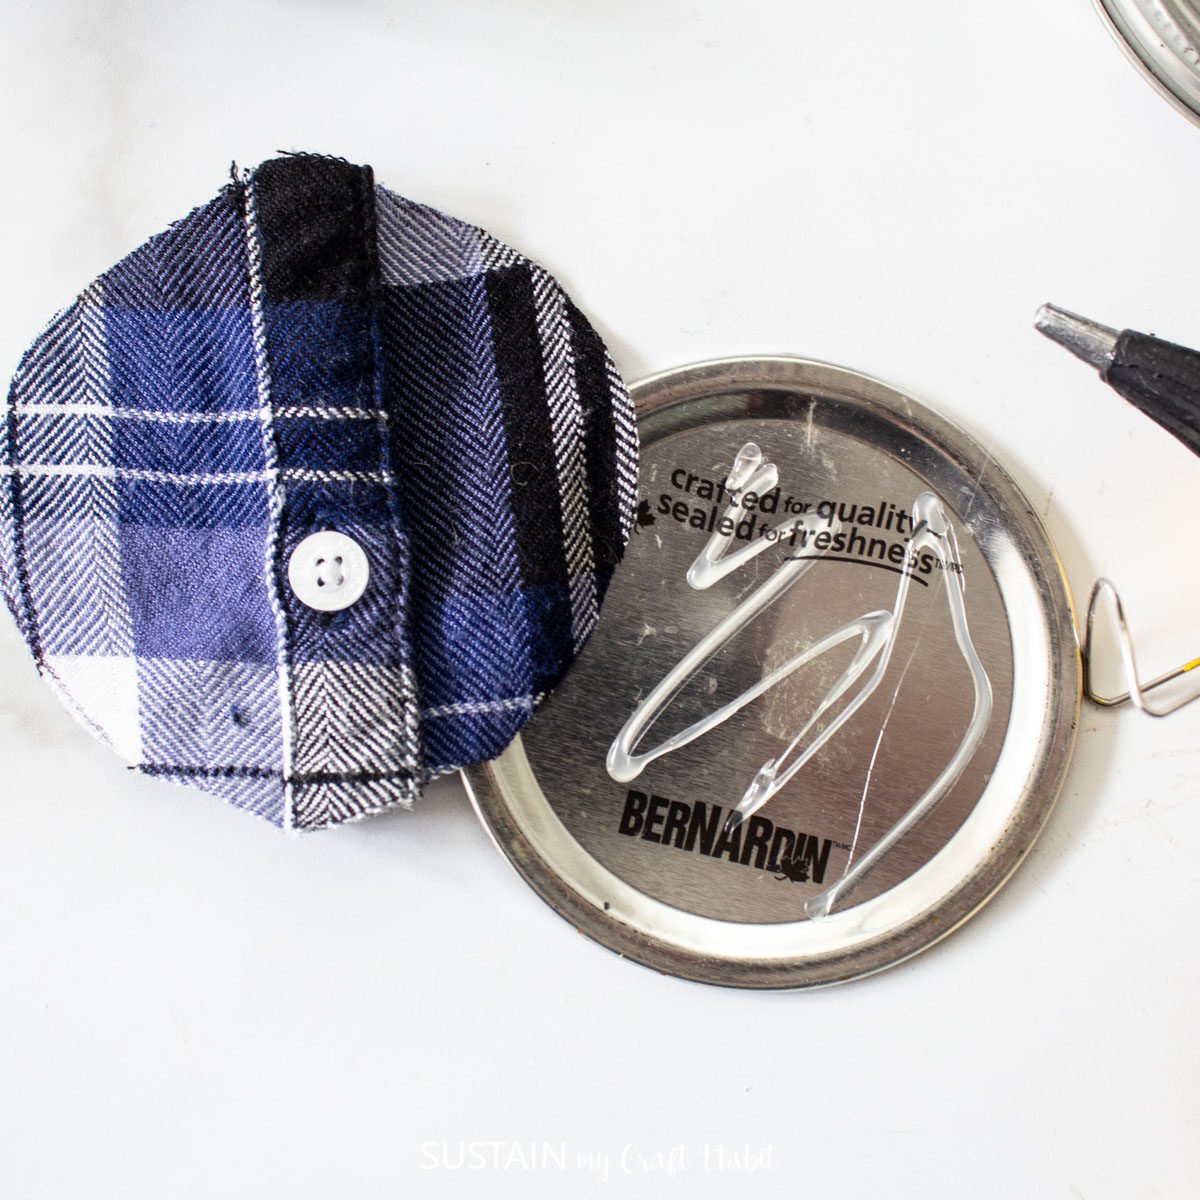
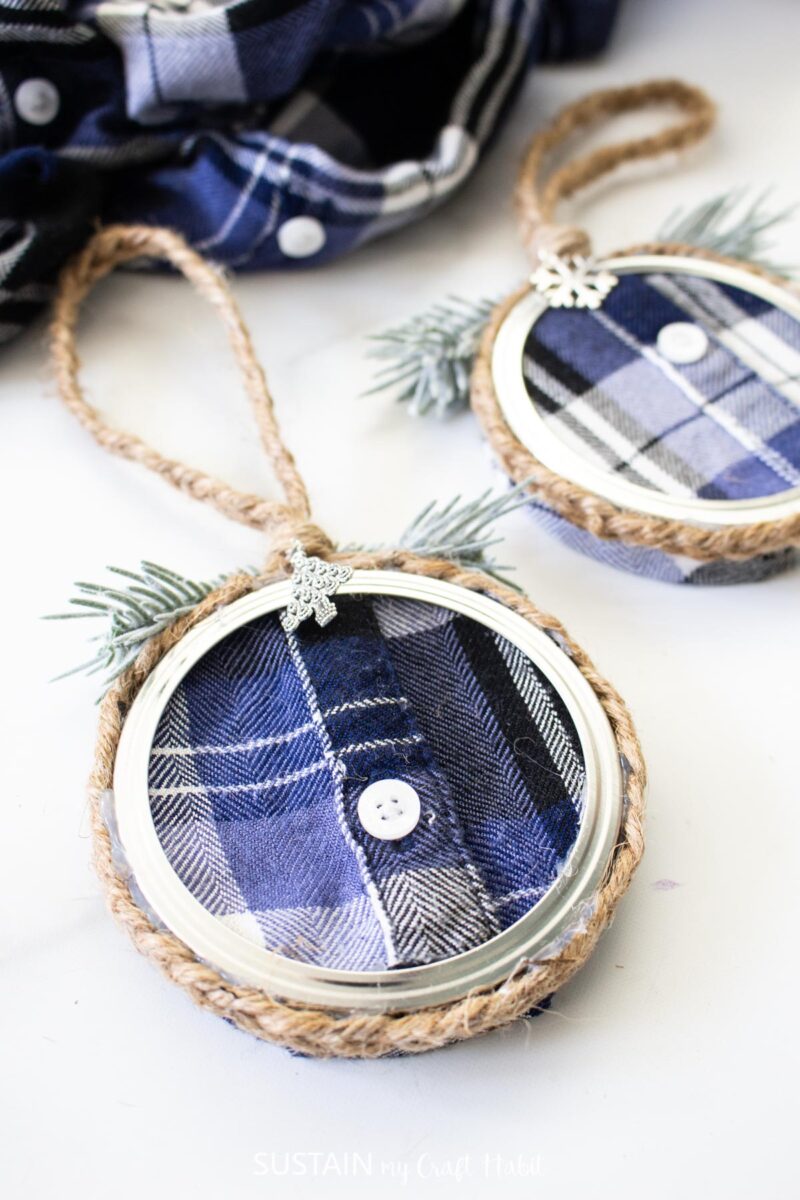
Place and center the lid over the top of the placket on the button-up shirt. Trace the lid with a pen, chalk, or wax.
Cut out the circle and glue the overlapping placket together with the hot glue gun.
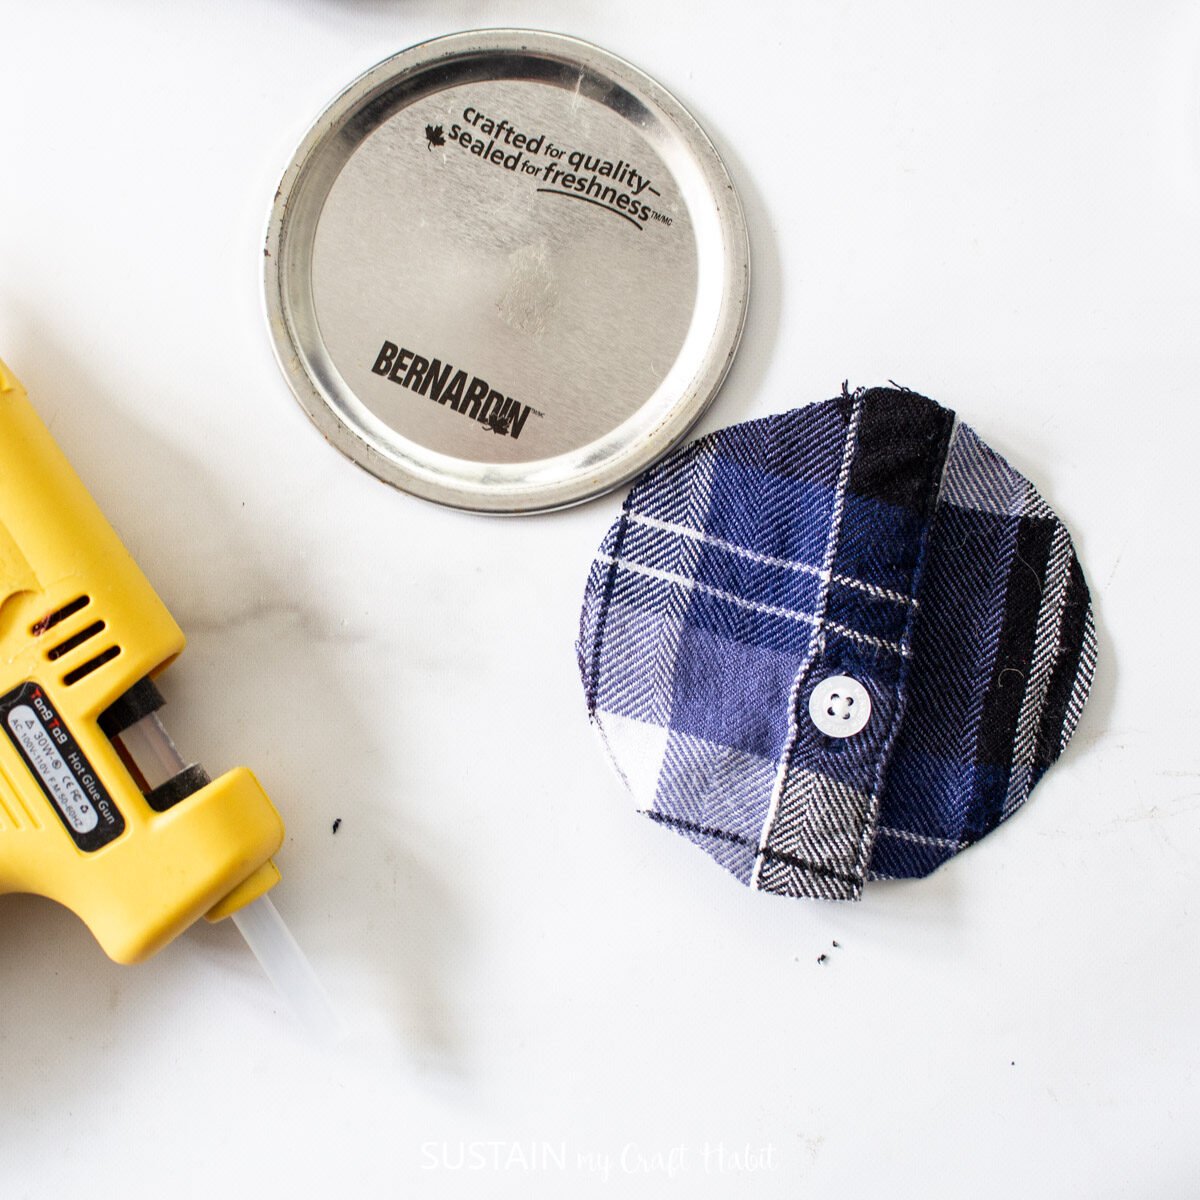
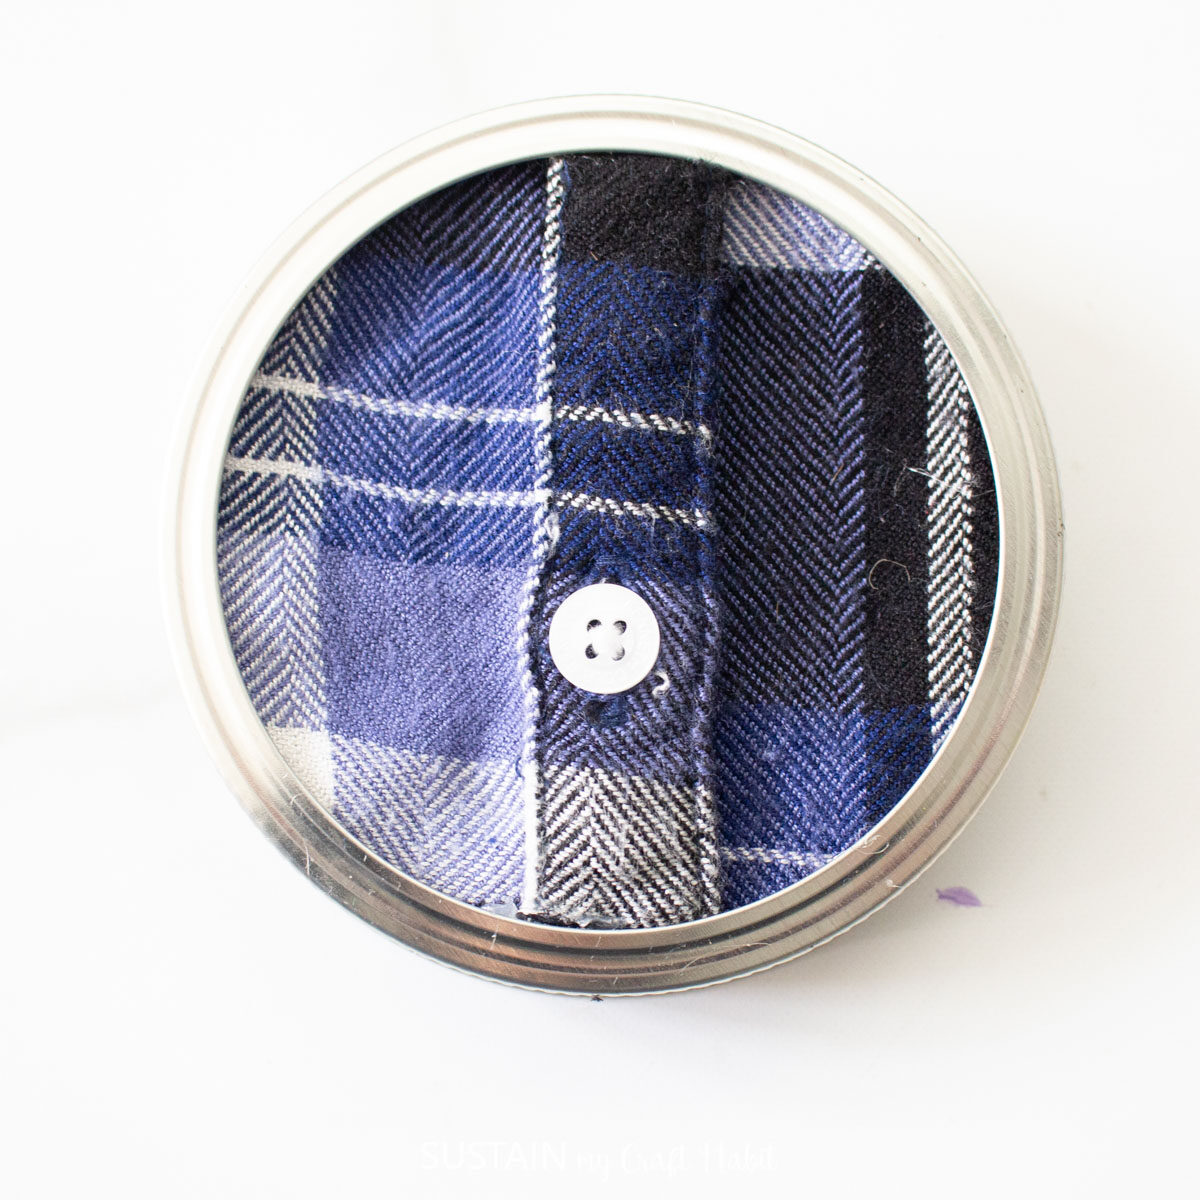
Place and glue the circle onto the lid and put it aside for time being.
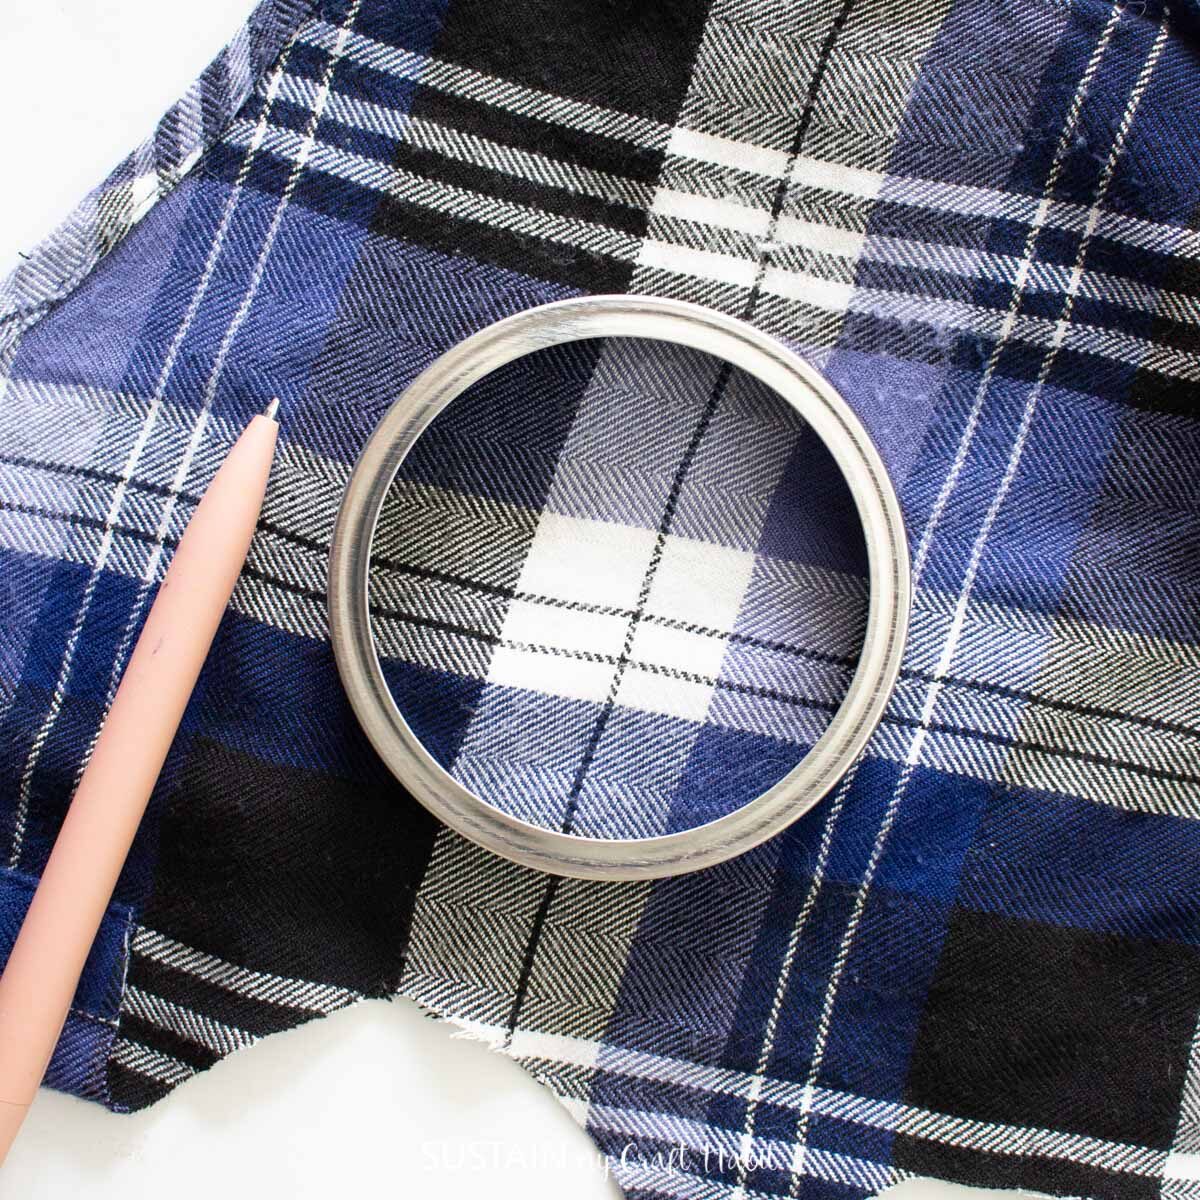
Use the screw band to trace another circle out of the shirt. Cut the circle out larger than the size of the screw band to have enough fabric to overlap the edges.
Place the covered lid into the screw band and glue it in place.
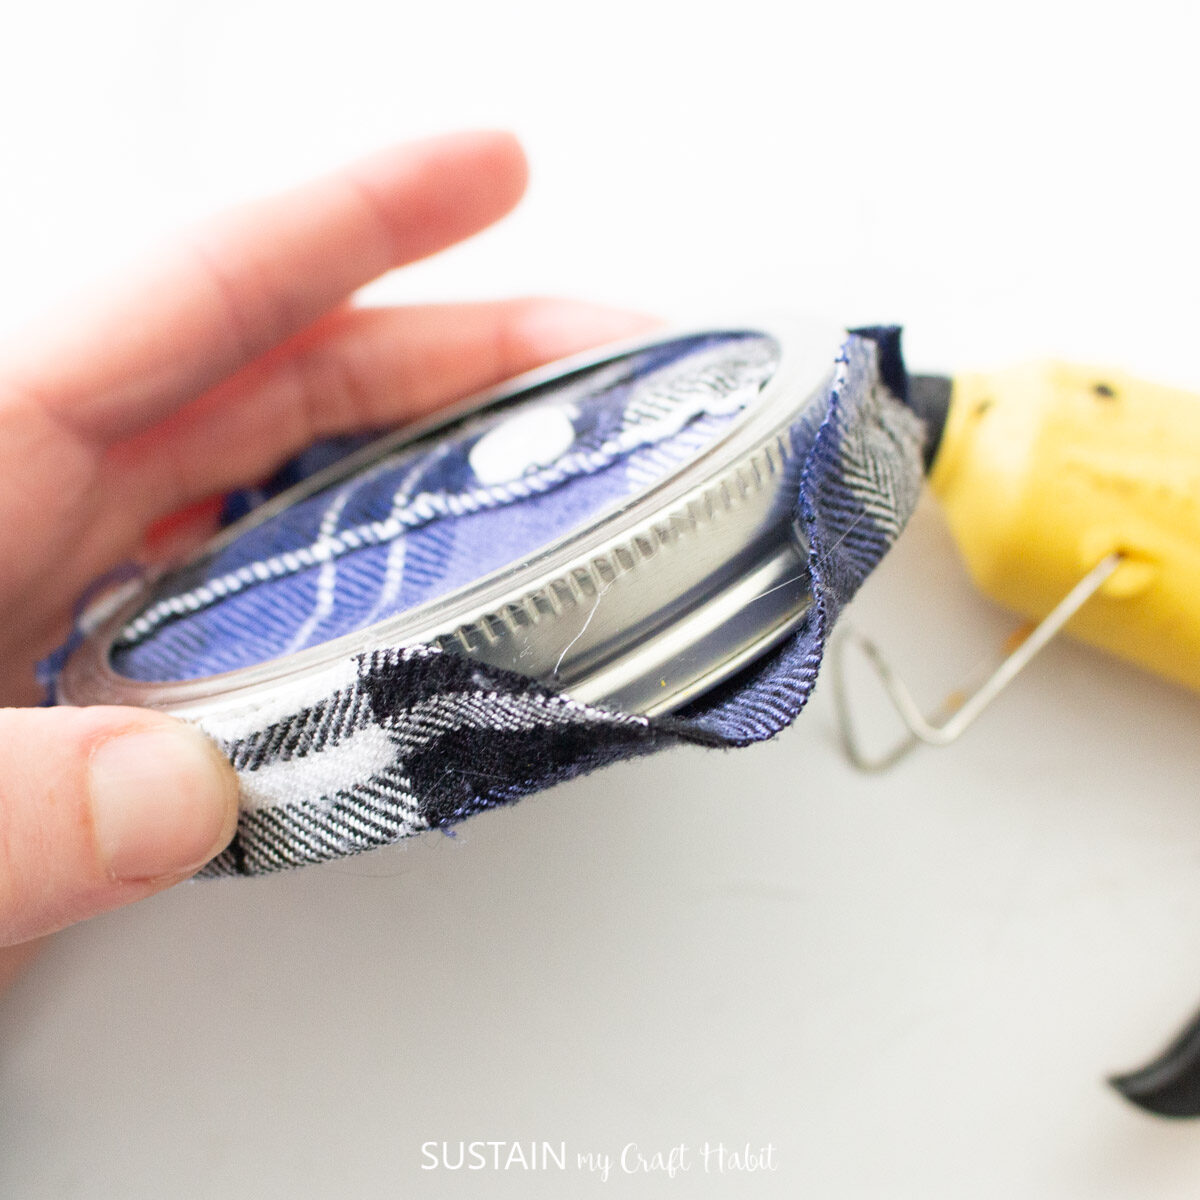
Use the other circle cut out to cover the back side of the ornament. Fold the edges over the band and glue them in place. Trim the excess if it extends past the top of the screw band.
Cut three long strands of twine. Secure one end and braid the three strands together. You’ll need the braid long enough to wrap around the perimeter of the ornament and to create a 4-5” long hanging loop.
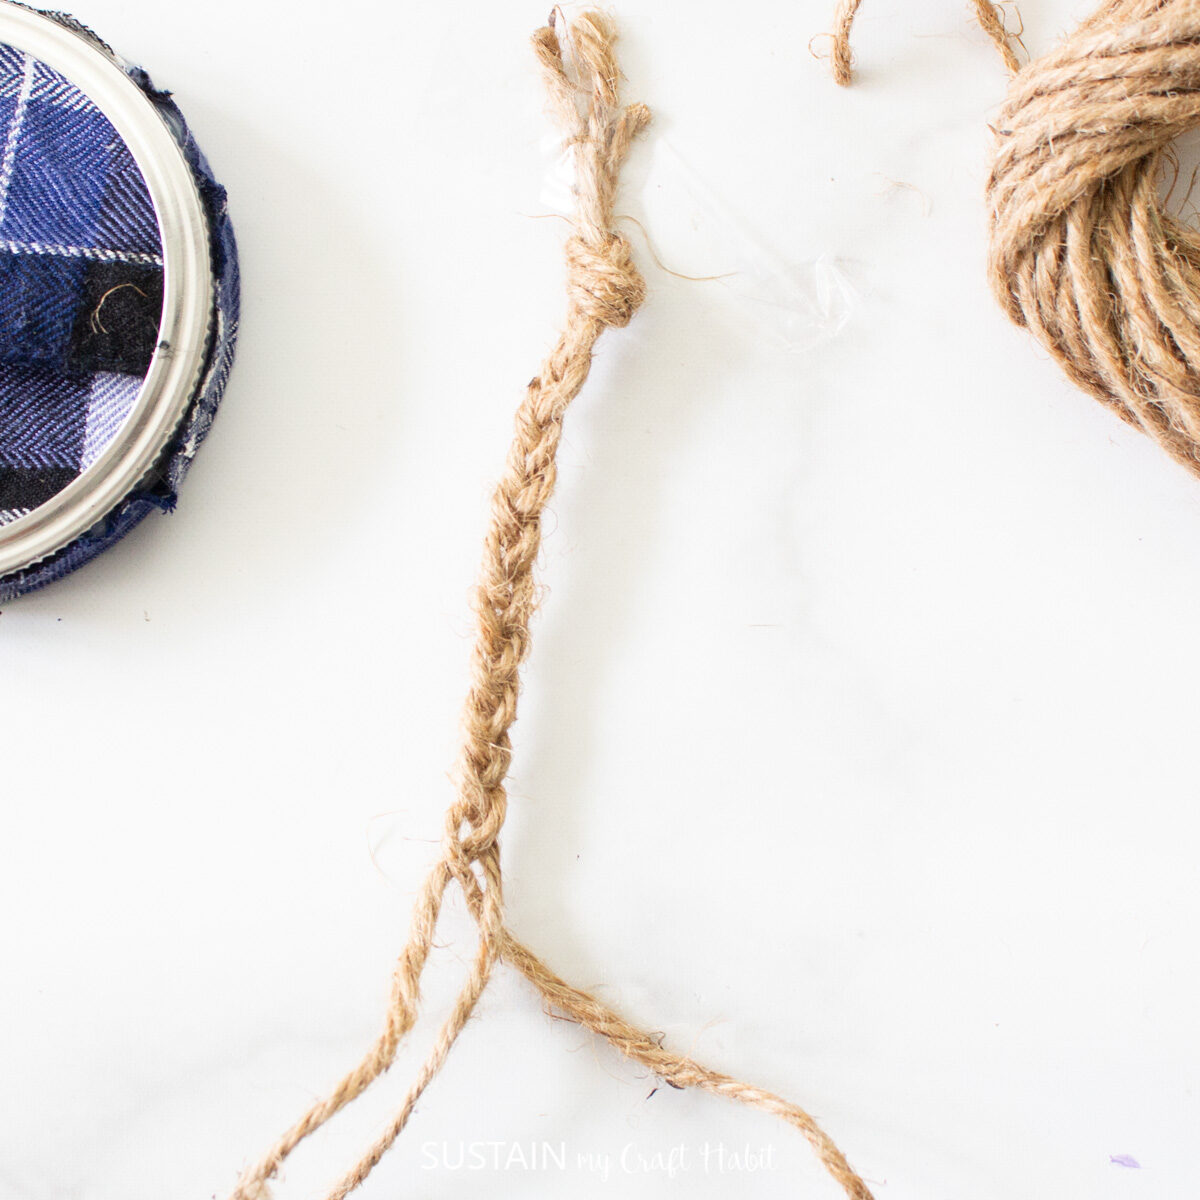
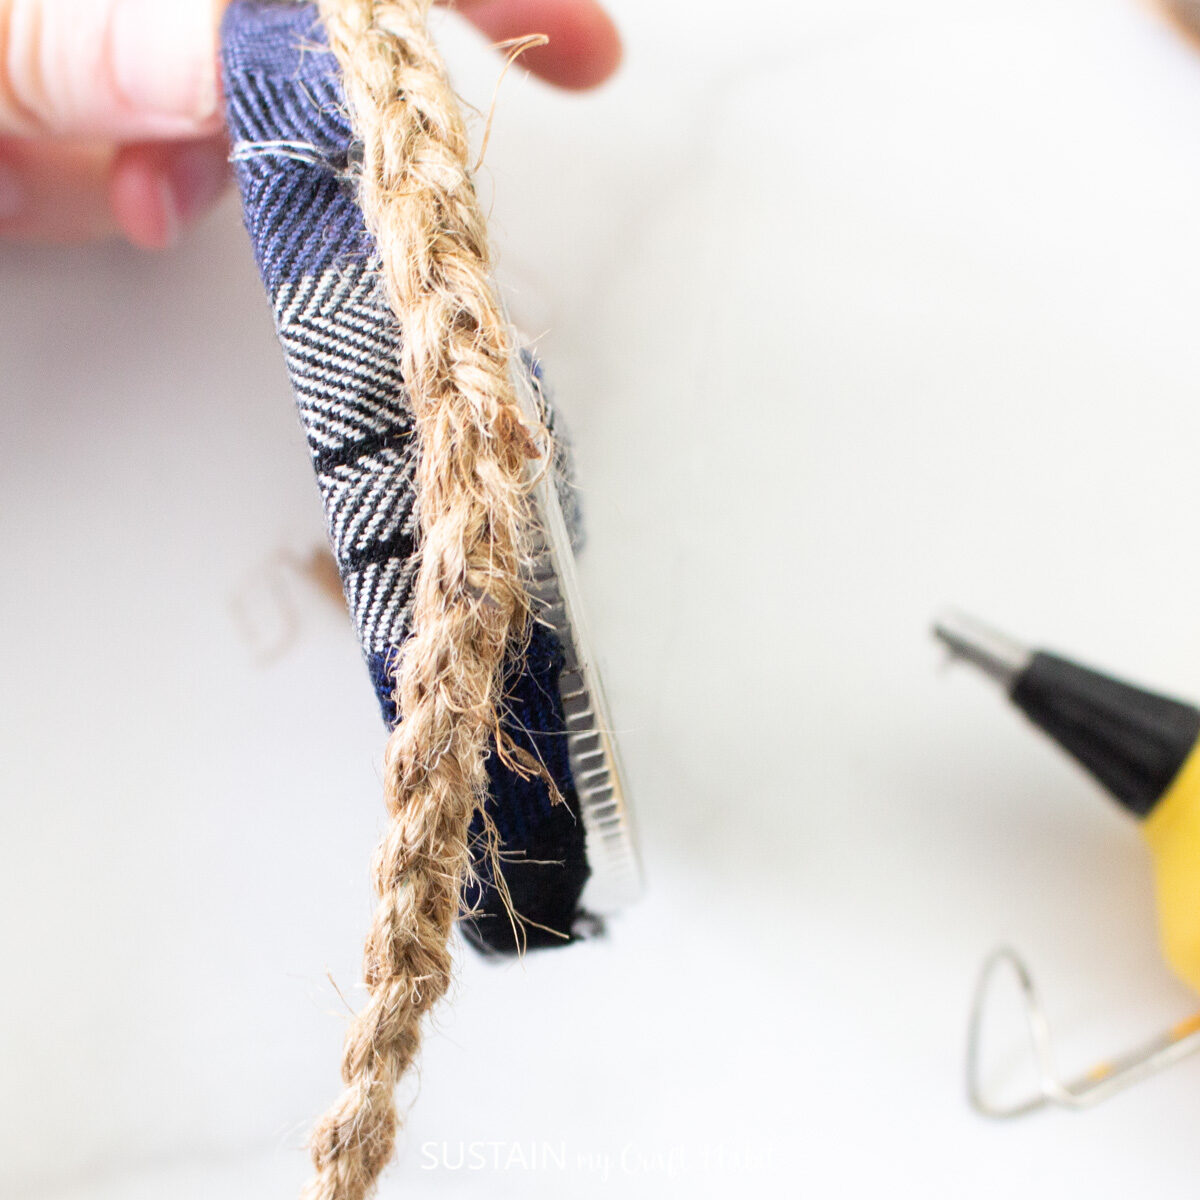
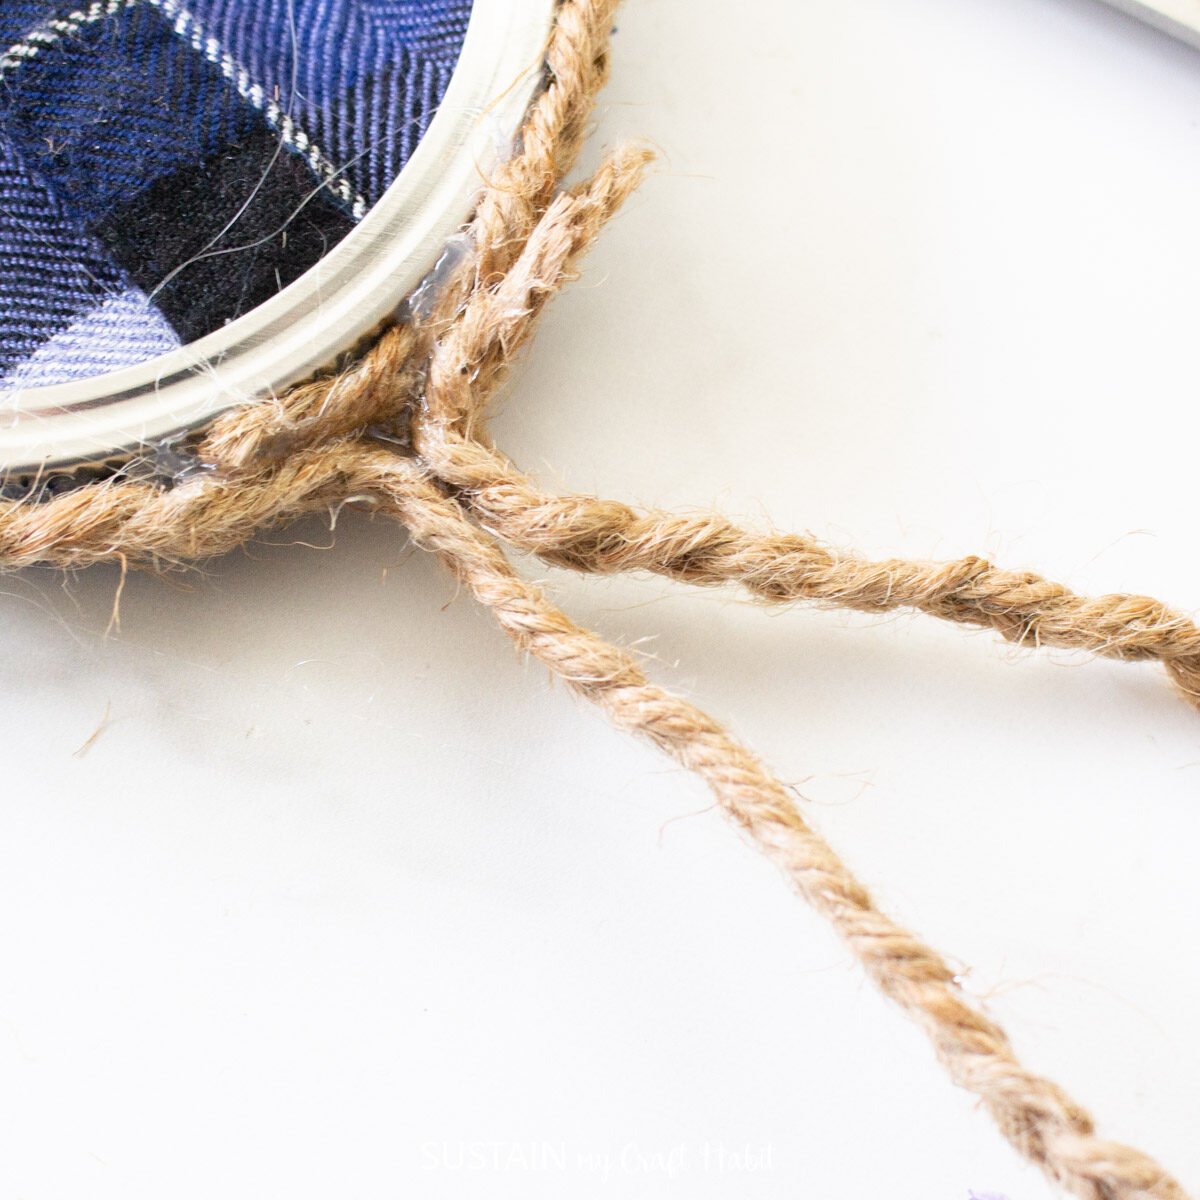
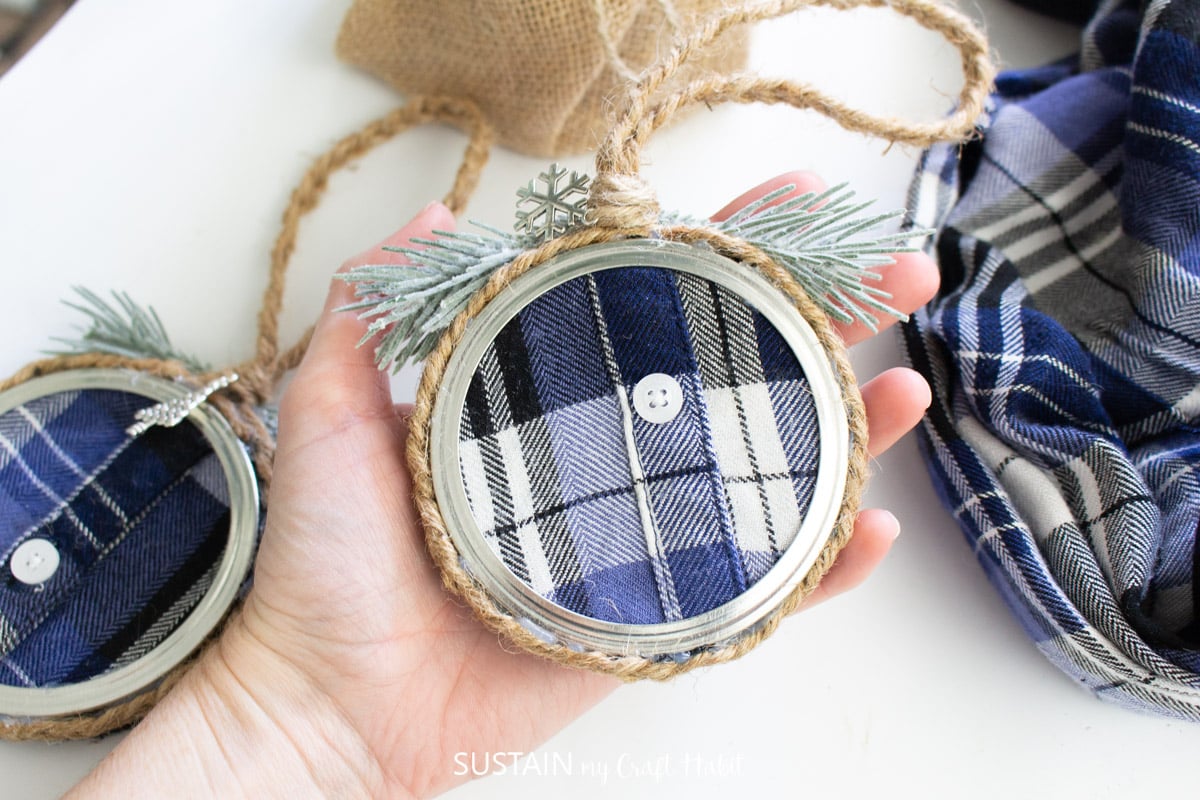
Glue the braided twine around the covered screw band forming a large loop for hanging at the top.
Wrap and tie another piece of twine around the base of the loop and attach a charm as well if you have one.

Lastly, glue some faux greenery to the top of the ornament on either side of the hanging loop.
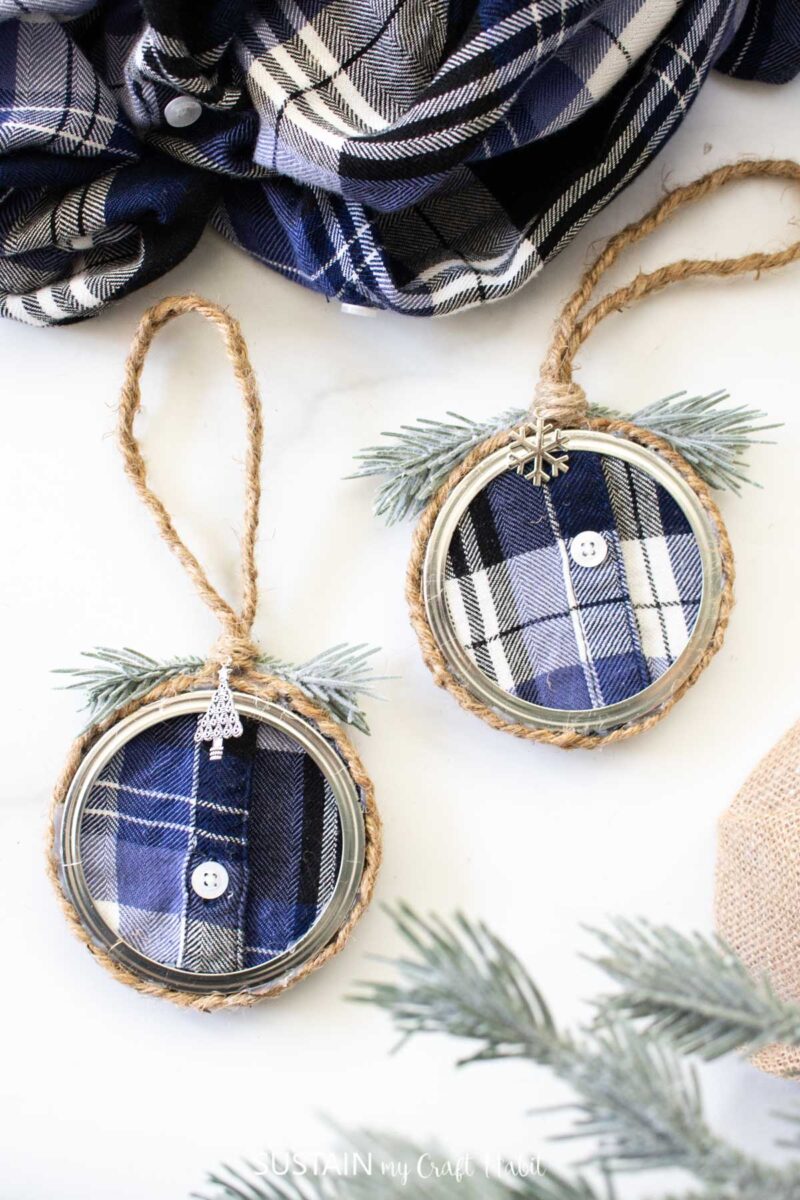
This image shows the back side of the completed memory ornament, as you can see it’s neat and tidy!

How did your new keepsake ornament turn out? Make sure to show it off to us! Tag us on Facebook or Instagram– we can’t wait to see it!
If you enjoyed this project, be sure to check out our collection of 60 fun craft ideas for adults!
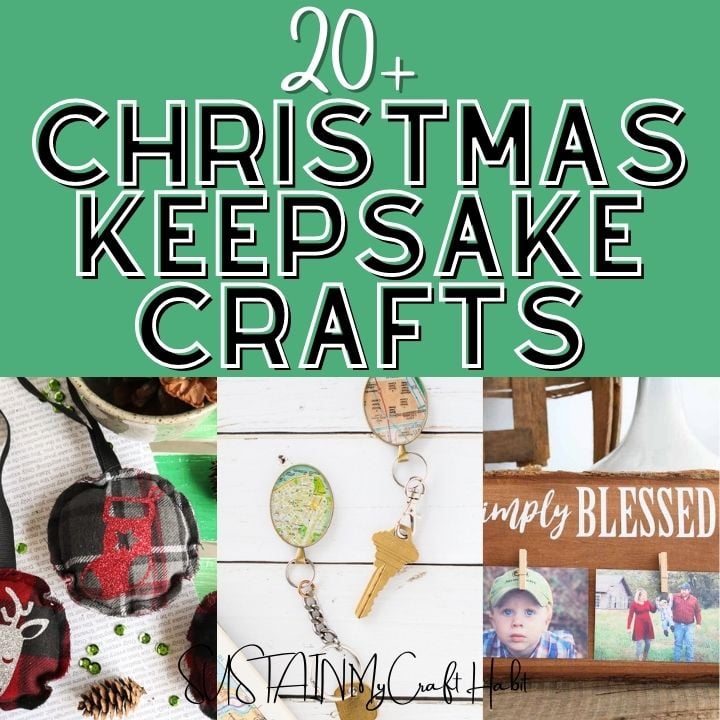
More Thoughtful Keepsake Craft Ideas
No matter the occasion or time of year, we have plenty of ideas for making one-of-a-kind keepsake crafts and gifts including memory bear sewing patterns, adorable memory bunny, engraved slate coaster and the ideas below:

Like it? Pin it to save for later!

Making Keepsake Memory Ornaments with Clothing
Materials
- Woven button up shirt
- Large canning jar lid and screw band
- Fabric scissors
- Hot glue gun
- Twine
- Silver Winter-themed charm (optional)
- Decorative greenery (optional)
Instructions
- Place and center lid over top of placket on button up shirt. Trace lid with pen, chalk or wax.
- Cut out circle and glue overlapping placket together with hot glue gun.
- Place and glue circle on to lid and put aside for time being.
- Use the screw band to trace another circle out of the shirt. Cut the circle out larger than the size of the screw band to have enough fabric to overlap the edges.
- Place covered lid into screw band and glue in place.
- Use the other circle cut out to cover the back side of the ornament. Fold the edges over the band and glue them in place. Trim the excess if it extends past the top of the screw band.
- Cut three long strands of twine. Secure one end and braid the three strands together. You’ll need the braid long enough to wrap around the perimeter of the ornament and to create a 4-5” long hanging loop.
- Glue the braided twine around the covered screw band forming a large loop for hanging at the top.
- Wrap and tie another piece of twine around the base of the loop and attach a charm as well if you have one.
- Lastly, glue some faux greenery to the top of the ornament on either side of the hanging loop.


Would like to see the back side of the ornament once it is finished.
Hi Susan, I added an image showing the back side of the ornament. Thankyou for asking, it is helpful to see both sides.
Recycle old Christmas cards by cutting a circle for the back side instead of the second piece of fabric.
Oh I love that idea! Thank you so much for the suggestion.
@Jane and Sonja, I have a great Christmas card collection of mainly family and friends. I never know what to do with them. I might just take this idea and use some cards from close family and friends. I have also used cookie cutters and cut out pictures of family in the shape, used hot glue to secure them a to the back of the cutter and hung them with a little ribbon on my tree. Always looking for new ideas for my memories. Thanks!
I would like to print out the directions but can’t.
Hi there, I just added a recipe card to the bottom of the post so you’ll be able to easily print the instructions. Hope this helps! Many thanks, Sonja
I plan to put a photo of my departed love one , wearing the clothing item as the back. It will make the ornament personal on both sides.
That is a wonderful idea, and thankyou for sharing it. I think others would love the suggestion as well.
Just finished making these as gifts using one of my grandfather’s flannel shirts 💕 It is our first Christmas without him and these will help make sure his memory is with us. Thank you!
I will add a layer of foam between the shirt and the lid to give it a more rounded appearance, but I Love these and am VERY grateful for the idea. Thank you so much! <3
Awwwww. I Iove these so much. My mom lost her dad and brother last year so I’m going to make these for her for Christmas. Thanks for the inspiration!
Cheers,
Jenn // http://www.shawave.com
Thank you for sharing this tutorial. I love these keepsake ornaments made from shirts. My husband passed away recently. I saved some of his clothing, which I will use to make an ornament for each of our children and grandchildren. I plan to add a charm that’s fitting to the individual receiving the ornament.
How do you make a tag with your loved ones signiture?
Having trouble getting the shirt to fit the whole for the back it seems a lot more material than ring any suggestions
@Kim Price,
You could also put a picture of the person the shirt (fabric) belonged to at one time on the back of the ornament. Maybe even a picture of them wearing that particular shirt.
I am planning on making these for the family. Do you have a verse to go with this? I’ve seen the one for pillows and bears that say “when you hold me” but they won’t be holding the ornament. Do you have something that says when you see me? thanks so much!!