Cricut Design Space: Help with Letter Spacing
If you’re wondering how to join individual letters to create a custom phrase or word within Cricut Design Space, then you’ll find this post helpful!
We recently created a couple of projects using the Cricut Maker that required either a custom saying like this fun bathroom sign, DIY sign for home or personalized names like this beautiful serving platter (shown below). Being fairly new to the Cricut world, it took us a bit of time to figure out how to achieve our own beautifully written lettering that wasn’t a ready-to-use project template.
Design Space has hundreds of creative craft projects to choose from but sometimes you just need something specific or personalized that you can’t find anywhere else. When you choose a cursive font (such as Pen and Ink or Adalaide for example) within Design Space, you will need to manually make some adjustments to the letters to join them together prior to cutting.
Silly Bathroom Signs with Cricut

I created this fun wood sign for my recently renovated cozy contemporary bathroom to sit over the toilet area. I was inspired by the funny bathroom signs available on Amazon but wanted to make my own with my Cricut Maker and some scrap wood.
How to Adjust Letter Spacing in Cricut Design Space: Bathroom Sign Example
Select New Project in Design Space. Click on the Text button on the left side panel.
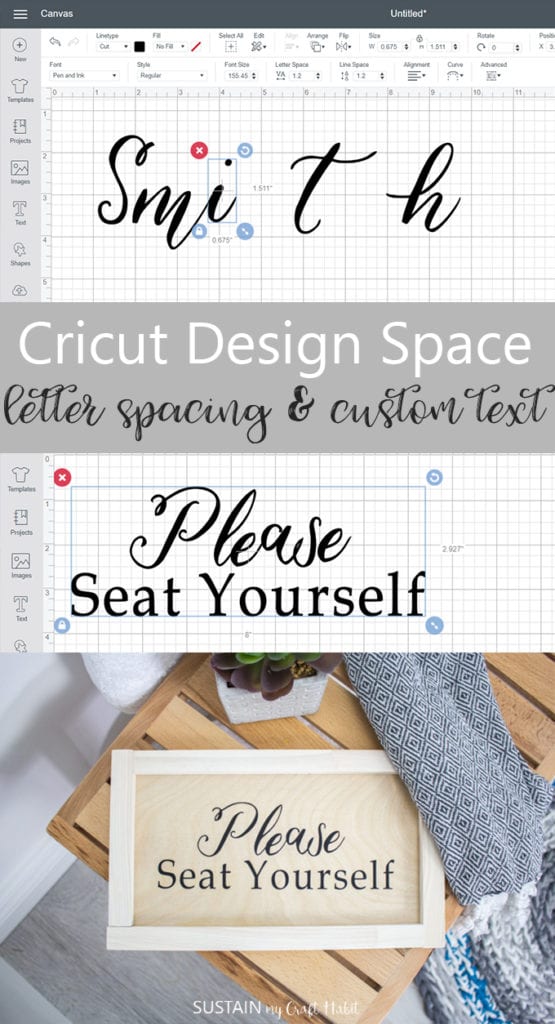
Type your custom text: Please

Click on the Text button again and type your next custom text: Seat Yourself
Click on the word Please and open the font drop down menu. Select Pen and Ink font in regular style from the options available. As you can see, even when the font selected is cursive, the letters remain separate.

With Please text highlighted, select “ungroup letters”.

Then shift each individual letter right up next to the prior one. And continue until all letters in the word are connected.

When happy with the letter spacing, select the word Please again and click on the Weld button at the bottom right corner to join the letters.

For the words “Seat Yourself”, select Book Antiqua font in regular style from the options available.
Adjust the size as you need. For my particular project, I sized the “Please” to 5” wide by 1.852” high and the “Seat Yourself” to 8″ wide by 1″ high.

Align the text so it is centered.
Lastly, click on both texts and select the Weld button again to join the words together.


Once this is done, you’re ready to move onto the next step: cutting out the text using the Cricut Maker.

For the rest of the how-to instructions for making this silly wood sign, head over to the original post.
Pretty Personalized Serving Platters

We also designed these pretty serving platters as gifts for guests to a party we were hosting. Each guest received their own platter with their surname on it in black glitter vinyl. We used the same Pen and Ink font that I used for my bathroom wood sign.
How to Adjust Letter Spacing in Cricut Design Space: Personalized Serving Platter Example
Select New Project in Design Space.
Click the Text button and type your custom text: Smith

Click off of the text. Click on the text and open the font drop down menu. Search for Pen and Ink font in the search box.

Select Pen and Ink font in regular style. As you can see, even when the font selected is cursive, the letters remain separate.

With the text highlighted, click on the Ungroup button in the upper right corner (or under the advanced button in the upper toolbar).

Next, shift each individual letter right up next to the prior one. Continue until all letters are connected.


Highlight the text by clicking the mouse and sweeping it over the text. Click on the Weld button in the bottom right corner to join the letters together.


Adjust the size as you need.

Once this is done, you’re ready to move onto the next step: cutting out the text using the Cricut Maker.

We’ll be sharing the rest of the how-to instructions for making these pretty personalized serving platters very soon, stay tuned!
Now that you know how to create your own personalized text, you can customize it to fit all of your project needs. Happy crafting!