How to Make Pine Cone Flowers (with Video!)
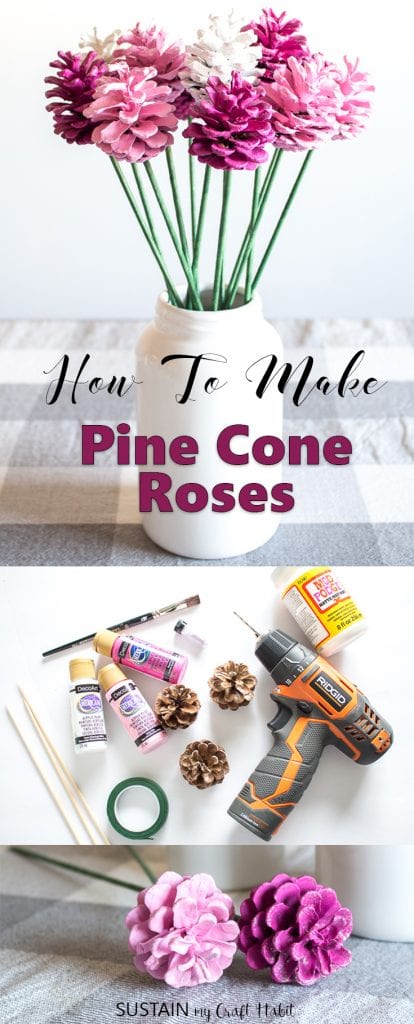
I would love to keep fresh cut flowers in my home every day if I could, who wouldn’t? But since fresh cut flowers are not always possible, I think I may have found an alternative with these colorful pine cone flowers. Learn how to make your own pinecone roses with our step-by-step DIY tutorial!

We’re so excited to be joining over two dozen bloggers from across Canada to bring you 30 sweet ideas to make, bake and create for Valentine’s Day. Thank you so much to Jo-Anna from A Pretty Life in the Suburbs blog for coordinating this inspiring blog hop. Be sure to check out all the amazing projects at the end of this post.

How to Make Pine Cone Flowers
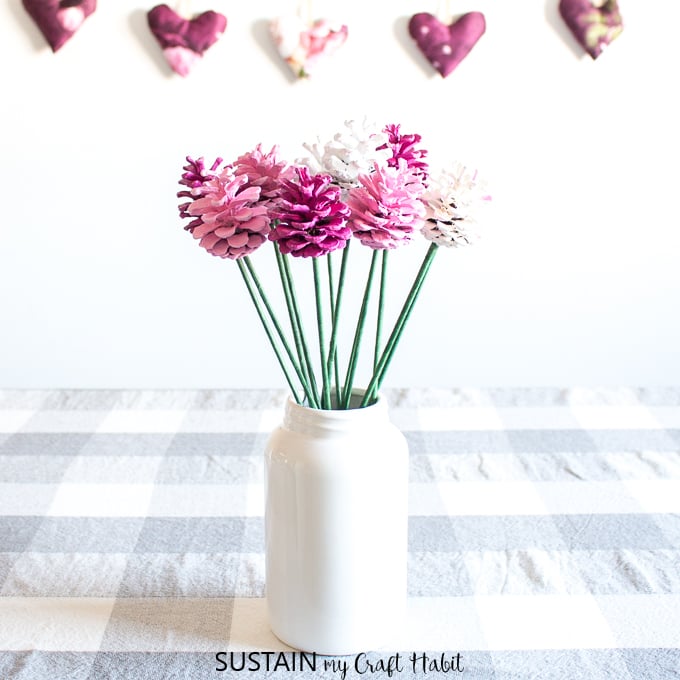
For our contribution to this blog hop, we wanted to show you how to make pine cone roses! You can arrange them together in a bouquet or leave them on their own as single delicate roses.
And since these pine cone flowers will never wilt, they can be reused as decorations throughout the year, such as for Valentine’s Day, Mother’s Day or some other special occasion, like a bridal shower or wedding. We even made a pine cone bouquet for Halloween in orange, black and white!
These pine cone roses are one of those really fun nature crafts that you can do on your own as part of girls crafting night. Of if you have a bounty of them, learn how to make a pine cone wreath with just three supplies!
And if you’re looking for more creative crafting ideas, check out our top picks of craft kits for adults.
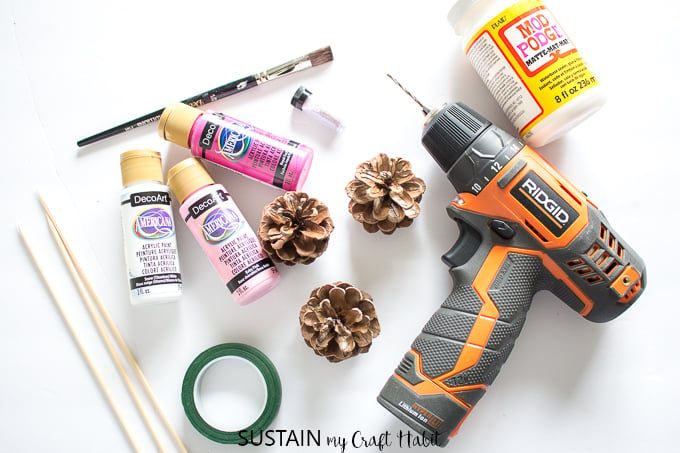
Supplies Needed to Make Pinecone Roses:
Disclosures: We have not received any compensation for this post. However, we have (and continue to) receive products from DecoArt. Also, this post continues affiliate links for your shopping convenience. You can find our full disclosure policy here.
- Pine cones, cleaned for crafting (you can find some in our Etsy shop)
- DecoArt Americana Acrylics in Baby Pink, Royal Fuschia, Titanium White
- Paint brush
- Wooden skewers
- Floral tape, green
- Drill with small drill bit (same diameter as wooden skewer)
- Clear drying craft glue (we used Mod Podge in matte finish)
- Glitter, extra fine
DIY Pinecone Flowers (Video Tutorial):
We have a video of how to make the pinecone flowers for you here, using the same process (just different colors). If you prefer the photo tutorial, scroll on!
How to Make Pine Cone Roses:
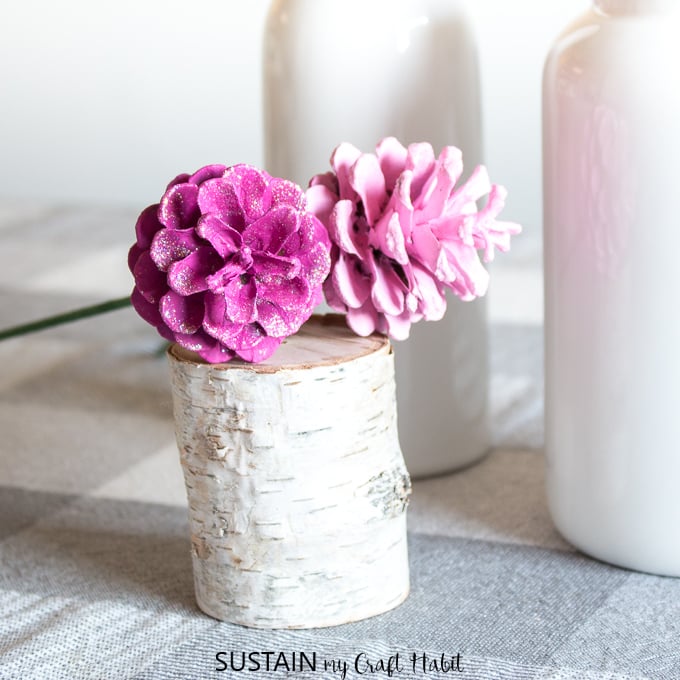
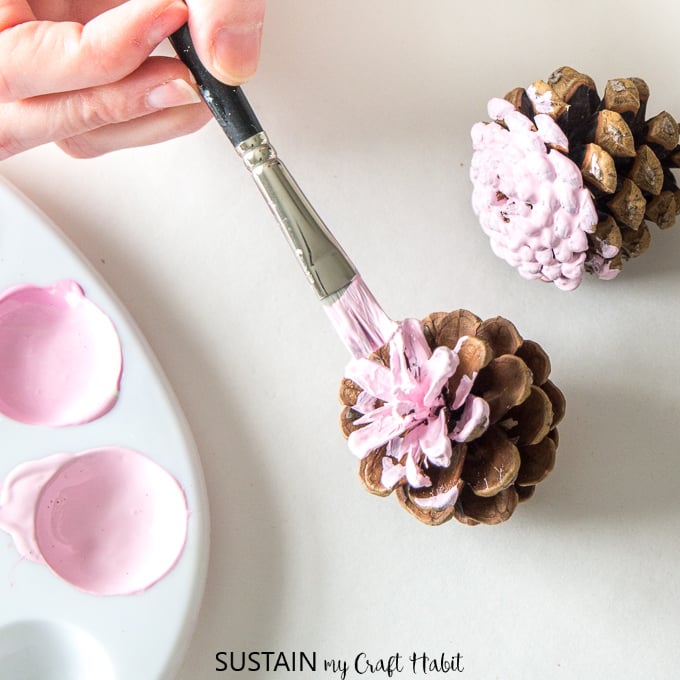
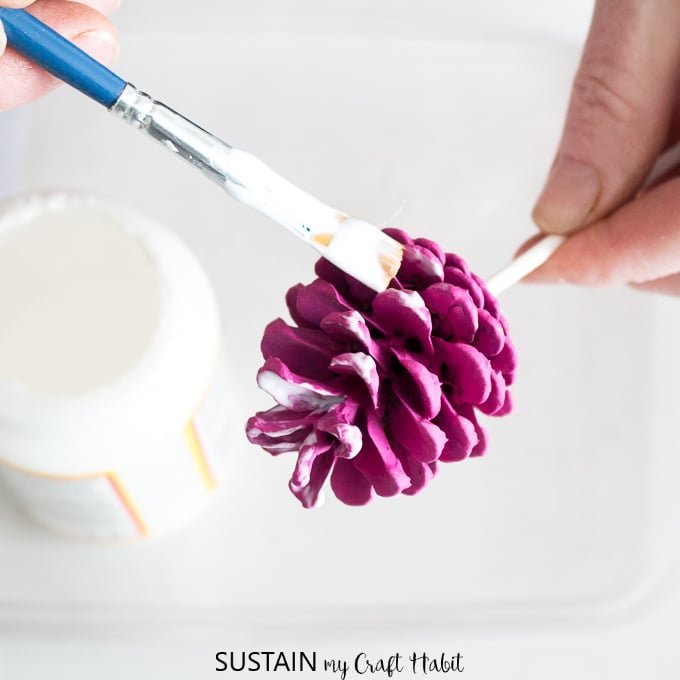
Using a small, flat tip paint brush, paint each pine cone in the colour of your choice. Put aside to dry between coats and apply as needed to achieve desired coverage.
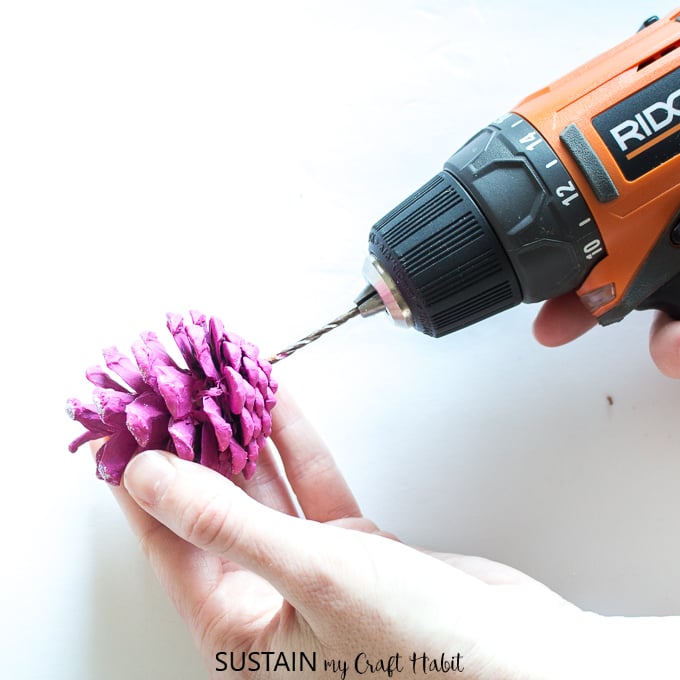
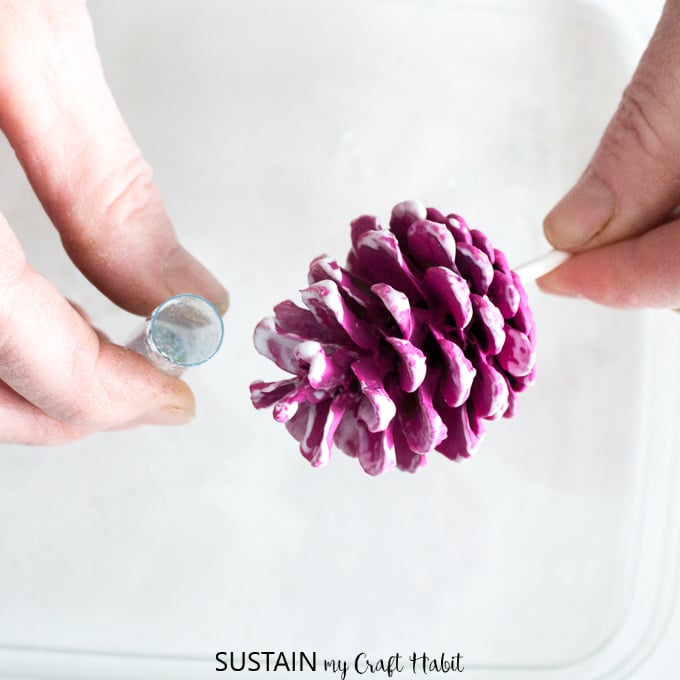
Once dry, drill a small hole about ¼” deep into the bottom of the pine cone using a small size drill bit (the same size as the diameter of the wooden skewer).
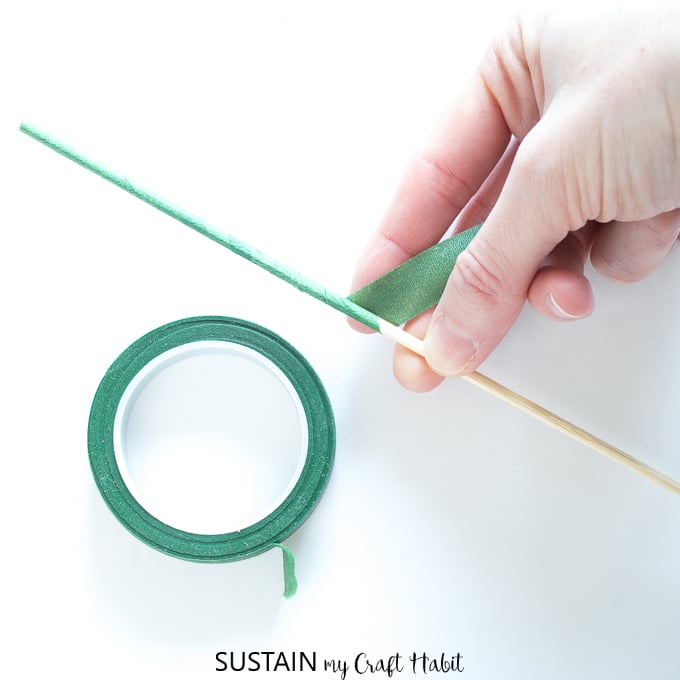
Wrap the wooden skewer with green floral tape starting at one end and finishing at the other.
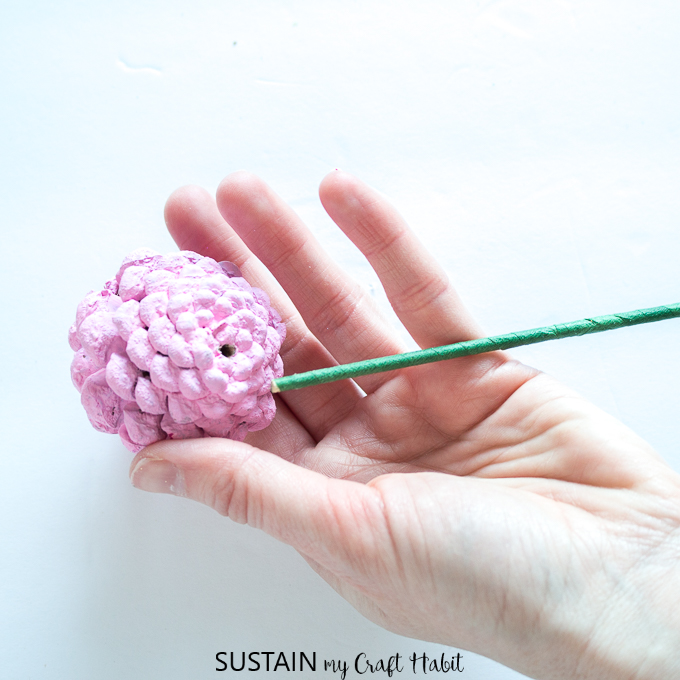
Insert one end of the wrapped skewer into the drilled pine cone. Add glue if necessary to hold together.

And who doesn’t love a little glitter? You can also add some fine translucent glitter to your pinecone flowers by applying clear drying craft glue to pine cone tips and then pouring glitter over top. Shake off the excess glitter and set aside until dry.
Arrange the pine cone roses inside a vase for a beautiful alternative floral bouquet.

We hope you’ve enjoyed this tutorial on how to make pine cone roses. I’m already thinking we’ll have to make more pinecone flowers for Christmas as well!

We definitely have a thing for crafting with pine cones, as you can probably tell from our many pine cone projects, such as our rustic pine cone wall hanging and our easy DIY burlap wreath.
Additional Valentine’s Day Ideas
As promised, here are 30 beautiful ideas to make, bake and create for Valentine’s day…

Valentine’s Day Cherry Pie by Jo-Anna of A Pretty Life
Valentine’s Triple Berry Breakfast Parfait by Joanna at Lazy Moms Blog
Valentine’s Day Mini Bouquet with Printable Wrap by Lucy of Craftberry Bush
DIY Iron-On Mini Tote Bags for Galentine’s Day by Joann of Woman in Real Life
DIY Clay Valentine Heart Wall Hanging by Jen of Kitchen Counter Chronicles
Valentine’s Day Smoothie Bowl by Kristeena of Motherhood in Stilettos
Chunky Crochet Heart Banner by Christina of The DIY Mommy
‘I’m Stuck On You Valentine’ Free Printable by Chandra of HashtagBlessed Blog
DIY Love Tees by Colleen of Lemon Thistle
Red Velvet Cheesecake by Kim of Kim Power Style
Custom Floral Dishware DIY with Temporary Tattoos by Christine of Amidst the Chaos
Valentine’s Day Keto Cheesecake by Thalita of The Learner Observer
How to Host a Mother/Daughter Galentine’s by Kelsey of Kelsey Diane Blog
Free Printable Farmhouse Style Valentine’s Day Cards by Shannon of AKA Design
GALentine’s Day Tea Party by Shauna of Satori Design for Living
Valentine Heart Necklace by Christine of The DIY Dreamer
Simple Valentine’s Day Decor by Alicia of A Burst of Beautiful
Valentine’s Sushi Recipe by Stefania of From the Playpen
Valentine’s Day Decor by Dannyelle of Life is a Party
Valentine Countdown for Kids by Heather of Raising Memories
Love Sign by Meagan of Row House Nest
Valentine’s Day Kindness Countdown Calendar by Jen of Rambling Renovators
Rustic Valentine’s Day Decor by Sarah of The Project Pile
Peach Raspberry Crisp by Brittany of My Daily Randomness
How to Make Pine Cone Roses by Jane & Sonja of Sustain My Craft Habit
Handmade Paper Gift Boxes by Jessica of The Vanderveen House
DIY Valentine’s Day Pouch by Lidia of Design Inside the Box
Valentine Oreo Cookies by Kendra of Joy In Our Home
Valentine’s Day Lunch Idea by Adriana of Chaos and Caffeine
Like it? Pin it for Later!


How to Make Pine Cone Roses
Materials
- 12 Pine cones
- Acrylic paint in light pink, dark pink, white
- Paint brush
- Green wooden skewers
- Floral tape
- Drill with small drill bit
- Clear drying craft glue
- Extra fine white glitter
Instructions
- Using a small, flat tip paint brush, paint each pine cone in the colour of your choice.
- Once dry, drill a small hole about ¼” deep into the bottom of the pine cone using a small size drill bit (the same size as the diameter of the wooden skewer).
- Wrap the wooden skewer with green floral tape starting at one end and finishing at the other.
- Insert one end of the wrapped skewer into the drilled pine cone. Add glue if necessary to hold together.
- Glue some fine translucent glitter to the painted pine cones if desired.
Pine cone roses!!! What a great and cute idea!! Love it! Pinned!
Thank you, Christine!
What a lovely idea. We love crafting with pine cones.
Glad we’re not the only ones! We just can’t get enough of pine cone crafts:)
This is so SMART!!! Valentine’s Day is at a weird time of the year where (at least in Ottawa), it’s still frigid and snow covered! Love this!!
Same here, that’s why it’s nice to bring in some color this time of year!
What a great and simple idea! I love having flowers around my home all year round, and these are the perfect solution!
Totally! I’m going to enjoy seeing these in a vase all year round.
This is such a cute idea! My girls would love to make these with me, too!
You come up with some of the cutest, and yet so simple, crafts I have seen. I love these, and the different shades of pink
We don’t normally craft with variations of pink so it was a real treat for us!
This is soooo cute! Love the pinecones. So creative!
Thank you so much, Adriana. Glad you like them.
You guys are so clever, what a sweet idea!
Thank you, Laurie!
Oh, that little touch of glitter – so smart, good call! Can’t wait to make these with my kiddos.
We couldn’t resist the glitter!
So cute!!!!!! These would make for a great classroom craft!!!
The kid’s could make these for Mother’s Day. Would just need to predrill the pinecones for the kids beforehand.
What a great idea and I love the colours you used too! So cute.
Thanks, Dannyelle! Was so fun to use pink in our crafting for a change,
Love this craft idea! Perfect to do with the kiddos 🙂
Absolutely Beautiful!! I’m in Love with pinecones..all sizes..lol.. are those pine cones you used Mogal pines? I ask because it’s hard to tell what size is right for some projects. I’ve got sizes from tiny redwood cones to huge Digger pines. And I’m loving doing my thing with them all. The Rose’s will be perfect for Valentines & Mothers day!! I also think I’m going to make a few Red White & Blue for 4th of July, I thought it would be a fun table setting. Thanks for such great ideas and simple as well..I enjoy your blogs. Sincerely Daralynn Wagerle (of Grants Pass, Oregon)
Thank you, Daralynn! You sure know your pine cones!! For these roses, yes, I’d say they were from mogal pines. Each pine cone fit in the palm of my hand or in other words, roughly the size of an actual large rose. But I think any size would do or a mix of sizes would also look beautiful!
I loved your tutorial about painting pinecones. I haven’t been able to see it again. It is either the Halloween video or ads? Please advise.
Thankyou, Lynne. Yes, it is the halloween video that is included in the post. The video is also here – https://sustainmycrafthabit.com/making-pine-cone-flowers/ for your reference.
I have so many pine cones and had no ideas what to do with them – this is a great idea
So glad you like it!