
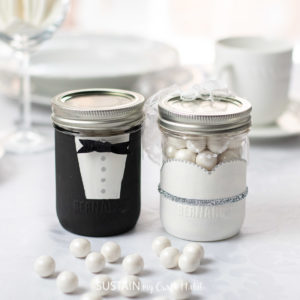
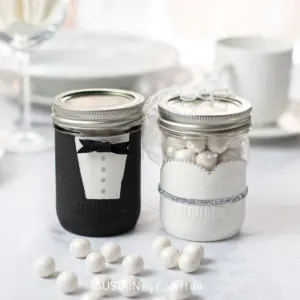
Dum dum de dum, here comes the bride and groom DIY wedding favors using glass mason jar mugs, and loads of creativity. If you’re looking for wedding ideas, you’ll love these mason jar favors with this crafty tutorial for making a set of elegant mason jar wedding favors to give as a guest wedding gift on your special day.
Disclosure: This post is sponsored by Bernardin Canada. All opinions are our own.
DIY Wedding Favors using Glass Jars
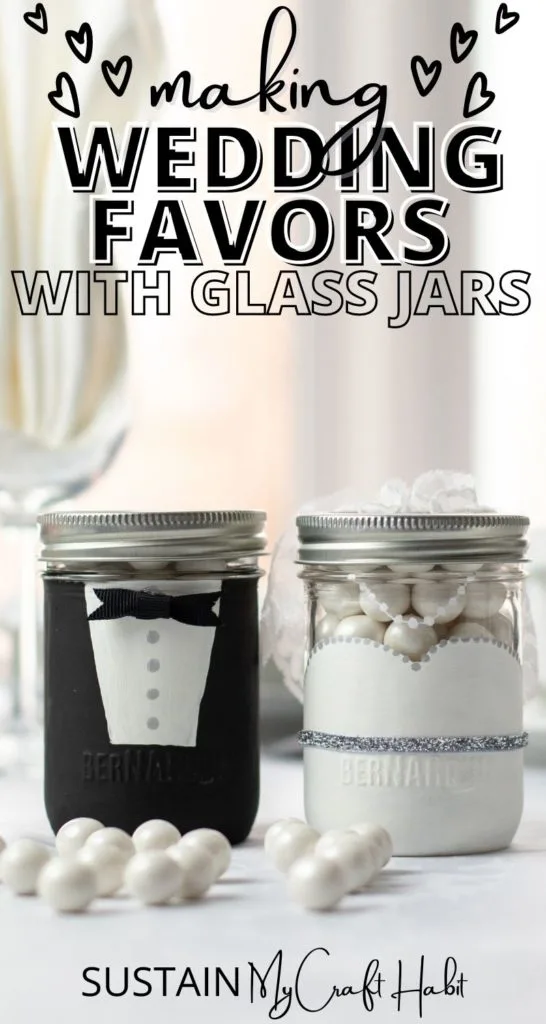
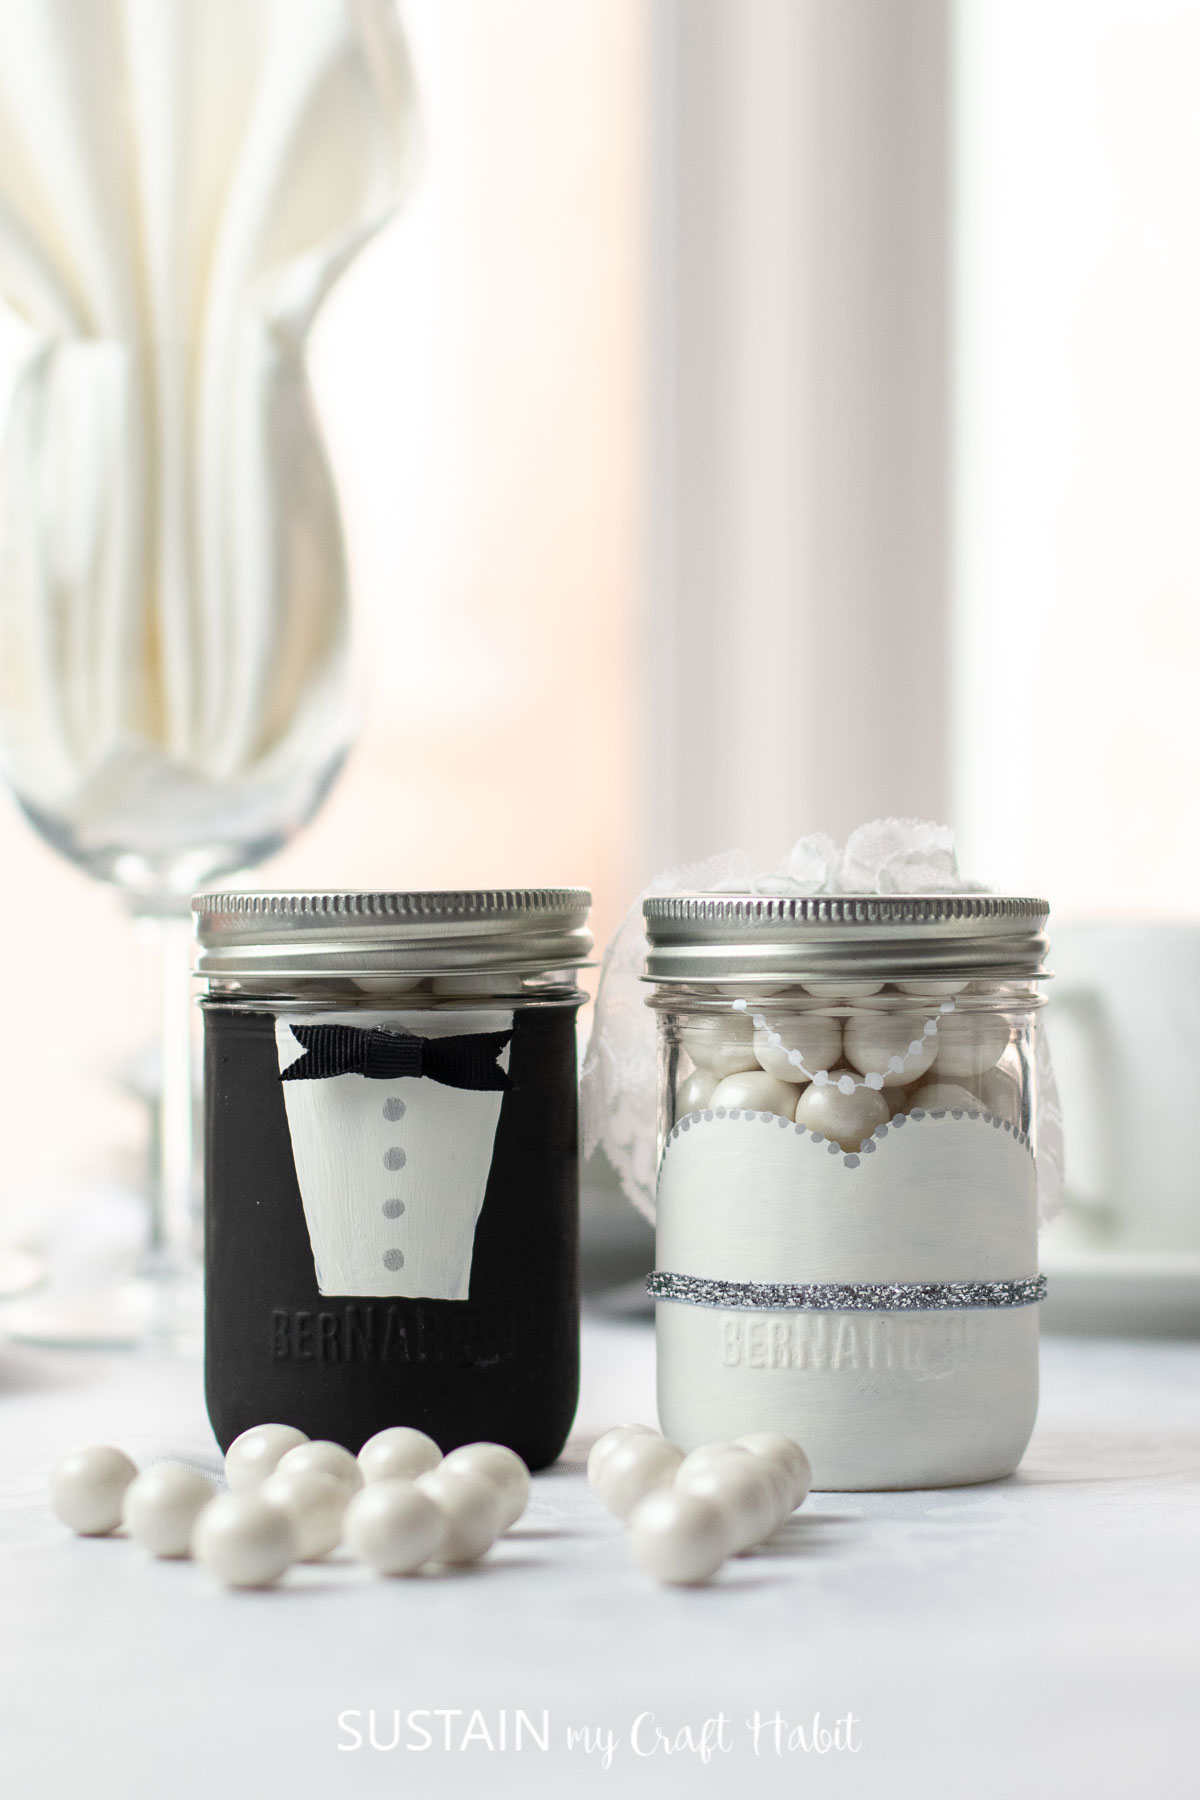
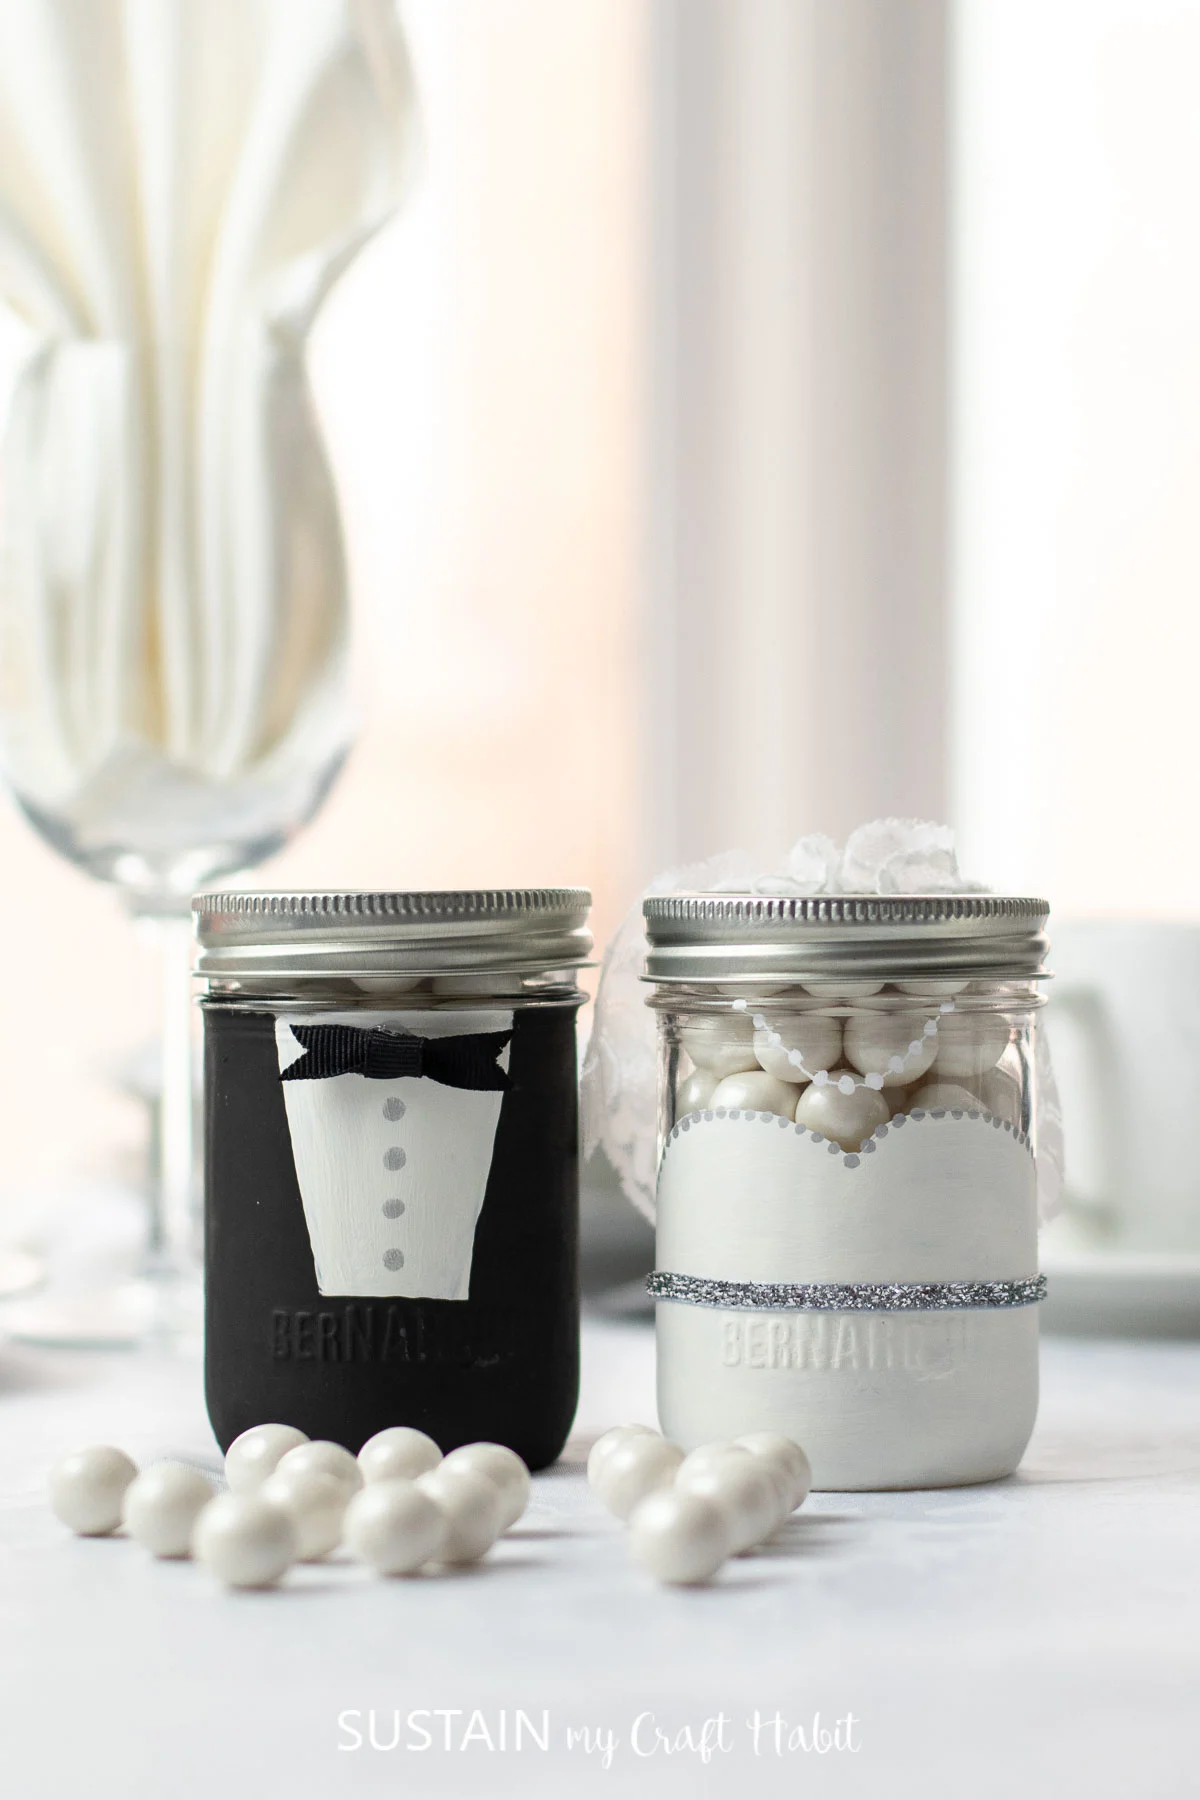
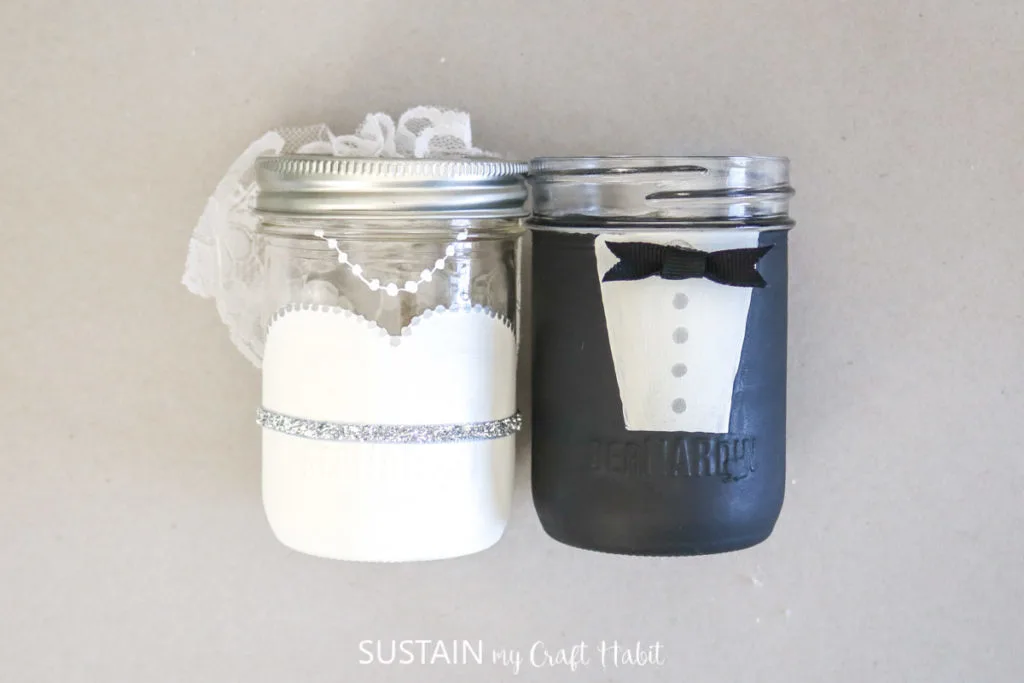
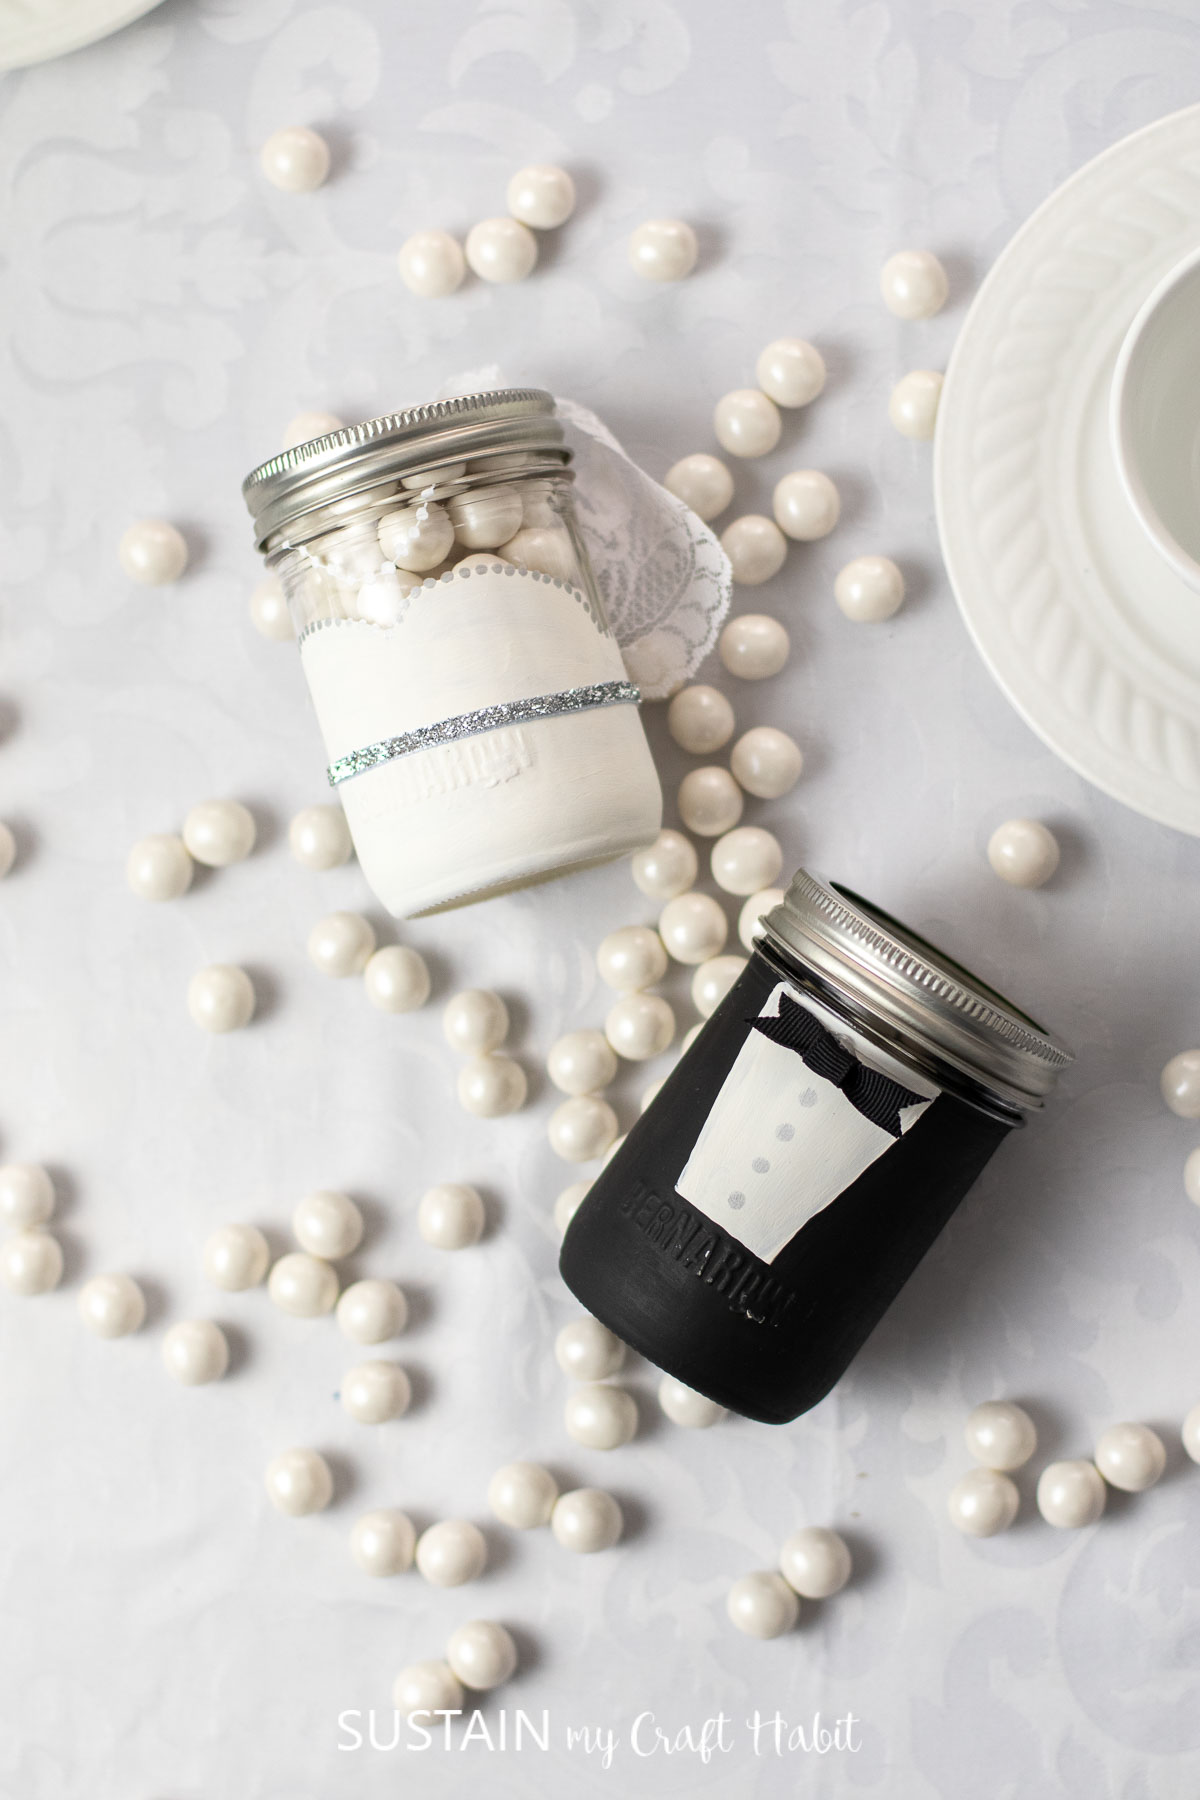
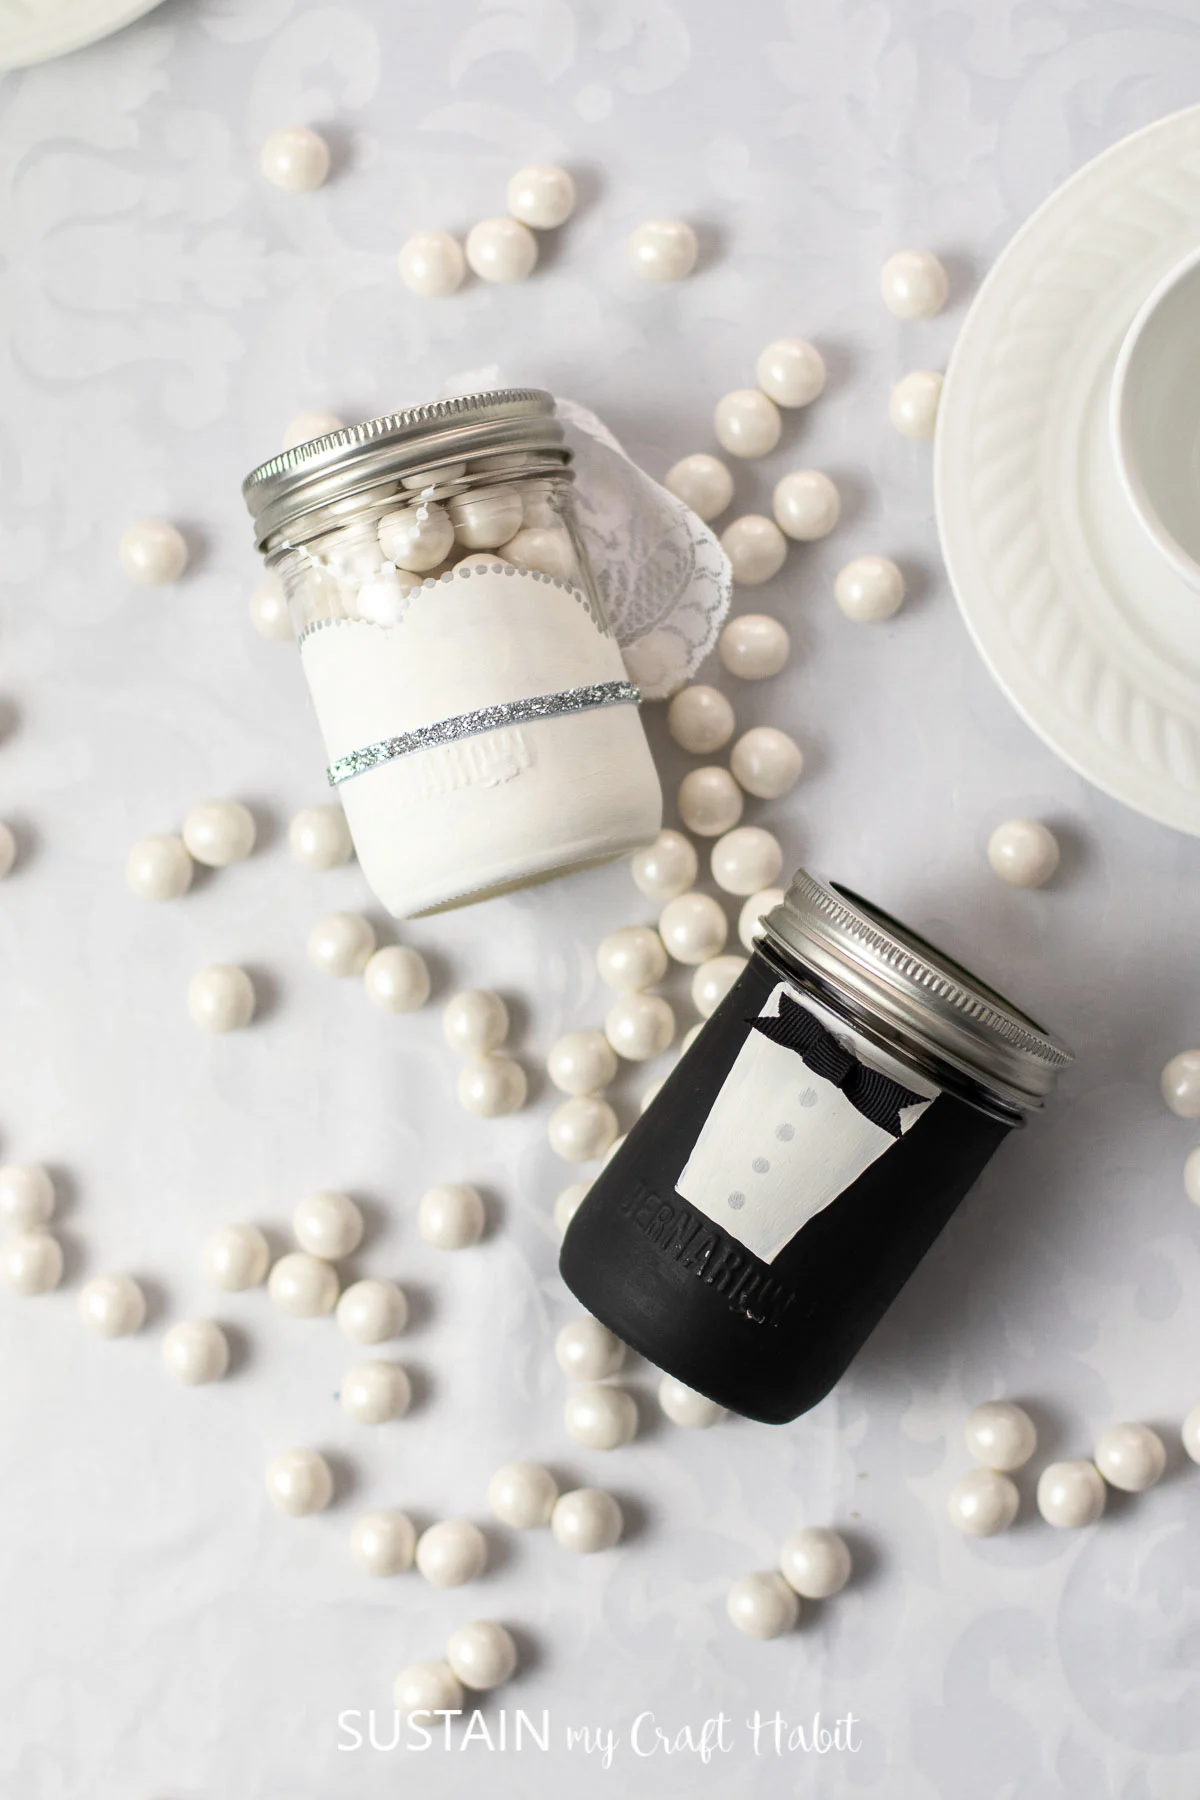
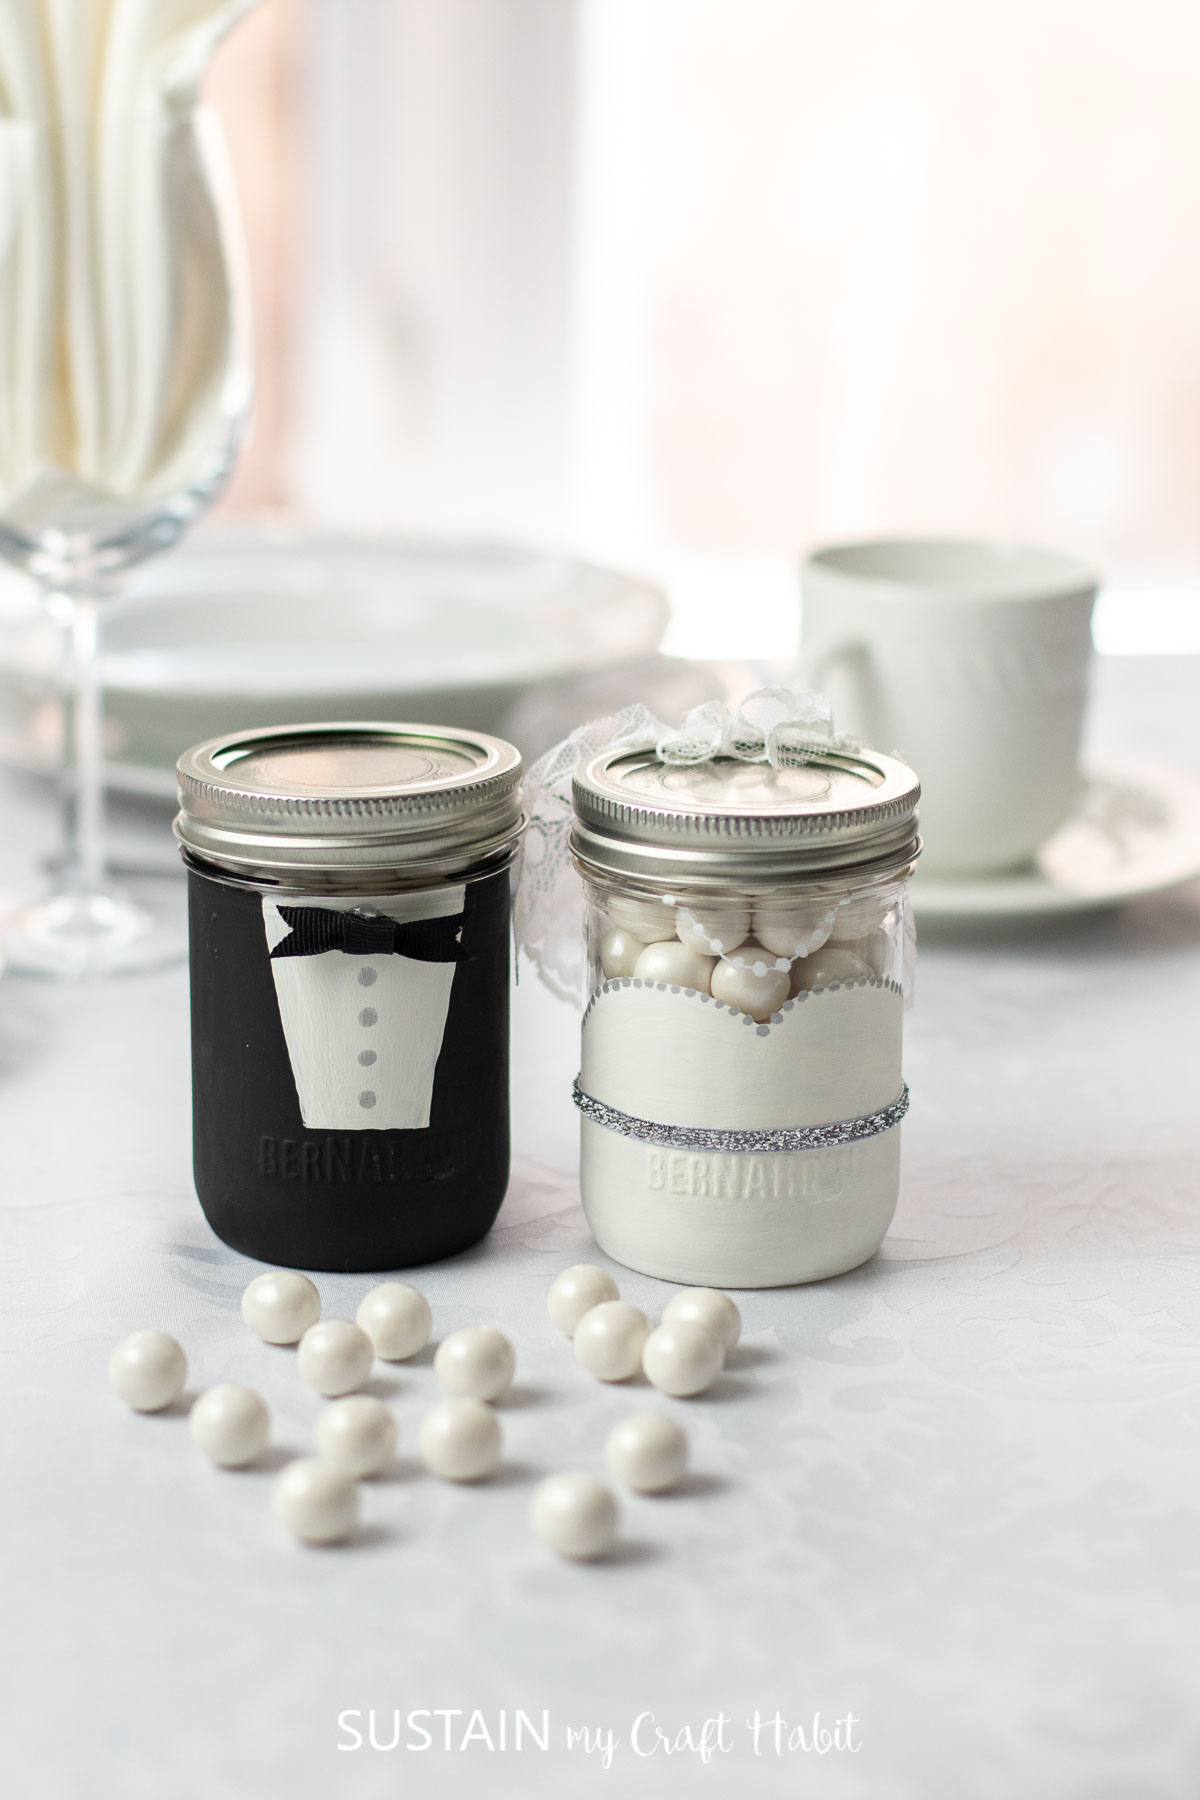
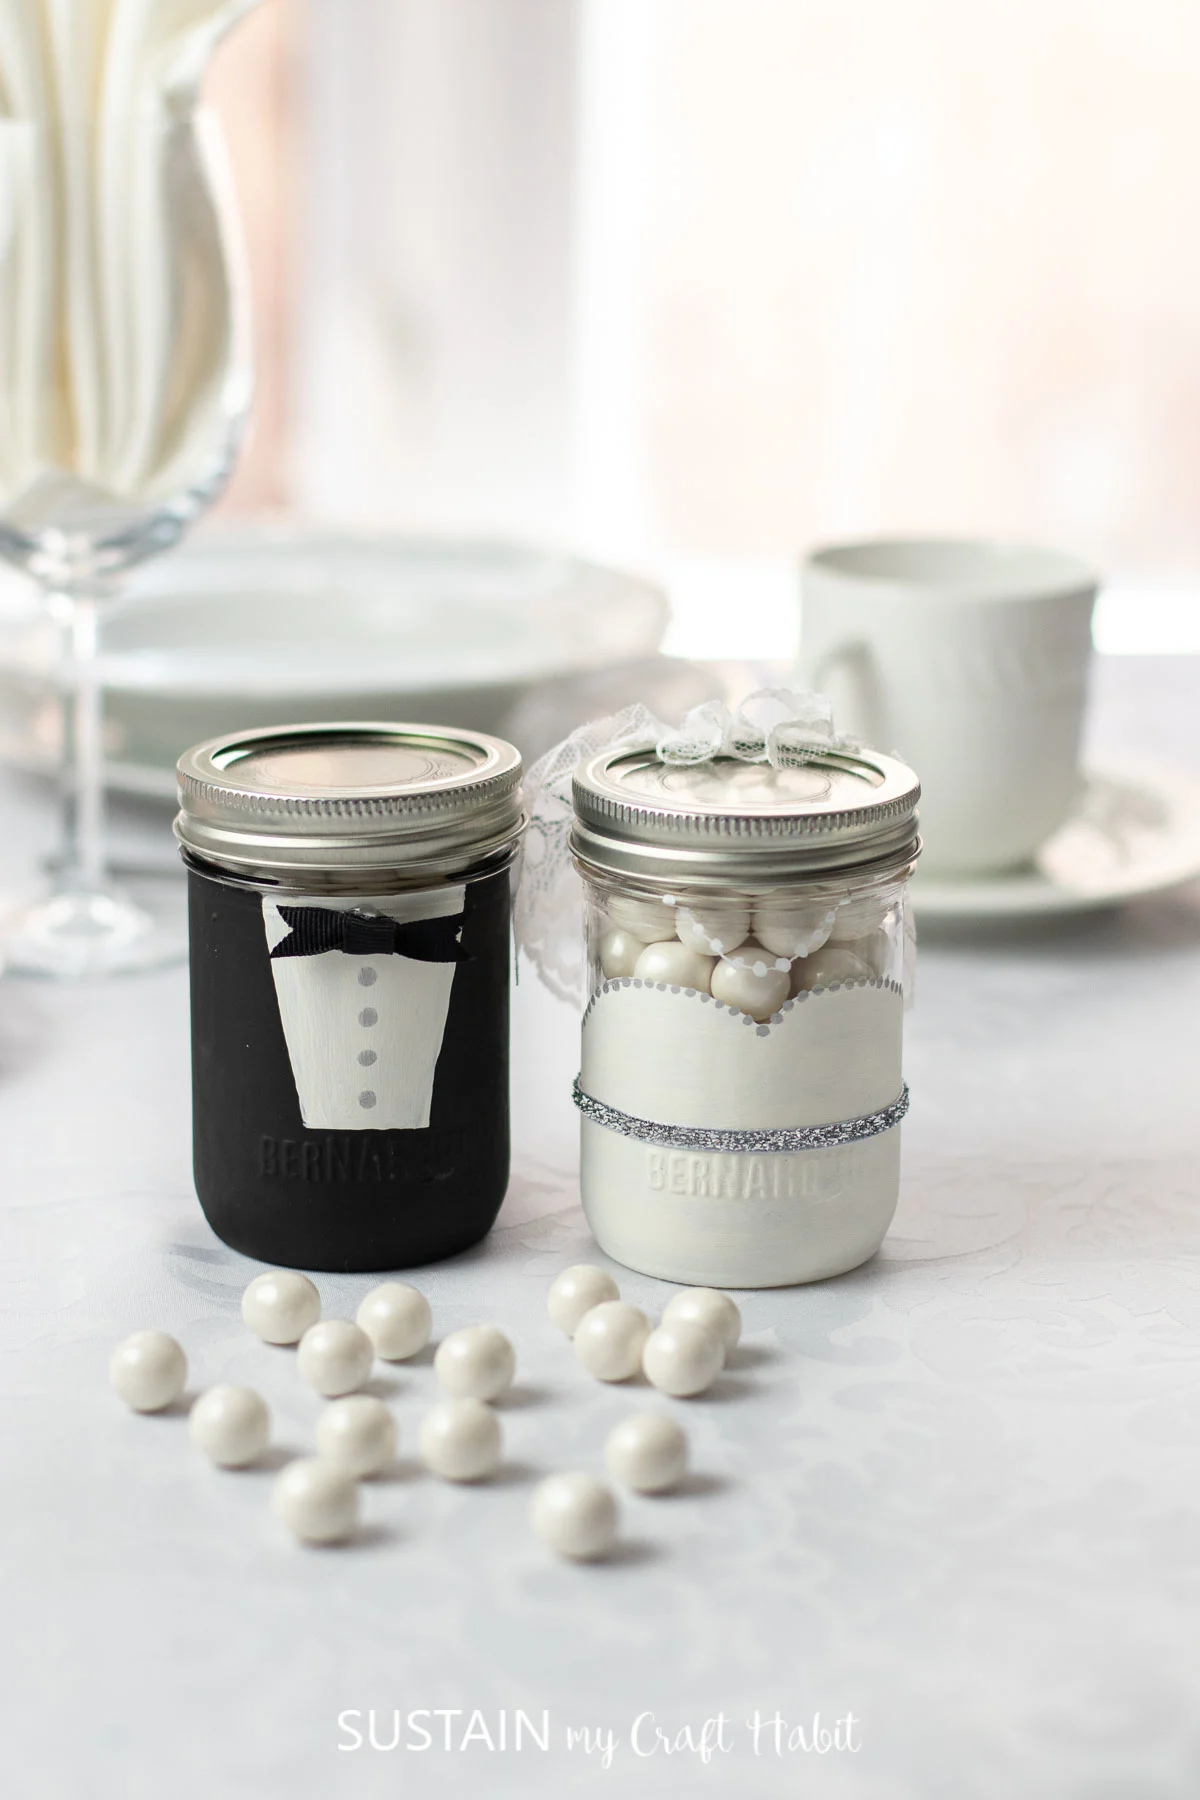
Small mason jars have never looked so classy and elegant as these DIY wedding favors! We’re pretty certain guests will be impressed by the fun designs of these adorable bride and groom candy jars, which they’ll be able to take home with them as their bomboniere after the wedding reception. We filled them with pearlized gumballs, which can be purchased at a bulk food retail store and look so much like a bride’s pearl necklace. This wedding day favor can also be the perfect gift for a bridal shower or as a personalized gift for your bridal party attendants. This craft will turn vintage style mason jars into modern wedding favors and be a perfect addition to your wedding party theme.

Ways To Personalize Your Wedding Mason Jars
Personalizing wedding mason jars adds a special touch to the big day, making each favor unique and memorable for your guests. One popular way to personalize these jars is by adding the monogram initials of the wedding guests or with the couple’s names and wedding date. You could also include a heartfelt message or a favorite quote to make them more meaningful. Another fun way is to add a splash of color lace or mini flower that matches the wedding color scheme, tying a small charm around the neck of the jar for an extra touch of elegance. Additionally, consider filling the jars with treats or items that have personal significance or fill them with your favorite candy in wedding colors to share a piece of the couple’s special day with their loved ones. A simple engraved message directly onto the glass can further enhance the uniqueness of each wedding favor, ensuring they stand out as precious keepsakes from your special day.
Can I Use Mason Jars For Other Occasions?
Absolutely! Mason jars are incredibly versatile and can be adapted for various events beyond weddings. They make a charming personalized birthday gift, and birthday party favors, which can be filled with colorful candies or a bouquet of fresh wild flowers. For a baby shower, consider using mason jars as containers for small gifts or snacks. During the holiday season, mason jars can be transformed into festive decorations using a tealight candle or used as unique packaging for homemade treats. Their rustic yet elegant appeal makes them best part for any special occasion requiring a personal touch. This is an enjoyable way to spend a day with family and friends and create an excellent wedding favor.
Another idea we had with these bride and groom jars were to make them in to salt and pepper shakers for the wedding tables. So if you’re pressed for time, consider making just enough for each table to use as shakers. You can purchase shaker lids to fit on top of your glass jars.
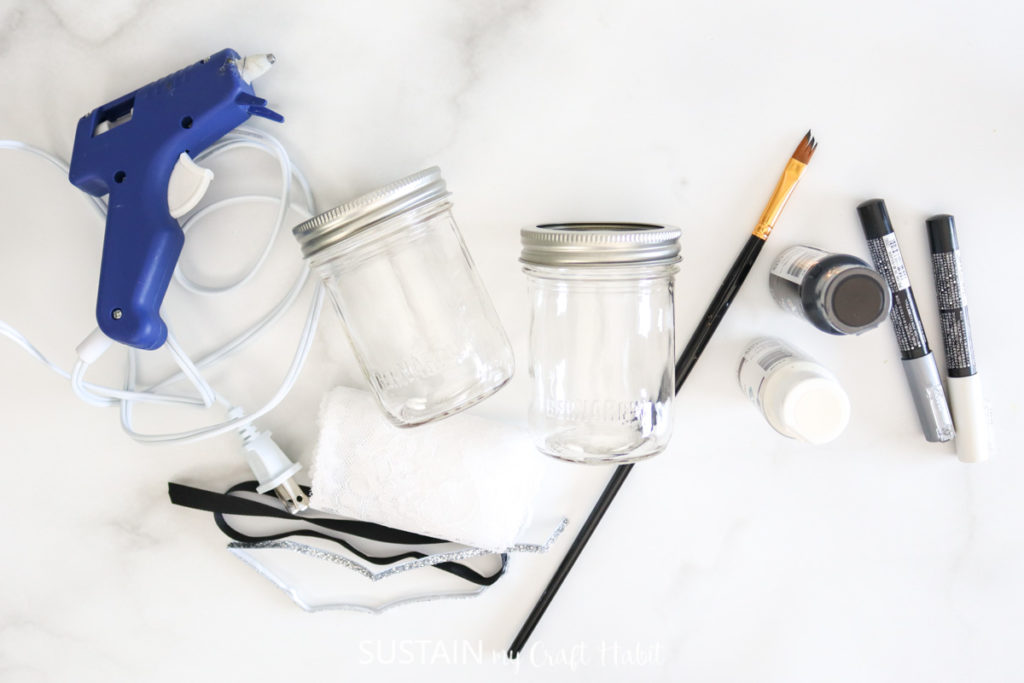
Materials Needed to Make Wedding Favors:
Disclosure: This post continues affiliate links for your shopping convenience. You can find our full disclosure policy here.
- Set of 2 Bernardin Jars, 250ml smooth without shoulders; with lids
- Glass paint in black and white (we used DecoArt Glass Paint in Black and White)
- Paintbrush, medium flat and fine tip
- White and silver paint pens
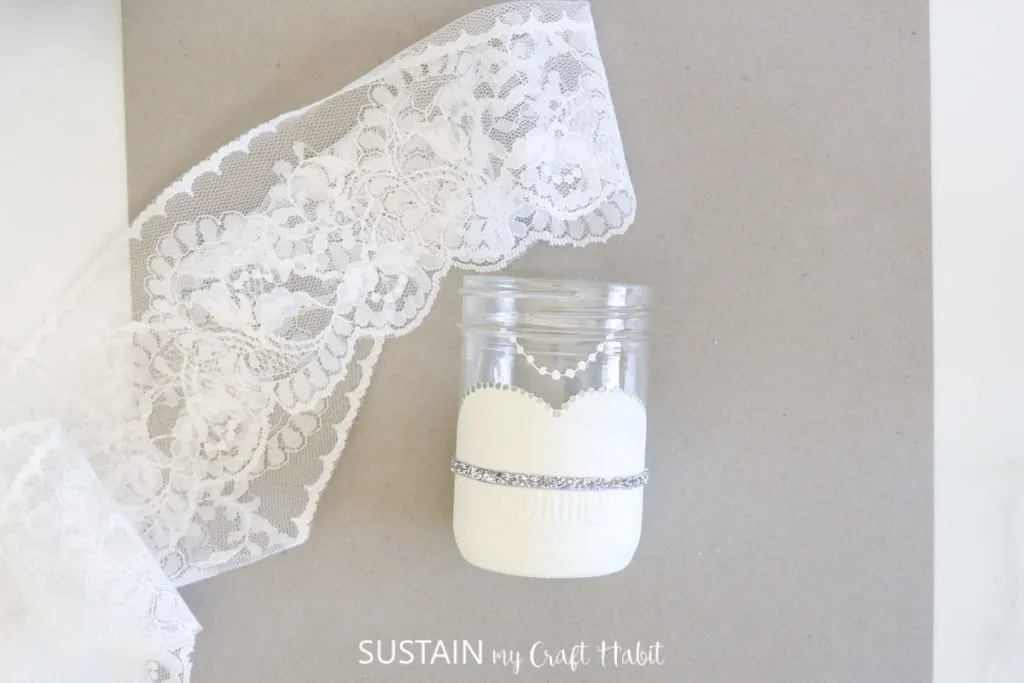
- Decorative white lace
- Decorative silver glitter adhesive tape, ⅛” thick
- Black grosgrain ribbon for making bow
- Hot glue gun with clear glue sticks
DIY Wedding Favors using Glass Jars
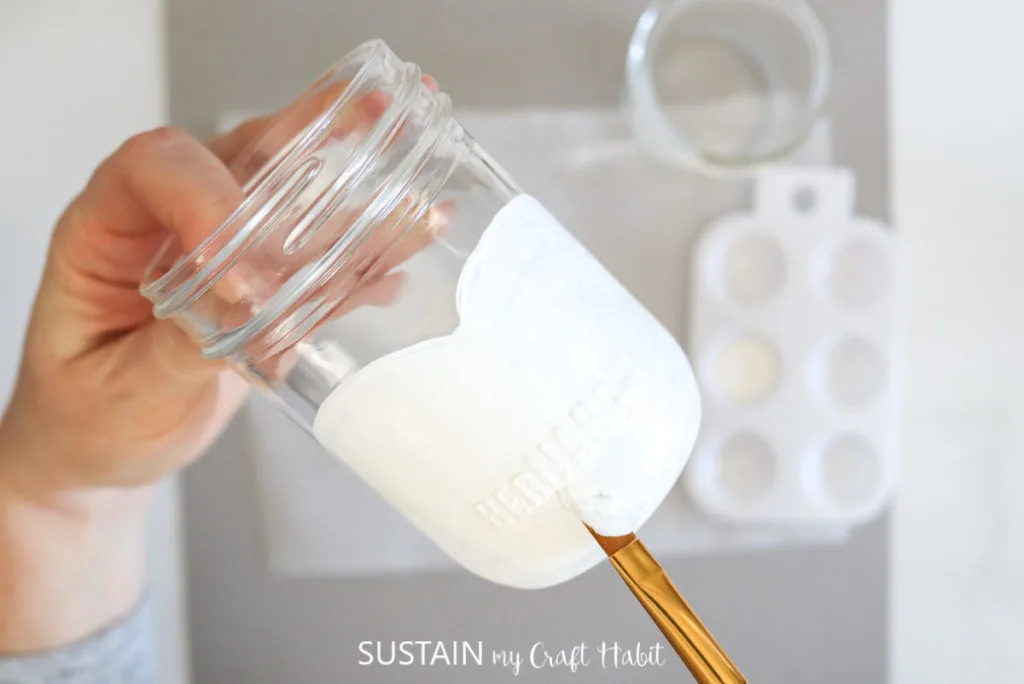
Thoroughly wash jars with soap and hot water and let them dry completely before using. Additionally, use rubbing alcohol and a clean paper towel to wipe away any prints or smudges.
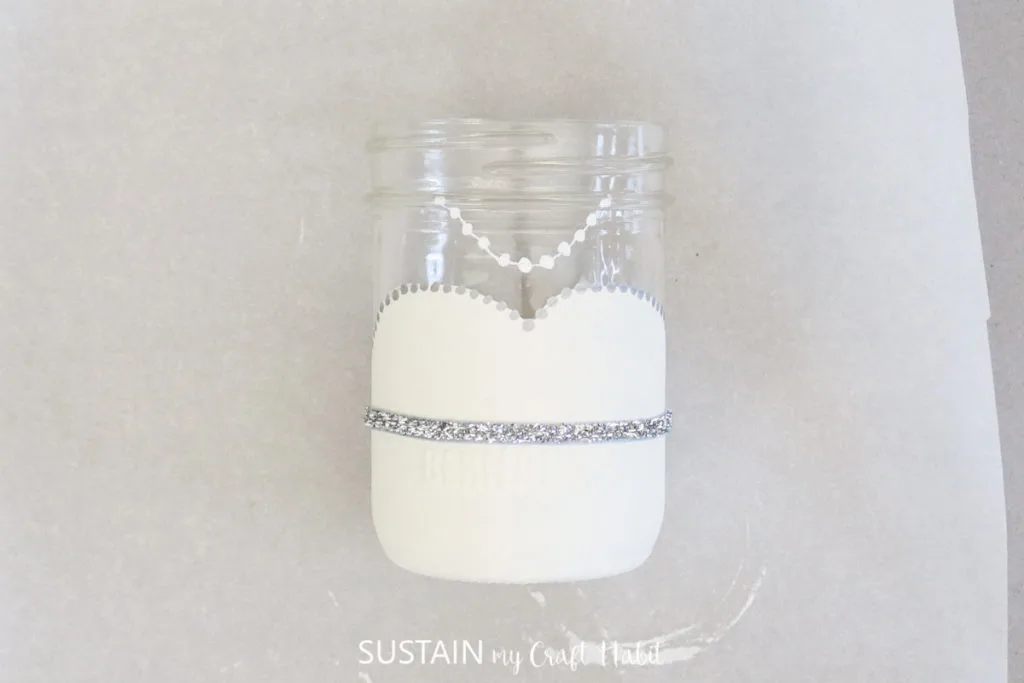
Using a fine-tipped paintbrush, paint a sweetheart neckline in the center of the mason jar surface using white Glass Paint. Fill in the area before the neckline with white paint.

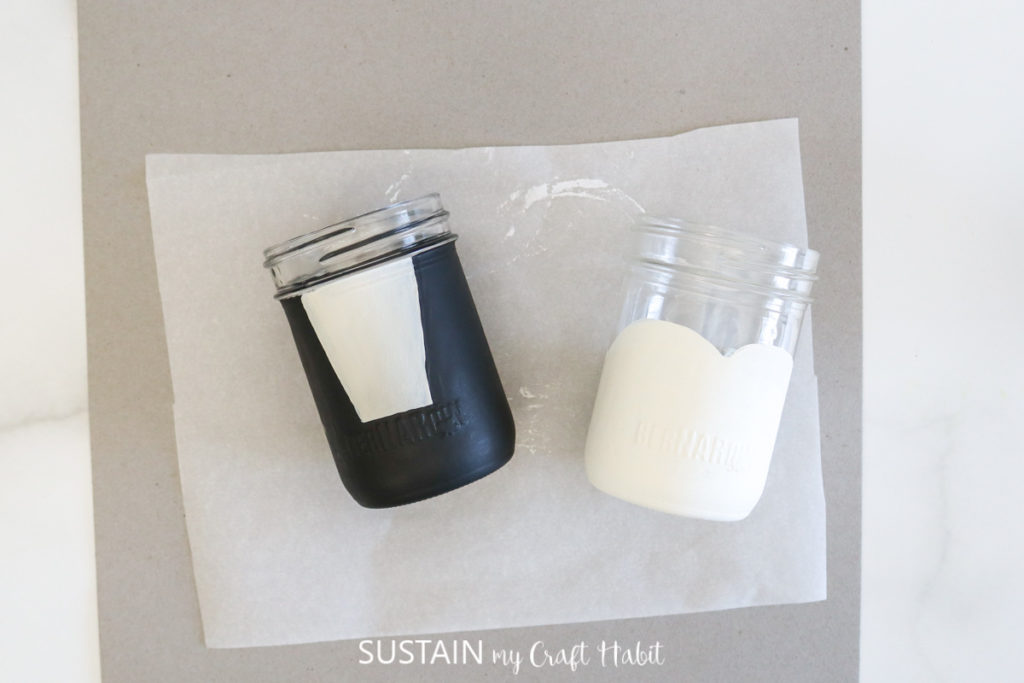
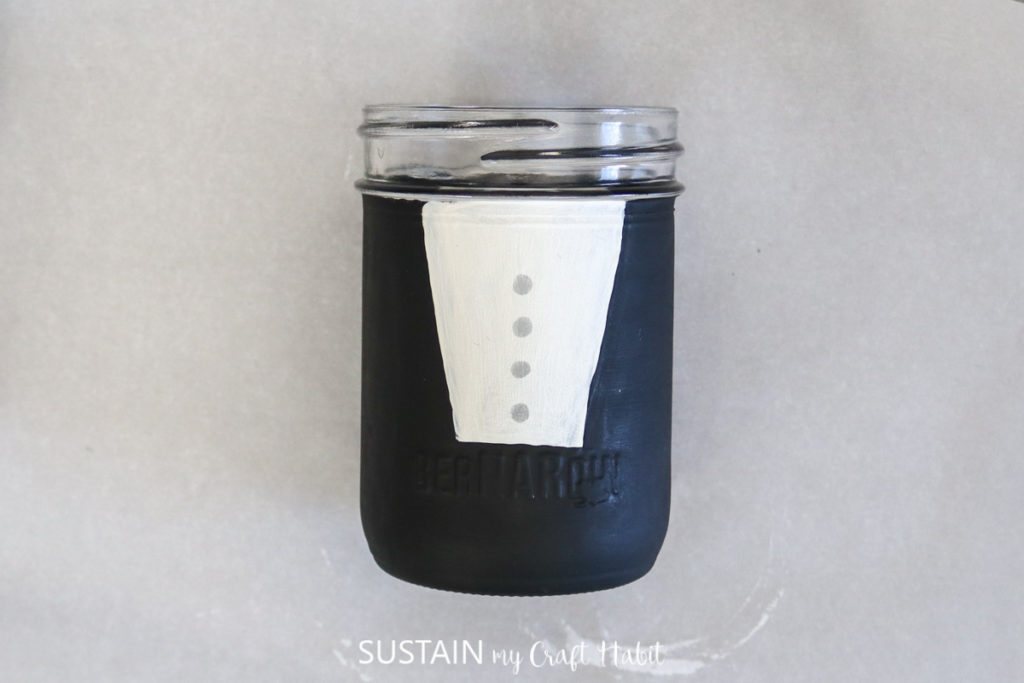
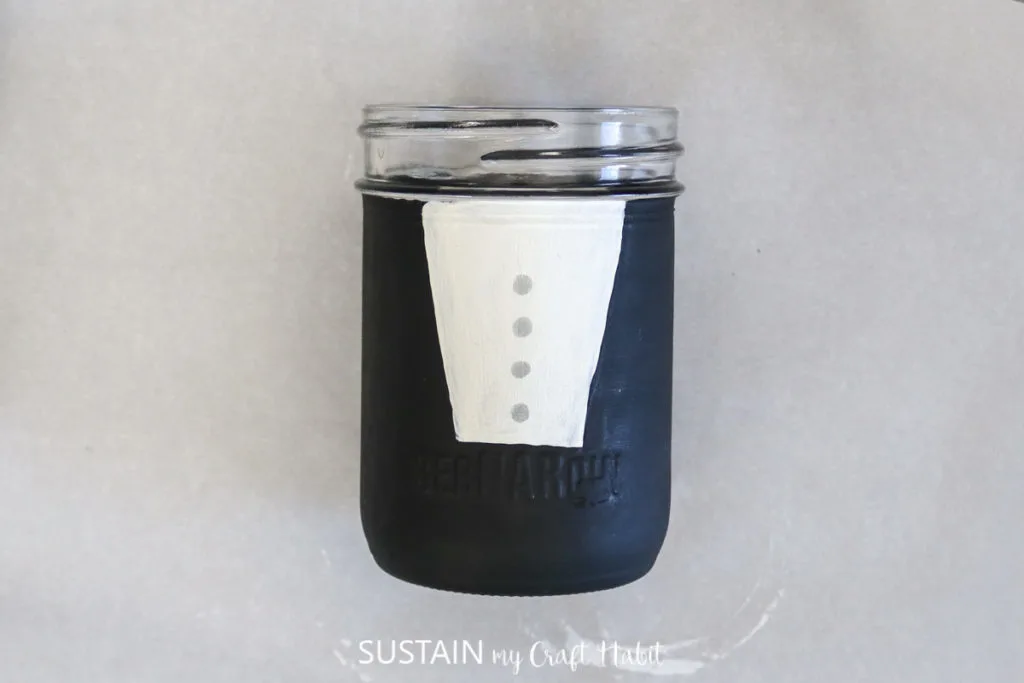
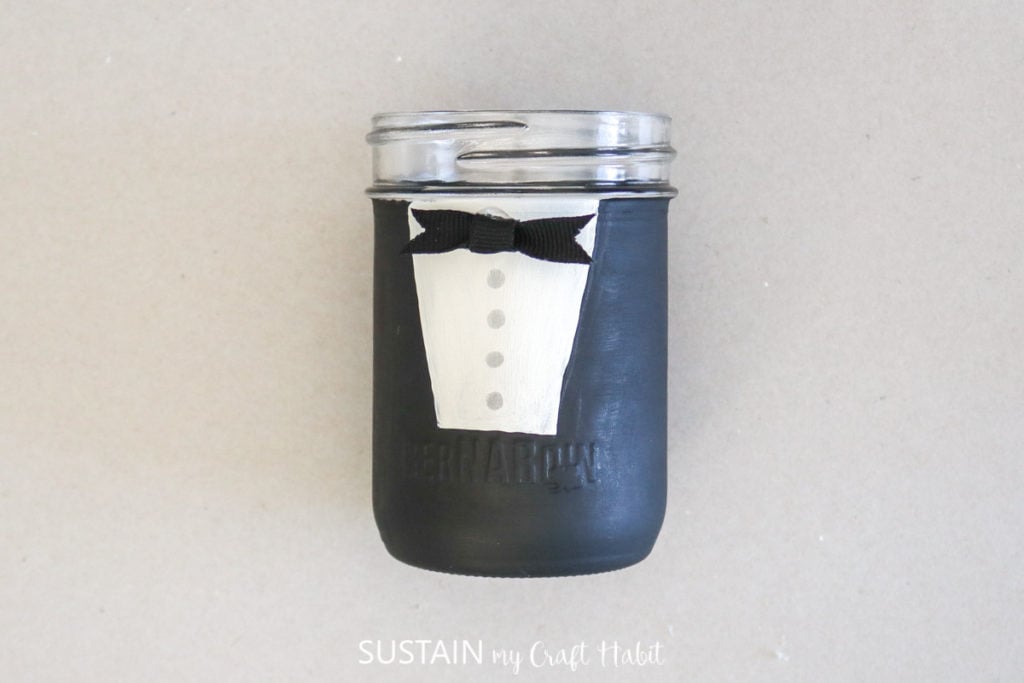
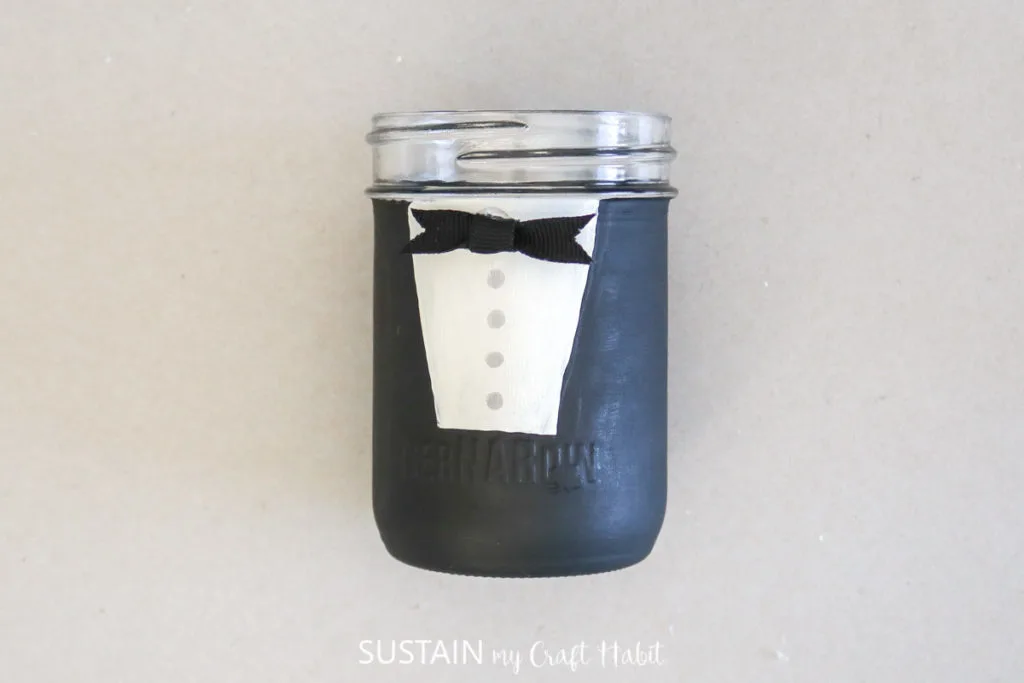
On the second jar, paint the center portion in white with a slight angle towards the center bottom.
Allow paint to fully dry before applying a second coat of paint and before moving on to the next steps.
Next, paint the remaining area of the second jar in black and allow paint to dry fully.

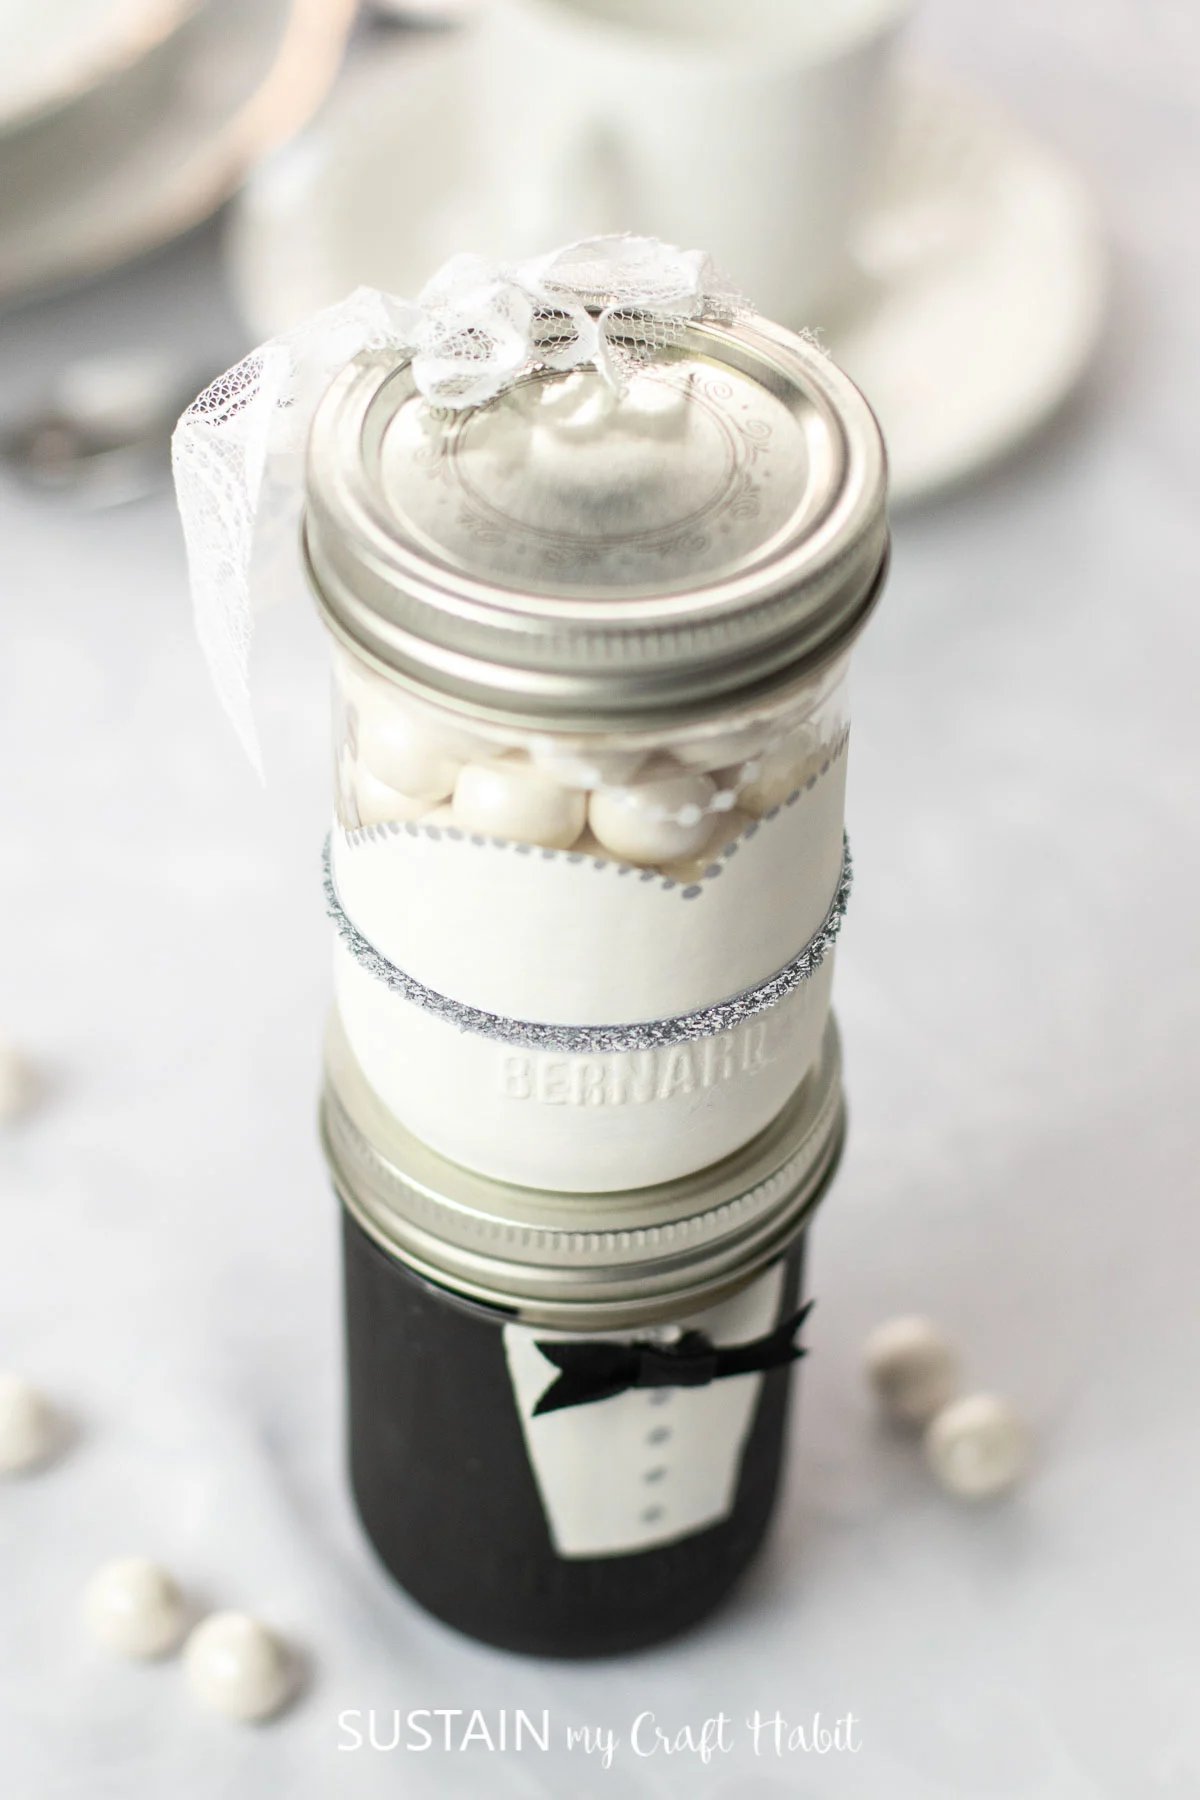
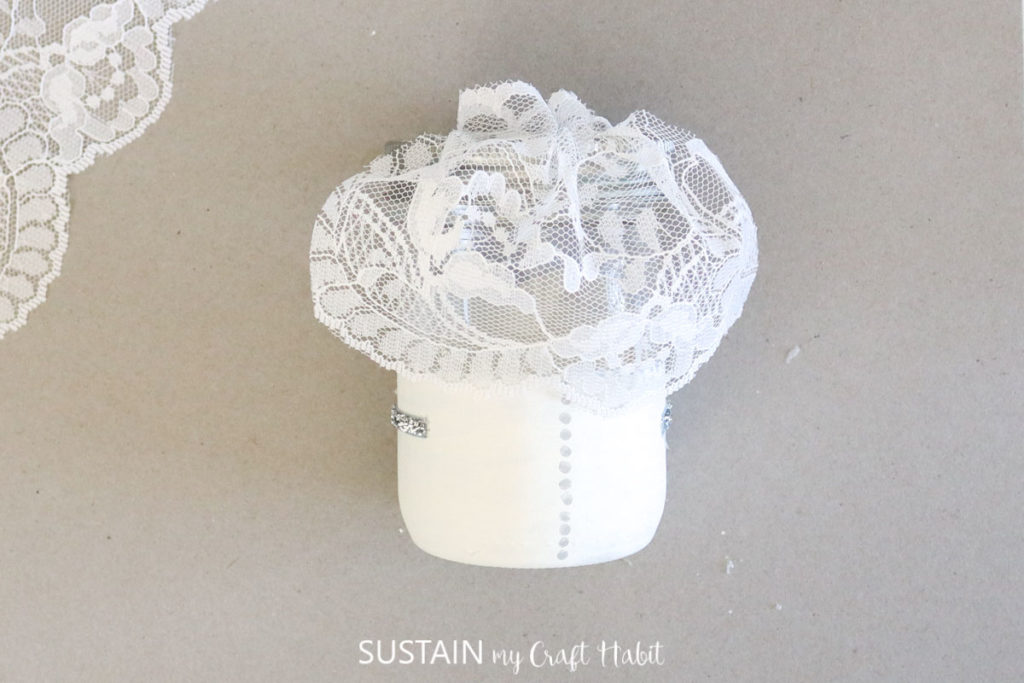
On the bride’s jar, use a silver paint pen to dab small dots along the neckline of the “dress”. Continue all the way around the jar.


Use the white paint pen to draw a pearl necklace on to the jar, just above the sweetheart neckline.


Cut a strip of glitter adhesive tape and press it on to and around the middle portion of the jar.

Use the silver paint pen to dab dots along the center white portion of the groom’s jar.
Cut a piece of white lace and fold the lace along the lengthwise straight edge creating small pleats. Glue the pleated lace to the lid.


Cut a piece of grosgrain ribbon about 1” long and trim the ends into a “v” shape resembling a bow. Wrap and glue a smaller piece of ribbon around the center to complete the bow. Glue the black bow on to the groom’s jar as shown.

Fill with candies and place on the wedding tables for your guests to admire and enjoy!
Aren’t these DIY wedding favors adorable? Makes me want to head to a wedding reception!
More DIY Wedding Ideas
Now that you’ve made your own wedding favors check out these other DIY decorating ideas for your wedding:
- Wedding table numbers
- Elegant wedding table decor
- Monogrammed napkin holders
- Glass jar wedding centerpieces
- Beach theme centerpiece
- Inscribed stone centerpiece
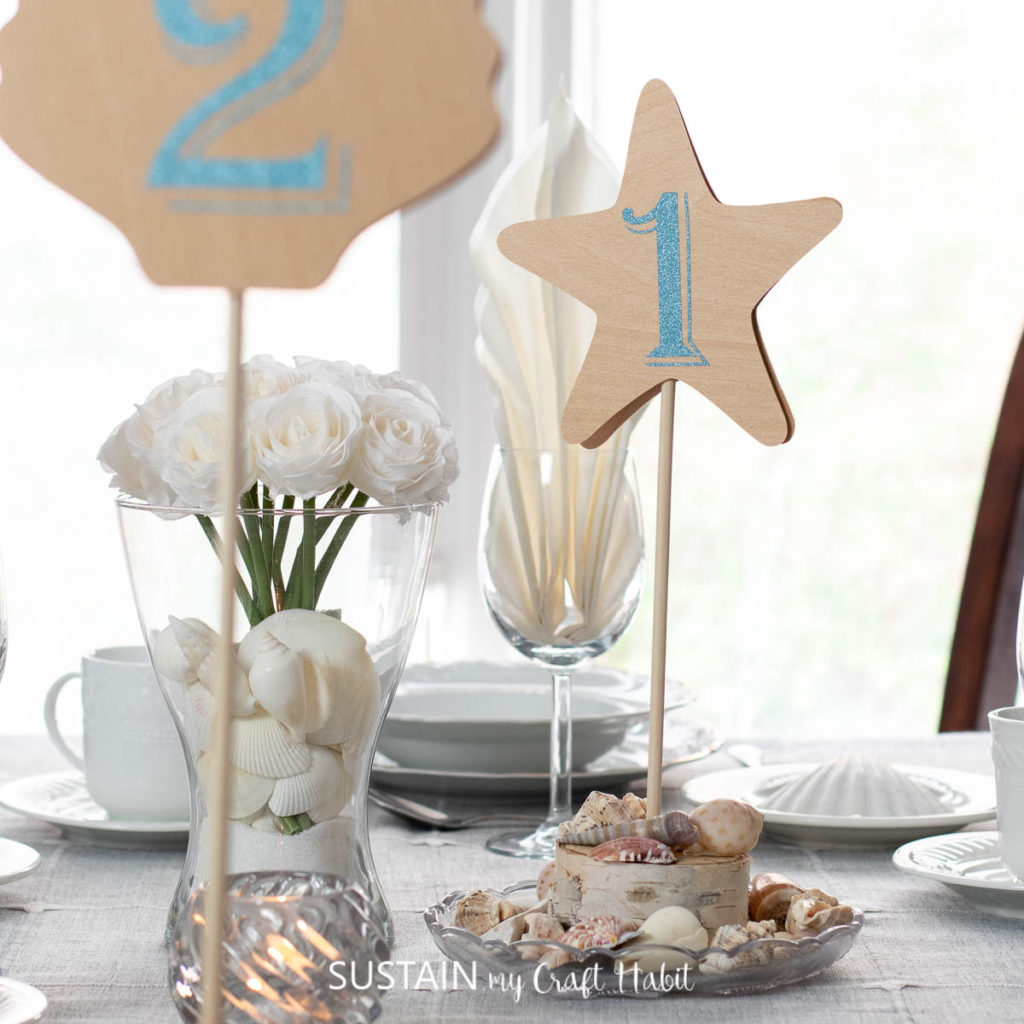

Table Numbers 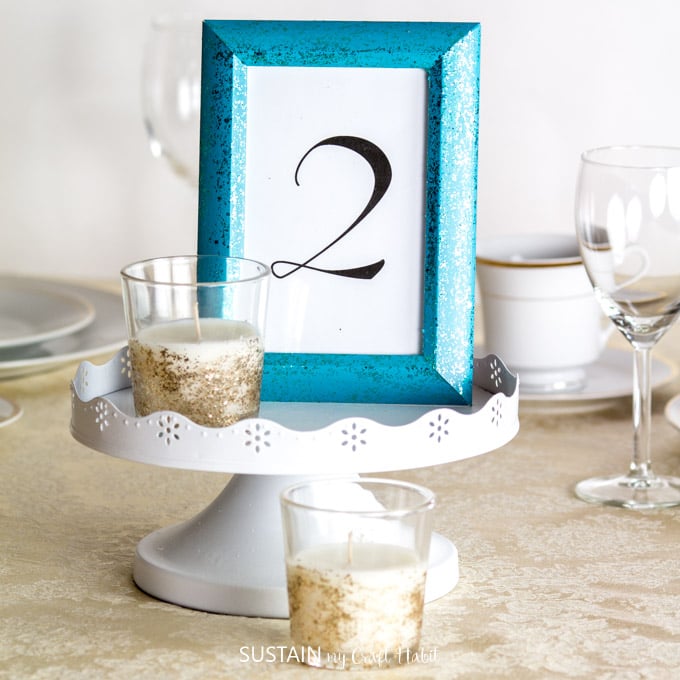

Wedding Table Number Frame 
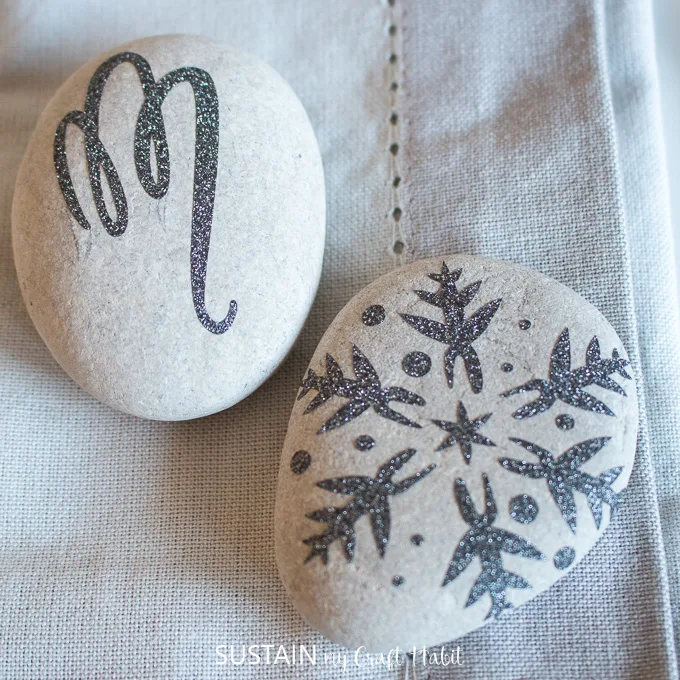
Glittering Monogrammed Rocks 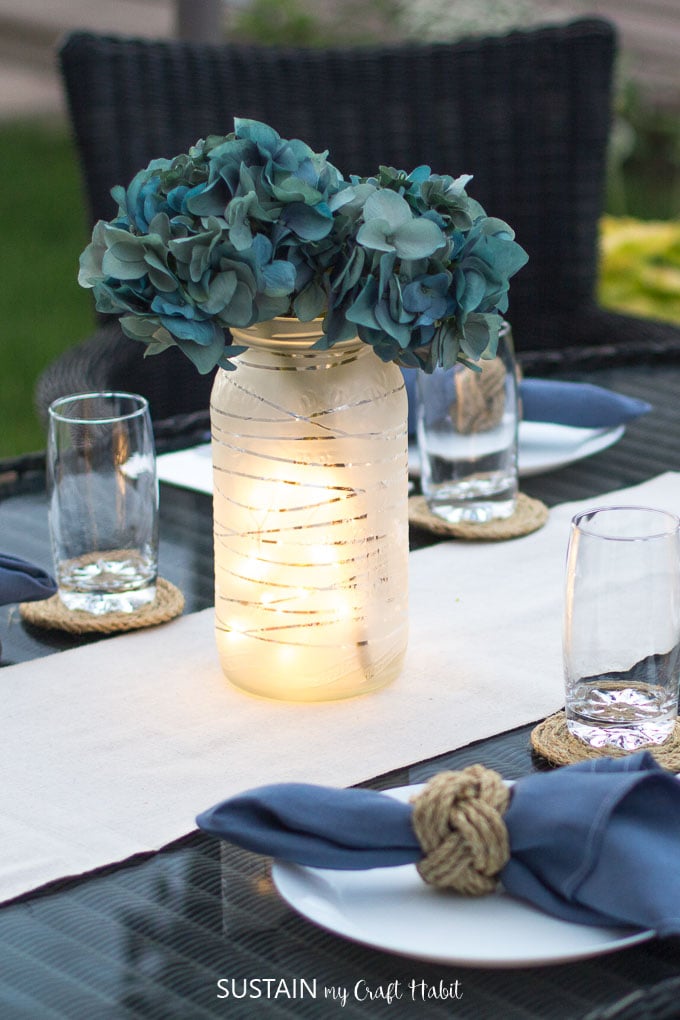

Upcycled Jar Centerpiece ![So beautiful! A summer tablescape including a DIY beach theme centerpiece with sea shells and hydrangeas from Afloral.com . Video tutorial included for this beach themed wedding, bridal shower or coastal cottage decorating idea! [sponsored]](https://sustainmycrafthabit.com/wp-content/uploads/2017/05/Simple-DIY-Beach-Centerpieces-9274-683x1024.jpg)
![So beautiful! A summer tablescape including a DIY beach theme centerpiece with sea shells and hydrangeas from Afloral.com . Video tutorial included for this beach themed wedding, bridal shower or coastal cottage decorating idea! [sponsored]](data:image/svg+xml,%3Csvg%20xmlns='http://www.w3.org/2000/svg'%20width='683'%20height='1024'%20viewBox='0%200%20683%201024'%3E%3C/svg%3E)
Beach Theme Centerpiece 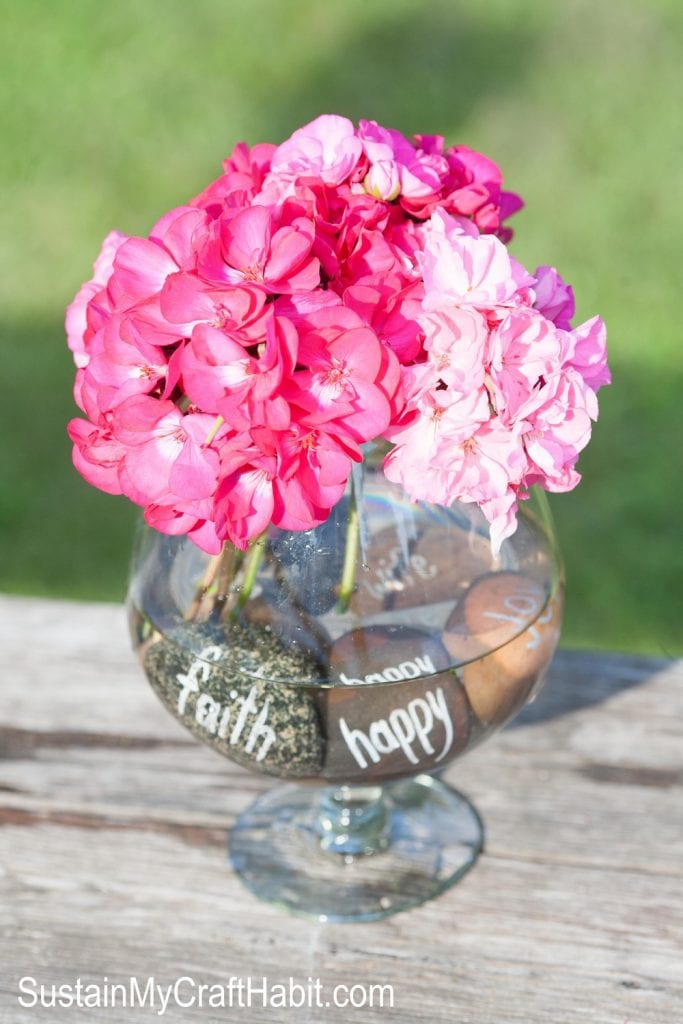
Inscribed Rock and Floral Centerpiece


![So beautiful! A summer tablescape including a DIY beach theme centerpiece with sea shells and hydrangeas from Afloral.com . Video tutorial included for this beach themed wedding, bridal shower or coastal cottage decorating idea! [sponsored]](https://sustainmycrafthabit.com/wp-content/uploads/2017/05/Simple-DIY-Beach-Centerpieces-9274-683x1024.jpg.webp)

Like it? Pin it for later!


DIY Wedding Favors using Glass Jars
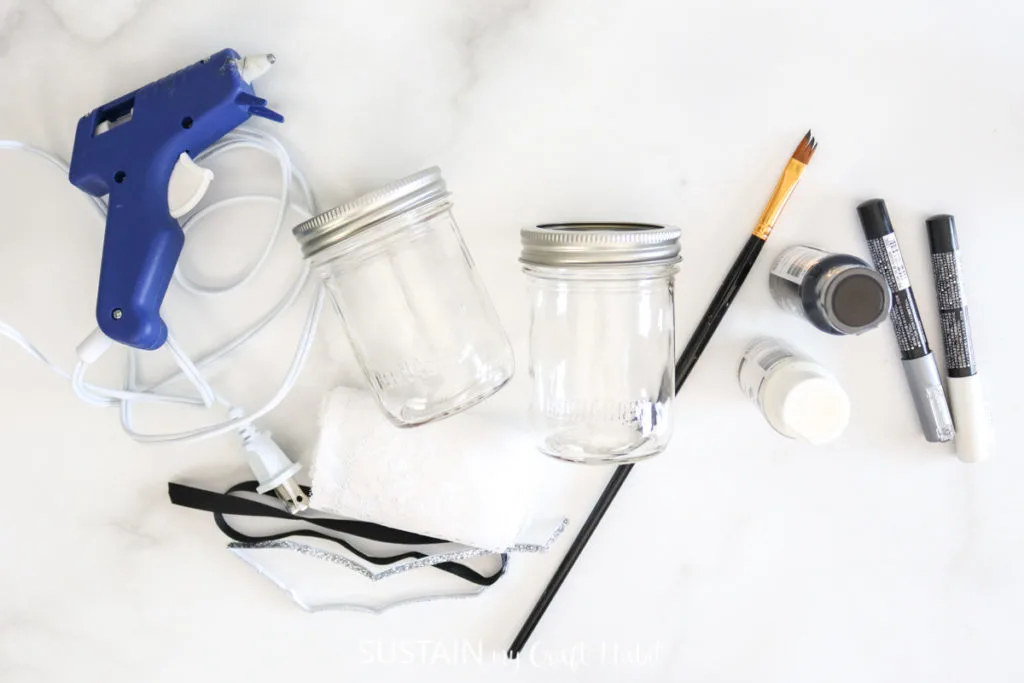
Materials
- Set of 2 Jars 250ml smooth without shoulders; with lids
- Glass paint in black and white
- Paintbrushes medium flat and fine tip
- White and silver paint pens
- Decorative white lace
- Decorative silver glitter adhesive tape ⅛” thick
- Black grosgrain ribbon for making bow
- Hot glue gun with clear glue sticks
Instructions
- Thoroughly wash jars with soap and hot water and let them dry completely before using.
- Using a fine tip paintbrush, paint a sweetheart neckline shape in the center of one of the jars using Glass Paint in white. Fill in the area before the neckline in white paint.
- On the second jar, paint the center portion in white with a slight angle towards the center bottom.
- Next, paint the remaining area of the second jar in black and allow paint to dry fully.
- On the bride’s jar, use a silver paint pen to dab small dots along the neckline of the “dress”. Continue all the way around the jar.
- Use the white paint pen to draw a pearl necklace on to the jar, just above the sweetheart neckline.
- Cut a strip of glitter adhesive tape and press it on to and around the middle portion of the jar.
- Use the silver paint pen to dab dots along the center white portion of the groom’s jar.
- Cut a piece of white lace and fold the lace along the lengthwise straight edge creating small pleats. Glue the pleated lace to the lid.
- Cut a piece of grosgrain ribbon about 1” long and trim the ends into a “v” shape resembling a bow. Wrap and glue a smaller piece of ribbon around the center to complete the bow. Glue the black bow on to the groom’s jar.
Lynne
Tuesday 15th of June 2021
These are adorable! What a creative idea for a wedding favor! Pinned!